- Windows 10 开发教程
- Windows 10 - 主页
- Windows 10 - 简介
- Windows 10 – UWP
- Windows 10 – 第一个应用程序
- Windows 10 - 商店
- Windows 10 - XAML 控件
- Windows 10 - 数据绑定
- Windows 10 - XAML 性能
- Windows 10 - 自适应设计
- Windows 10 - 自适应 UI
- Windows 10 - 自适应代码
- Windows 10 - 文件管理
- Windows 10 - SQLite 数据库
- Windows 10 – 通讯
- Windows 10 - 应用程序本地化
- Windows 10 - 应用程序生命周期
- Windows 10 - 后台执行
- Windows 10 - 应用程序服务
- Windows 10 - 网络平台
- Windows 10 - 互联体验
- Windows 10 - 导航
- Windows 10 - 网络
- Windows 10 - 云服务
- Windows 10 - 动态磁贴
- Windows 10 - 共享合同
- Windows 10 - 移植到 Windows
- Windows 10 有用资源
- Windows 10 - 快速指南
- Windows 10 - 有用的资源
- Windows 10 - 讨论
Windows 10 开发 - 数据绑定
数据绑定是 XAML 应用程序中的一种机制,它为 Windows 运行时应用程序使用部分类来显示数据并与数据交互提供了一种简单易用的方法。在该机制中,数据的管理与数据的显示方式完全分离。
数据绑定允许用户界面上的 UI 元素和数据对象之间的数据流。当建立绑定并且数据或业务模型发生变化时,它会自动将更新反映到 UI 元素,反之亦然。也可以不绑定到标准数据源,而是绑定到页面上的另一个元素。数据绑定可以是 -
- 单向数据绑定
- 双向数据绑定
- 元素绑定
单向数据绑定
在单向绑定中,数据从其源(保存数据的对象)绑定到其目标(显示数据的对象)。
让我们看一个单向数据绑定的简单示例。下面给出的是 XAML 代码,其中使用一些属性创建了四个文本块。
<Page
   x:Class = "OneWayDataBinding.MainPage"
   xmlns = "http://schemas.microsoft.com/winfx/2006/xaml/presentation"
   xmlns:x = "http://schemas.microsoft.com/winfx/2006/xaml"
   xmlns:local = "using:OneWayDataBinding"
   xmlns:d = "http://schemas.microsoft.com/expression/blend/2008"
   xmlns:mc = "http://schemas.openxmlformats.org/markup-compatibility/2006"
   mc:Ignorable = "d">

   <Grid Background = "{ThemeResource ApplicationPageBackgroundThemeBrush}">
      <StackPanel Name = "Display">
         <StackPanel Orientation = "Horizontal" Margin = "50, 50, 0, 0">
            <TextBlock Text = "Name: " Margin = "10" Width = "100"/>
            <TextBlock Margin = "10" Width = "100" Text = "{Binding Name}"/>
         </StackPanel>

         <StackPanel Orientation = "Horizontal" Margin = "50,0,50,0">
            <TextBlock Text = "Title: " Margin = "10" Width = "100"/>
            <TextBlock Margin = "10" Width = "200" Text = "{Binding Title}" />
         </StackPanel>

      </StackPanel>
   </Grid>

</Page>
两个文本块的 Text 属性静态设置为“Name”和“Title”,而文本块的另外两个 Text 属性则绑定到“Name”和“Title”,它们是 Employee 类的类变量,如下所示。
using Windows.UI.Xaml.Controls;

// The Blank Page item template is documented at
   http://go.microsoft.com/fwlink/?LinkId=402352&clcid=0x409

namespace OneWayDataBinding {

   /// <summary>
      /// An empty page that can be used on its own or navigated to within a Frame.
   /// </summary>

   public sealed partial class MainPage : Page {
      public MainPage(){
         this.InitializeComponent();
         DataContext = Employee.GetEmployee();
      }
   }

   public class Employee {
      public string Name { get; set; }
      public string Title { get; set; }

      public static Employee GetEmployee() {
         var emp = new Employee() {
            Name = "Waqar Ahmed",
            Title = "Development Manager"
         };

         return emp;
      }

   }
}
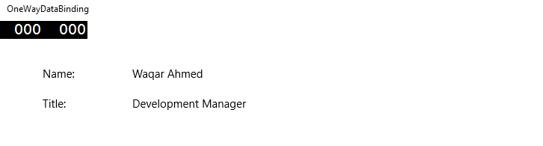
在Employee 类中,我们有变量Name和Title以及一个静态方法,在该方法中初始化员工对象并将返回该员工对象。因此,我们绑定了属性、Name 和 Title,但我们还没有选择该属性所属的对象。最简单的方法是将一个对象分配给DataContext ,我们在MainPage构造函数中绑定其属性。
当您运行此应用程序时,您可以立即在主窗口中看到您已成功绑定到该 Employee 对象的名称和标题。
双向数据绑定
在双向绑定中,用户能够通过用户界面修改数据并在源中更新该数据。例如,如果在用户查看视图时源发生变化,您希望更新视图。
让我们看一下下面给出的示例,其中使用一些属性和事件创建了两个标签、两个文本框和一个按钮。
<Page
   x:Class = "TwoWayDataBinding.MainPage"
   xmlns = "http://schemas.microsoft.com/winfx/2006/xaml/presentation"
   xmlns:x = "http://schemas.microsoft.com/winfx/2006/xaml"
   xmlns:local = "using:TwoWayDataBinding"
   xmlns:d = "http://schemas.microsoft.com/expression/blend/2008"
   xmlns:mc = "http://schemas.openxmlformats.org/markup-compatibility/2006"
   mc:Ignorable = "d">

   <Grid Background = "{ThemeResource ApplicationPageBackgroundThemeBrush}">

      <Grid.RowDefinitions>
         <RowDefinition Height = "Auto" />
         <RowDefinition Height = "Auto" />
         <RowDefinition Height = "*" />
      </Grid.RowDefinitions>

      <Grid.ColumnDefinitions>
         <ColumnDefinition Width = "Auto" />
         <ColumnDefinition Width = "200" />
      </Grid.ColumnDefinitions>

      <TextBlock Name = "nameLabel" Margin = "200,20,0,0">Name:</TextBlock>

      <TextBox Name = "nameText" Grid.Column = "1" Margin = "10,20,0,0"
         Text = "{Binding Name, Mode = TwoWay}"/>

      <TextBlock Name = "ageLabel" Margin = "200,20,0,0"
         Grid.Row = "1">Age:</TextBlock>

      <TextBox Name = "ageText" Grid.Column = "1" Grid.Row = "1" Margin = "10,20,0,0"
         Text = "{Binding Age, Mode = TwoWay}"/>

      <StackPanel Grid.Row = "2" Grid.ColumnSpan = "2">
         <Button Content = "Display" Click = "Button_Click"
            Margin = "200,20,0,0"/>
         <TextBlock x:Name = "txtblock" Margin = "200,20,0,0"/>
      </StackPanel>

   </Grid>

</Page>
我们可以观察到以下几点 -
两个文本框的 Text 属性都绑定到“Name”和“Age” ,它们是Person 类的类变量,如下所示。
在Person 类中,我们只有两个变量 - Name 和 Age,其对象在MainWindow类中初始化。
在 XAML 代码中,我们绑定到属性 - Name和Age,但我们没有选择该属性所属的对象。
更简单的方法是将一个对象分配给 DataContext ,我们在 C# 代码中绑定其属性,如下所示的MainWindow 构造函数。
using Windows.UI.Xaml;
using Windows.UI.Xaml.Controls;

// The Blank Page item template is documented at
   http://go.microsoft.com/fwlink/?LinkId=402352&clcid=0x409

namespace TwoWayDataBinding {

   /// <summary>
      /// An empty page that can be used on its own or navigated to within a Frame.
   /// </summary>

   public sealed partial class MainPage : Page {
      Person person = new Person { Name = "Salman", Age = 26 };

      public MainPage() {
         this.InitializeComponent();
         this.DataContext = person;
      }

      private void Button_Click(object sender, RoutedEventArgs e) {
         string message = person.Name + " is " + person.Age + " years old";
         txtblock.Text = message;
      }

   }

   public class Person {
      private string nameValue;

      public string Name {
         get { return nameValue; }
         set { nameValue = value; }
      }

      private double ageValue;

      public double Age {
         get { return ageValue; }

         set {
            if (value != ageValue) {
               ageValue = value;
            }
         }
      }

   }

}
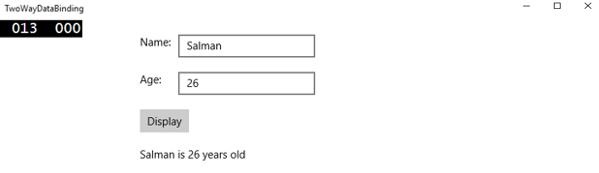
编译并执行上述代码后,您将看到以下窗口。单击显示按钮。
让我们更改“姓名”和“年龄”,然后再次单击“显示”按钮。
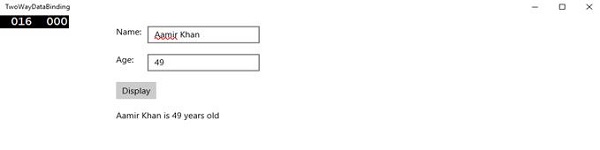
您可以看到,在单击按钮“显示”中,文本框的文本不用于显示TextBlock上的数据,而是使用类变量。
我建议您在两种情况下都执行上述代码,以便更好地理解。
元素绑定
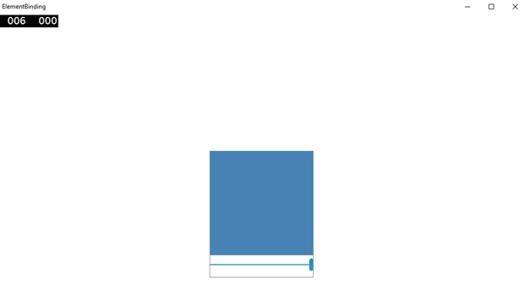
也可以不绑定到标准数据源,而是绑定到页面上的另一个元素。让我们创建一个名为ElementBinding的应用程序,其中创建一个滑块和一个矩形,并通过滑块绑定矩形的宽度和高度。下面给出的是 XAML 中的代码。
<Page
   x:Class = "ElementBinding.MainPage"
   xmlns = "http://schemas.microsoft.com/winfx/2006/xaml/presentation"
   xmlns:x = "http://schemas.microsoft.com/winfx/2006/xaml"
   xmlns:local = "using:ElementBinding"
   xmlns:d = "http://schemas.microsoft.com/expression/blend/2008"
   xmlns:mc = "http://schemas.openxmlformats.org/markup-compatibility/2006"
   mc:Ignorable = "d">

   <Grid Background = "{ThemeResource ApplicationPageBackgroundThemeBrush}">
      <StackPanel VerticalAlignment = "Center" HorizontalAlignment = "Center">

         <Rectangle Height = "100" Width = "100" Fill = "SteelBlue"
            RenderTransformOrigin = "0.5,0.5" Margin = "50">

            <Rectangle.RenderTransform>
               <CompositeTransform ScaleX = "{Binding Value, ElementName = MySlider}"
                  ScaleY = "{Binding Value, ElementName = MySlider}"/>
            </Rectangle.RenderTransform>

         </Rectangle>

         <Slider Minimum = ".5" Maximum = "2.0" StepFrequency = ".1"
            x:Name = "MySlider" />

      </StackPanel>
   </Grid>

</Page>
编译并执行上述代码后,您将看到以下窗口。
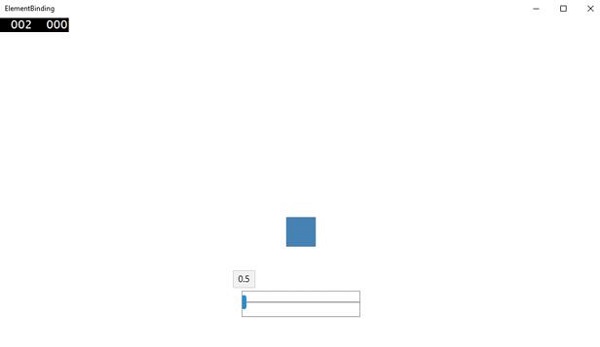
使用滑块,您可以更改矩形的大小,如下所示。