- Spring Boot 教程
- Spring Boot - 主页
- Spring Boot - 简介
- Spring Boot - 快速入门
- Spring Boot - 引导
- Spring Boot - Tomcat 部署
- Spring Boot - 构建系统
- Spring Boot - 代码结构
- Spring Bean 和依赖注入
- Spring Boot - 跑步者
- Spring Boot - 应用程序属性
- Spring Boot - 日志记录
- 构建 RESTful Web 服务
- Spring Boot - 异常处理
- Spring Boot - 拦截器
- Spring Boot - Servlet 过滤器
- Spring Boot - Tomcat 端口号
- Spring Boot - Rest 模板
- Spring Boot - 文件处理
- Spring Boot - 服务组件
- Spring Boot - Thymeleaf
- 使用 RESTful Web 服务
- Spring Boot - CORS 支持
- Spring Boot - 国际化
- Spring Boot - 调度
- Spring Boot - 启用 HTTPS
- Spring Boot-Eureka 服务器
- 向 Eureka 注册服务
- Zuul代理服务器和路由
- Spring Cloud配置服务器
- Spring Cloud 配置客户端
- Spring Boot - 执行器
- Spring Boot - 管理服务器
- Spring Boot - 管理客户端
- Spring Boot - 启用 Swagger2
- Spring Boot - 创建 Docker 镜像
- 追踪微服务日志
- Spring Boot - Flyway 数据库
- Spring Boot - 发送电子邮件
- Spring Boot-Hystrix
- Spring Boot - Web Socket
- Spring Boot - 批量服务
- Spring Boot-Apache Kafka
- Spring Boot - Twilio
- Spring Boot - 单元测试用例
- 休息控制器单元测试
- Spring Boot - 数据库处理
- 保护 Web 应用程序的安全
- Spring Boot - 使用 JWT 的 OAuth2
- Spring Boot - Google 云平台
- Spring Boot - Google OAuth2 登录
- Spring Boot 资源
- Spring Boot - 快速指南
- Spring Boot - 有用的资源
- Spring Boot - 讨论
Spring Boot - Flyway 数据库
Flyway 是一个版本控制应用程序,可在所有实例中轻松可靠地发展数据库架构。要了解有关 Flyway 的更多信息,您可以使用链接 - www.flywaydb.org
许多软件项目都使用关系数据库。这需要处理数据库迁移,通常也称为模式迁移。
在本章中,您将详细了解如何在 Spring Boot 应用程序中配置 Flyway 数据库。
配置Flyway数据库
首先,从 Spring Initializer 页面www.start.spring.io下载 Spring Boot 项目并选择以下依赖项 -
- Spring Boot 入门网站
- 飞道
- MySQL
- 数据库连接
Maven 用户可以在 pom.xml 文件中添加以下依赖项。
<dependency>
   <groupId>org.flywaydb</groupId>
   <artifactId>flyway-core</artifactId>
</dependency>

<dependency>
   <groupId>org.springframework.boot</groupId>
   <artifactId>spring-boot-starter-jdbc</artifactId>
</dependency>

<dependency>
   <groupId>org.springframework.boot</groupId>
   <artifactId>spring-boot-starter-web</artifactId>
</dependency>

<dependency>
   <groupId>mysql</groupId>
   <artifactId>mysql-connector-java</artifactId>
</dependency>

<dependency>
   <groupId>org.springframework.boot</groupId>
   <artifactId>spring-boot-starter-test</artifactId>
   <scope>test</scope>
</dependency>
Gradle 用户可以在 build.gradle 文件中添加以下依赖项。
compile('org.flywaydb:flyway-core')
compile('org.springframework.boot:spring-boot-starter-jdbc')
compile('org.springframework.boot:spring-boot-starter-web')
compile('mysql:mysql-connector-java')
在应用程序属性中,我们需要配置用于创建数据源的数据库属性,以及我们需要在应用程序属性中配置的flyway属性。
对于属性文件用户,请在 application.properties 文件中添加以下属性。
spring.application.name = flywayapp

spring.datasource.driverClassName = com.mysql.jdbc.Driver
spring.datasource.url = jdbc:mysql://localhost:3306/USERSERVICE?autoreconnect=true
spring.datasource.username = root
spring.datasource.password = root
spring.datasource.testOnBorrow = true
spring.datasource.testWhileIdle = true
spring.datasource.timeBetweenEvictionRunsMillis = 60000
spring.datasource.minEvictableIdleTimeMillis = 30000
spring.datasource.validationQuery = SELECT 1
spring.datasource.max-active = 15
spring.datasource.max-idle = 10
spring.datasource.max-wait = 8000

flyway.url = jdbc:mysql://localhost:3306/mysql
flyway.schemas = USERSERVICE
flyway.user = root
flyway.password = root
YAML 用户可以在 application.yml 文件中添加以下属性。
spring:
   application:
      name: flywayapp
   datasource:
      driverClassName: com.mysql.jdbc.Driver
      url: "jdbc:mysql://localhost:3306/USERSERVICE?autoreconnect=true"
      password: "root"
      username: "root"
      testOnBorrow: true
      testWhileIdle: true
      timeBetweenEvictionRunsMillis: 60000
      minEvictableIdleTimeMillis: 30000
      validationQuery: SELECT 1
      max-active: 15
      max-idle: 10
      max-wait: 8000
flyway:
   url: jdbc:mysql://localhost:3306/mysql
   schemas: USERSERVICE
   user: "root"
   password: "root"
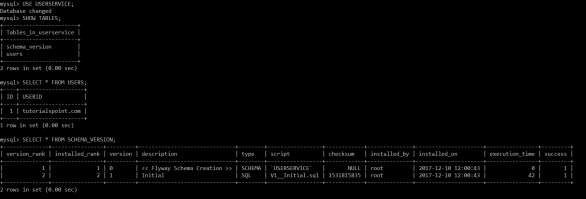
现在,在src/main/resources/db/migration目录下创建一个 SQL 文件。将 SQL 文件命名为“V1__Initial.sql”
CREATE TABLE USERS (ID INT AUTO_INCREMENT PRIMARY KEY, USERID VARCHAR(45));
INSERT INTO USERS (ID, USERID) VALUES (1, 'tutorialspoint.com');
主要的 Spring Boot 应用程序类文件代码如下 -
package com.tutorialspoint.flywayapp;

import org.springframework.boot.SpringApplication;
import org.springframework.boot.autoconfigure.SpringBootApplication;

@SpringBootApplication
public class FlywayappApplication {
   public static void main(String[] args) {
      SpringApplication.run(FlywayappApplication.class, args);
   }
}
下面给出了完整的构建配置文件。
Maven – pom.xml
<?xml version = "1.0" encoding = "UTF-8"?>
<project xmlns = "http://maven.apache.org/POM/4.0.0"
   xmlns:xsi = "http://www.w3.org/2001/XMLSchema-instance"
   xsi:schemaLocation = "http://maven.apache.org/POM/4.0.0
   http://maven.apache.org/xsd/maven-4.0.0.xsd">

   <modelVersion>4.0.0</modelVersion>
   <groupId>com.tutorialspoint</groupId>
   <artifactId>flywayapp</artifactId>
   <version>0.0.1-SNAPSHOT</version>
   <packaging>jar</packaging>
   <name>flywayapp</name>
   <description>Demo project for Spring Boot</description>

   <parent>
      <groupId>org.springframework.boot</groupId>
      <artifactId>spring-boot-starter-parent</artifactId>
      <version>1.5.9.RELEASE</version>
      <relativePath/> <!-- lookup parent from repository -->
   </parent>

   <properties>
      <project.build.sourceEncoding>UTF-8</project.build.sourceEncoding>
      <project.reporting.outputEncoding>UTF-8</project.reporting.outputEncoding>
      <java.version>1.8</java.version>
   </properties>

   <dependencies>
      <dependency>
         <groupId>org.flywaydb</groupId>
         <artifactId>flyway-core</artifactId>
      </dependency>

      <dependency>
         <groupId>org.springframework.boot</groupId>
         <artifactId>spring-boot-starter-jdbc</artifactId>
      </dependency>

      <dependency>
         <groupId>org.springframework.boot</groupId>
         <artifactId>spring-boot-starter-web</artifactId>
      </dependency>

      <dependency>
         <groupId>mysql</groupId>
         <artifactId>mysql-connector-java</artifactId>
      </dependency>
   </dependencies>

   <build>
      <plugins>
         <plugin>
            <groupId>org.springframework.boot</groupId>
            <artifactId>spring-boot-maven-plugin</artifactId>
         </plugin>
      </plugins>
   </build>

</project>
Gradle – build.gradle
buildscript {
   ext {
      springBootVersion = '1.5.9.RELEASE'
   }
   repositories {
      mavenCentral()
   }
   dependencies {
      classpath("org.springframework.boot:spring-boot-gradle-plugin:${springBootVersion}")
   }
}

apply plugin: 'java'
apply plugin: 'eclipse'
apply plugin: 'org.springframework.boot'

group = 'com.tutorialspoint'
version = '0.0.1-SNAPSHOT'
sourceCompatibility = 1.8

repositories {
   mavenCentral()
}
dependencies {
   compile('org.flywaydb:flyway-core')
   compile('org.springframework.boot:spring-boot-starter-jdbc')
   compile('org.springframework.boot:spring-boot-starter-web')
   compile('mysql:mysql-connector-java')
   testCompile('org.springframework.boot:spring-boot-starter-test')
}
您可以创建可执行 JAR 文件,并使用下面给出的 Maven 或 Gradle 命令运行 Spring Boot 应用程序 -
对于 Maven,您可以使用此处显示的命令 -
mvn clean install
“BUILD SUCCESS”后,您可以在目标目录下找到JAR文件。
对于 Gradle,您可以使用此处显示的命令 -
gradle clean build
“BUILD SUCCESSFUL”后,您可以在build/libs目录下找到JAR文件。
现在,使用以下命令运行 JAR 文件 -
java –jar <JARFILE>
现在,Tomcat 在端口 8080 上启动,在控制台窗口中您可以看到 Flyway 数据库日志,如下所示。

您现在可以访问数据库并执行选择查询。