- ASP.NET WP 教程
- ASP.NET WP - 主页
- ASP.NET WP - 概述
- ASP.NET WP - 环境设置
- ASP.NET WP - 入门
- ASP.NET WP - 视图引擎
- 项目文件夹结构
- ASP.NET WP - 全局页面
- ASP.NET WP - 编程概念
- ASP.NET WP - 布局
- ASP.NET WP - 使用表单
- ASP.NET WP - 页面对象模型
- ASP.NET WP - 数据库
- ASP.NET WP - 将数据添加到数据库
- ASP.NET WP - 编辑数据库数据
- ASP.NET WP - 删除数据库数据
- ASP.NET WP - WebGrid
- ASP.NET WP - 图表
- ASP.NET WP - 处理文件
- ASP.NET WP - 处理图像
- ASP.NET WP - 处理视频
- ASP.NET WP - 添加电子邮件
- ASP.NET WP - 添加搜索
- 将社交网络添加到网站
- ASP.NET WP - 缓存
- ASP.NET WP - 安全
- ASP.NET WP - 发布
- ASP.NET WP 有用资源
- ASP.NET WP - 快速指南
- ASP.NET WP - 有用的资源
- ASP.NET WP - 讨论
ASP.NET WP - 编辑数据库数据
在本章中,我们将介绍如何创建一个网页,用户可以在其中编辑数据库的现有数据。
在此过程中,我们将创建两个页面,这两个页面与我们之前为数据插入创建的页面类似。
第一页显示客户列表并让用户选择他们想要更改的客户。
第二页让用户实际进行编辑并保存。
如何编辑数据库现有数据?
让我们在项目中创建一个新的 CSHTML 文件。
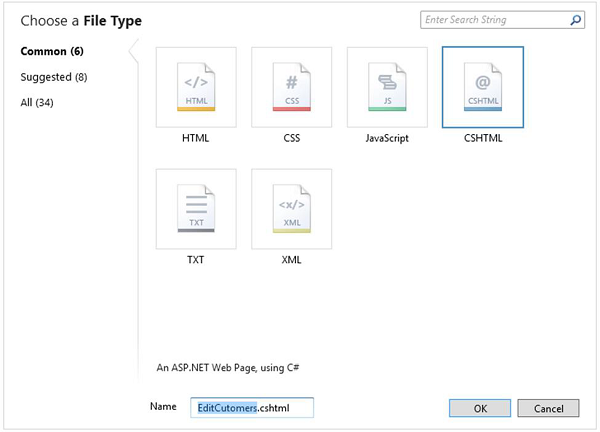
在“名称”字段中输入EditCustomers.cshtml ,然后单击“确定”。
现在将 EditCustomers.cshtml 文件替换为以下代码。
@{
   var db = Database.Open("WebPagesCustomers");
   var selectQueryString = "SELECT * FROM Customers ORDER BY FirstName";
}

<!DOCTYPE html>
<html>
   <head>
      <title>Customers List</title>
      <style>
         table, th, td {
            border: solid 1px #bbbbbb;
            border-collapse: collapse;
            padding: 2px;
         }
      </style>

   </head>
   <body>
      <h1>Customers List</h1>
      <table>
         <thead>
            <tr>
               <th> </th>
               <th>First Name</th>
               <th>Last Name</th>
               <th>Address</th>
            </tr>
         </thead>

         <tbody>
            @foreach(var row in db.Query(selectQueryString)){
               <tr>
                  <td><a href = "@Href("~/UpdateCustomers", row.Id)">Edit</a></td>
                  <td>@row.FirstName</td>
                  <td>@row.LastName</td>
                  <td>@row.Address</td>
               </tr>
            }
         </tbody>
      </table>

   </body>
</html>
EditCustomers.cshtml页面和ListCustomers.cshtml页面之间的唯一区别是它包含一个显示编辑链接的额外列。
当您单击该编辑链接时,它将带您进入尚未创建的UpdateCustomer.cshtml页面。因此,我们需要创建 UpdateCustomer.cshtml 文件并将其替换为以下代码。
@{
   Validation.RequireField("FirstName", "First Name is required.");
   Validation.RequireField("LastName", "Last Name is required.");
   Validation.RequireField("Address", "Address is required.");

   var FirstName = "";
   var LastName = "";
   var Address = "";
   var CustomerId = UrlData[0];

   if (CustomerId.IsEmpty()) {
      Response.Redirect("~/EditCustomers");
   }
   var db = Database.Open("WebPagesCustomers");

   if (IsPost && Validation.IsValid()) {
      var updateQueryString = "UPDATE Customers SET FirstName = @0, LastName = @1,
         Address = @2 WHERE Id = @3" ;
      FirstName = Request["FirstName"];
      LastName = Request["LastName"];
      Address = Request["Address"];
      db.Execute(updateQueryString, FirstName, LastName, Address, CustomerId);

      // Display the page that lists products.
      Response.Redirect(@Href("~/EditCustomers"));
   } else {
      var selectQueryString = "SELECT * FROM Customers WHERE ID = @0";
      var row = db.QuerySingle(selectQueryString, CustomerId);
      FirstName = row.FirstName;
      LastName = row.LastName;
      Address = row.Address;
   }
}

<!DOCTYPE html>
<html>
   <head>
      <title>Update Customer</title>
      <style type = "text/css">
         label {
            float:left;
            width: 8em;
            text-align: right;
            margin-right: 0.5em;
         }
         fieldset {
            padding: 1em;
            border: 1px solid;
            width: 50em;
         }
         legend {
            padding: 2px 4px;
            border: 1px solid;
            font-weight:bold;
         }
         .validation-summary-errors {
            font-weight:bold;
            color:red;
            font-size: 11pt;
         }
      </style>

   </head>
   <body>
      <h1>Update Customer</h1>
      @Html.ValidationSummary("Errors with your submission:")

      <form method = "post" action = "">
         <fieldset>
            <legend>Update Customer</legend>
            <div>
               <label>First Name:</label>
               <input name = "FirstName" type = "text" size = "50" value = "@FirstName"/>
            </div>

            <div>
               <label>Last Name:</label>
               <input name = "LastName" type = "text" size = "50" value = "@LastName" />
            </div>

            <div>
               <label>Address:</label>
               <input name = "Address" type = "text" size = "50" value = "@Address" />
            </div>

            <div>
               <label> </label>
               <input type = "submit" value = "Save" class = "submit" />
            </div>

         </fieldset>
      </form>

   </body>
</html>
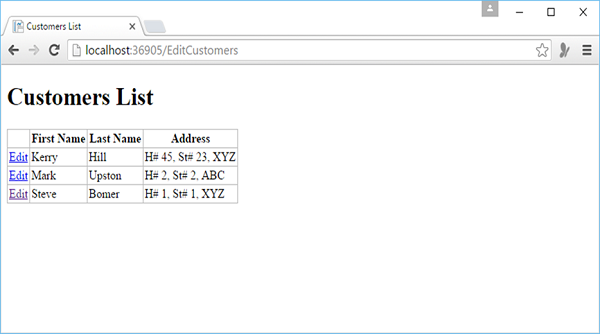
现在让我们运行应用程序并指定以下 url - http://localhost:36905/EditCustomers,您将看到以下网页。
正如您所看到的,它与ListCustomer是相同的网页,但它为每条记录提供了额外的编辑链接。现在,让我们单击任何客户的“编辑”链接,假设是第一个客户,您将看到以下页面。
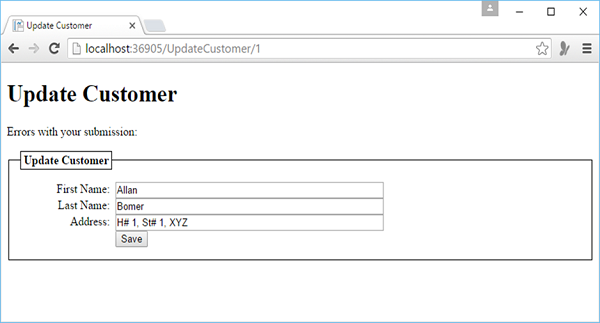
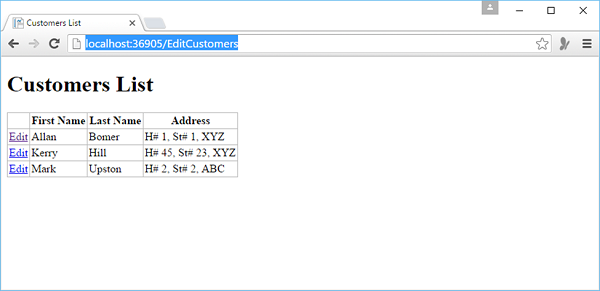
让我们将名字从 Allan 更改为 Steve,然后单击“保存”。
您将看到以下页面,其中包含更新后的名字,该页面现在位于末尾,因为我们已根据名字对列表进行排序。