- TurboGears 教程
- TurboGears - 主页
- TurboGears - 概述
- TurboGears - 环境
- TurboGears - 第一个程序
- TurboGears - 依赖关系
- TurboGears - 服务模板
- TurboGears - HTTP 方法
- Genshi模板语言
- TurboGears - 包括
- TurboGears - JSON 渲染
- TurboGears - URL 层次结构
- TurboGears - Toscawidgets 表格
- TurboGears - 验证
- TurboGears - 闪讯
- TurboGears - Cookie 和会话
- TurboGears - 缓存
- TurboGears - Sqlalchemy
- TurboGears - 创建模型
- TurboGears - 原油操作
- TurboGears - 数据网格
- TurboGears - 分页
- TurboGears - 管理员访问
- 授权与认证
- TurboGears - 使用 MongoDB
- TurboGears - 脚手架
- TurboGears - 挂钩
- TurboGears - 编写扩展
- TurboGears - 可插拔应用
- TurboGears - 安静的应用程序
- TurboGears - 部署
- TurboGears 有用资源
- TurboGears - 快速指南
- TurboGears - 有用的资源
- TurboGears - 讨论
TurboGears - 使用 MongoDB
TurboGears 还支持 MongoDB 文档数据库。它使用 Ming,一个对象文档映射器 API。Ming 的用法与 SQLAlchemy 非常相似。Ming 查询语言使得将基于 SQLAlchemy 的 TurboGears 项目移植到 Ming 成为可能。
什么是 PyMongo
PyMongo 是一个 Python 发行版,包含用于使用 MongoDB 的工具。Ming 扩展了 PyMongo 提供 -
- 声明式模型
- 模式验证和转换
- 模式演化
- 纯内存 MongoDB 实现
- 工作单元
- 身份地图
- 一对多、多对一和多对多关系
首先,您需要下载并安装 MongoDB。MongoDB 的最新发行版可以从https://www.mongodb.org/downloads下载
在 Windows 上,通过提供 -dbpath 选项启动 MongoDB 服务器 -
C:\mongodb\bin>Mongod --dbpath d:\mongo
D:\mongo 文件夹指定用于存储 MongoDB 数据库。服务器开始监听http://localhost:27017。现在要启动 MongoDB shell,请使用以下命令 -
C:\mongodb\bin>Mongo
我们的 MongoDB 环境现已准备就绪。
现在使用 -ming 选项创建一个 TurboGears 项目 -
gearbox quickstart --ming Hello
这个快速启动项目将提供一个身份验证和授权层,类似于为 SQLAlchemy 版本提供的层。该应用程序现在将尝试连接到本地计算机上端口 27017 上的服务器。项目文件夹中的development.ini 文件包含以下设置 -
ming.url = mongodb://localhost:27017/
ming.db = hello
使用以下命令设置项目 -
Python setup.py develop
项目文件夹包含模型子文件夹,其中包含以下文件 -
__init__.py - 这是设置数据库访问的地方。您的收藏应该导入到该模块中。例如,我们将在这个包中添加学生集合。
session.py - 该文件定义数据库连接的会话。每次必须声明MappedClass来指定执行查询的会话。
auth.py - 如果您在快速入门中启用了身份验证和授权,则会创建此文件它定义了三个集合repoze .who,进一步依赖于:User、Group 和 Permission。
定义你的收藏
默认情况下,TurboGears 以声明性模式配置 Ming。这类似于 SQLAlchemy 声明性支持,并且需要每个模型继承自 MappedClass 类。
MappedClass 要求内部有 __mongometa__ 子类,该子类进一步提供有关存储文档的集合名称以及用于存储文档的会话的详细信息。
MappedClass 还包含文档中字段的定义。Ming 的 odm 模块具有不同类型的字段属性的定义 -
- 现场属性
- 外国ID属性
- 关系属性
ming.schema 模块定义以下数据类型 -
- ming.schema.Anything
- ming.schema.Array
- ming.schema.Binary
- ming.schema.Bool
- ming.schema.Float
- ming.schema.Int
- ming.schema.ObjectId
- ming.schema.Scalar
- ming.schema.String
要在此模型中添加学生集合,请将以下代码保存为 hello/models 文件夹中的 Student.py。
你好\models\student.py
from ming import schema
from ming.odm import MappedClass
from ming.odm import FieldProperty, ForeignIdProperty
from hello.model import DBSession

Class student(MappedClass):
   class __mongometa__:
      session = DBSession
      name = 'student'

   _id = FieldProperty(schema.ObjectId)
   name = FieldProperty(schema.String(required = True))
   city = FieldProperty(schema.String(if_missing = ''))
   address = FieldProperty(schema.String(if_missing = ''))
   pincode = FieldProperty(schema.String(if_missing = ''))
最后,将该模型包含在 hello\models\__init__.py 中
# Import your model modules here.
from hello.model.auth import User, Group, Permission
from hello.model.student import student
要设置这些模型,请运行以下变速箱命令 -
Gearbox setup-app
使用以下变速箱命令启动服务器 -
Gearbox serve –reload –debug
打开此应用程序的主页(http://localhost:8080/)并使用管理员凭据登录。该应用程序的管理页面将显示设置的模型列表。(以管理员身份登录,密码为managepass)
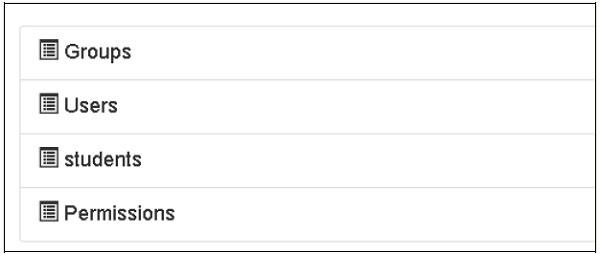
集合的创建也可以在 MongoDB Web 界面以及 MongoDB shell 中进行验证。
ODMSession 用于使用以下函数执行多个数据库操作 -
- model.query.find()
- model.query.find_and_modify()
- 模型.remove()
- 模型.update()
- model.flush()
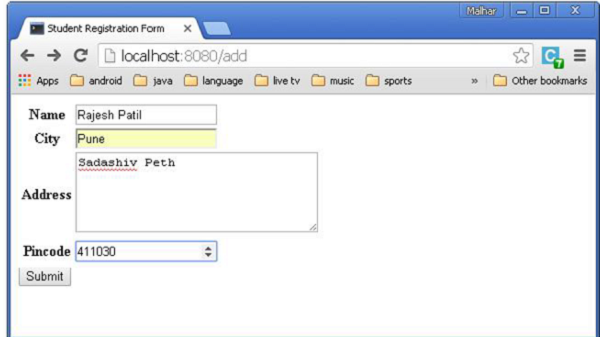
设计 ToscoWidget 表单
我们现在将设计一个 ToscoWidget 表单来输入学生数据并将其添加到学生模型底层的表中。
以下是创建 Studentform.py 的代码 -
你好\controllers\studentform.py
import tw2.core as twc
import tw2.forms as twf

class StudentForm(twf.Form):

   class child(twf.TableLayout):
      name = twf.TextField(size = 20)
      city = twf.TextField()
      address = twf.TextArea("",rows = 5, cols = 30)
      pincode = twf.NumberField()

   action = '/save_record'
   submit = twf.SubmitButton(value = 'Submit')
在应用程序的 Rootcontroller '/add' URL 中调用 add() 函数,这将在浏览器中打开上面设计的表单。然后它的提交按钮调用 save_record() 函数。它检索表单数据并将其保存在学生表中,并将应用程序重定向到“/listrec”URL,这会公开学生列表模板。
此活动的 root.py 如下 -
你好/controllers/root.py
from hello.lib.base import BaseController
from tg import expose, flash, redirect, request,url, lurl
from tg import redirect, validate
from hello import model
from hello.model import DBSession
from hello.model.student import student
from hello.controllers.studentform import StudentForm
class RootController(BaseController):
@expose()
def index(self):
return "<h1>Hello World</h1>"
@expose ("hello.templates.studentlist")
def listrec(self):
entries = student.query.find()
return dict(entries = entries)
@expose('hello.templates.studentform')
def add(self, *args, **kw):
return dict(page = 'studentform', form = StudentForm)
@expose()
def save_record(self, **kw):
newstudent = student(name = kw['name'],city = kw['city'],
address = kw['address'], pincode = kw['pincode'])
DBSession.flush()
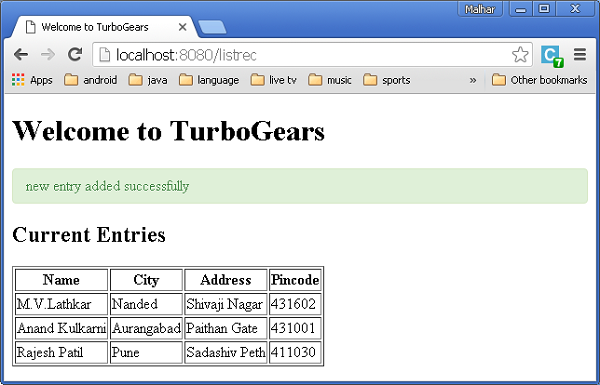
flash(message = "new entry added successfully")
redirect("/listrec")
在模板文件夹中创建以下模板 -
你好\模板\studentform.html
<!DOCTYPE html>
<html xmlns = "http://www.w3.org/1999/xhtml"
   xmlns:py = "http://genshi.edgewall.org/" lang = "en">

   <head>
      <title>Student Registration Form</title>
   </head>


   <body>
      <div id = "getting_started">
         ${form.display(value = dict(title = 'Enter data'))}
      </div>
   </body>

</html>
你好\模板\studentlist.html
<html xmlns = "http://www.w3.org/1999/xhtml"
   xmlns:py = "http://genshi.edgewall.org/">

   <head>
      <link rel = "stylesheet" type = "text/css" media = "screen"
         href = ${tg.url('/css/style.css')}" />
      <title>Welcome to TurboGears</title>
   </head>

   <body>
      <h1>Welcome to TurboGears</h1>

      <py:with vars = "flash = tg.flash_obj.render('flash', use_js = False)">
         <div py:if = "flash" py:replace = "Markup(flash)" />
      </py:with>

      <h2>Current Entries</h2>

      <table border = '1'>
         <thead>
            <tr>
               <th>Name</th>
               <th>City</th>
               <th>Address</th>
               <th>Pincode</th>
            </tr>
         </thead>

         <tbody>
            <py:for each = "entry in entries">
               <tr>
                  <td>${entry.name}</td>
                  <td>${entry.city}</td>
                  <td>${entry.address}</td>
                  <td>${entry.pincode}</td>
               </tr>
            </py:for>
         </tbody>
      </table>

   </body>

</html>
重新启动服务器并在浏览器中输入http://localhost:8080/add -
每次添加数据并按下提交按钮时,都会显示当前条目的列表。