Spring Security - Taglib
内容
- 简介和概述
- 春季安全标签
- 授权标签
- 认证标签
- csrfInput 标签
- csrfMetaTags 标签
- 入门(实用指南)
简介和概述
在使用 JSP 的 Spring MVC 应用程序中,我们可以使用 Spring Security 标签来应用安全约束以及访问安全信息。Spring Security Tag库为此类操作提供了基本支持。使用此类标签,我们可以根据用户的角色或权限控制向用户显示的信息。此外,我们还可以在表单中包含 CSRF 保护功能。
要使用 Spring 安全标记,我们必须在 JSP 文件中声明安全标记库。
<%@ taglib prefix="sec" uri="http://www.springframework.org/security/tags" %>
现在,我们可以使用带有“sec”前缀的 Spring Security 标签。现在让我们看看标签的用法。
授权标签
我们将讨论的第一个标签是授权标签。让我们看一些使用示例。
<sec:authorize access="!isAuthenticated()"> Login </sec:authorize>
<sec:authorize access="isAuthenticated()"> Logout </sec:authorize>
<sec:authorize access="hasRole('ADMIN')"> Hello Admin. </sec:authorize>
正如我们所看到的,我们可以使用此标签根据访问权限或角色隐藏或显示信息部分。为了评估角色或访问权限,我们还使用以下Spring Security 表达式-
hasRole(“ADMIN”) - 如果当前用户具有管理员角色,则评估结果为 true。
hasAnyRole('ADMIN','USER') - 如果当前用户具有任何列出的角色,则评估结果为 true
isAnonymous() - 如果当前用户是匿名用户,则评估结果为 true
isRememberMe() - 如果当前用户是记住我的用户,则评估为 true
isFullyAuthenticated() - 如果用户已通过身份验证并且既不是匿名用户也不是记住我的用户,则评估结果为 true
正如我们所看到的,访问属性是指定网络安全表达式的地方。然后,Spring Security 对表达式求值。求值通常委托给 SecurityExpressionHandler<FilterInitation>,它是在应用程序上下文中定义的。如果返回 true,则用户可以访问该部分中给出的信息。
如果我们将授权标签与 Spring Security 的权限评估器一起使用,我们还可以检查用户权限,如下所示 -
<sec:authorize access="hasPermission(#domain,'read') or hasPermission(#domain,'write')">
   This content is visible to users who have read or write permission.
</sec:authorize>
我们还可以允许或限制用户点击我们内容中的某些链接。
<sec:authorize url="/admin">
   This content will only be visible to users who are authorized to send requests to the "/admin" URL.
</sec:authorize>
认证标签
当我们想要访问存储在Spring Security Context中的当前Authentication对象时,我们可以使用authentication标签。然后我们可以使用它直接在 JSP 页面中呈现对象的属性。例如,如果我们想在页面中渲染 Authentication 对象的主体属性,我们可以按如下方式执行:
<sec:authentication property="principal.username" />
csrfInput 标签
当启用 CSRF 保护时,我们可以使用 csrfInput 标签插入一个隐藏表单字段,其中包含正确的 CSRF 保护令牌值。如果未启用 CSRF 保护,则该标签不输出任何内容。
我们可以将该标签与其他输入字段一起放置在 HTML <form></form> 块中。但是,我们不能将标签放置在 <form:form></form:form> 块中,因为 Spring Security 会自动在这些标签中插入 CSRF 表单字段,并且还会自动处理 Spring 表单。
<form method="post" action="/do/something">
   <sec:csrfInput />
   Username:<br />
   <input type="text" username="username" />
   ...
</form>
csrfMetaTags 标签
我们可以使用此标签插入元标签,其中包含 CSRF 保护令牌表单字段和标头名称以及 CSRF 保护令牌值。这些元标记对于在我们的应用程序中的 Javascript 中使用 CSRF 保护非常有用。然而,这个标签只有当我们在应用程序中启用了 CSRF 保护时才起作用,否则,这个标签不会输出任何内容。
<html>
   <head>
      <title>CSRF Protection in Javascript</title>
      <sec:csrfMetaTags />
      <script type="text/javascript" language="javascript">
         var csrfParam = $("meta[name='_csrf_param']").attr("content");
         var csrfToken = $("meta[name='_csrf']").attr("content");
      </script>
   </head>
   <body>
      ...
   </body>
</html>
入门(实用指南)
现在我们已经讨论了标签,让我们构建一个应用程序来演示标签的用法。我们将使用 Spring Tool Suite 4 作为我们的 IDE。此外,我们将使用 Apache Tomcat 服务器来为我们的应用程序提供服务。那么,让我们开始吧。
设置应用程序
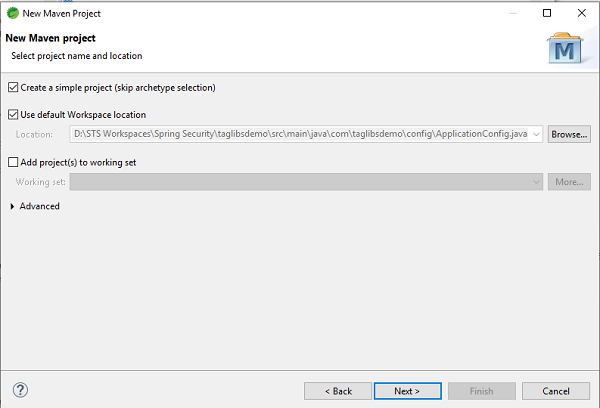
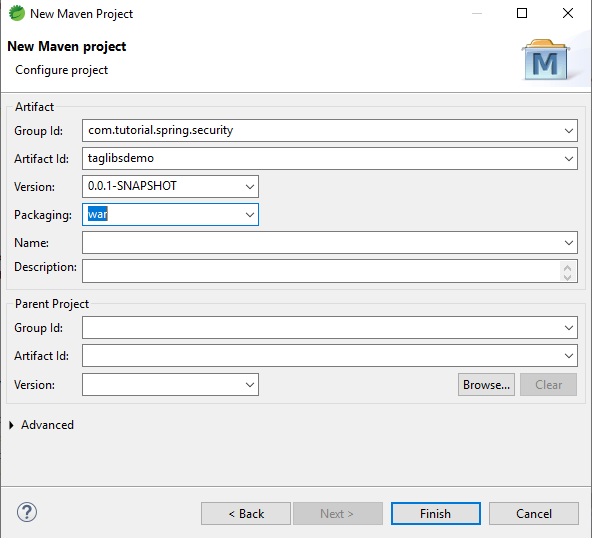
让我们在 STS 中创建一个简单的 Maven 项目。我们可以将应用程序命名为 taglibsdemo,并将其打包为 .war 文件。
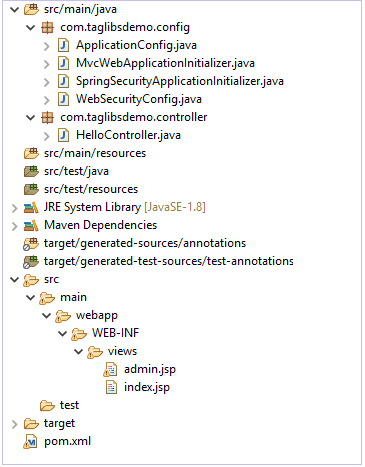
当我们完成应用程序的设置后,它应该具有与此类似的结构。
pom.xml 文件
我们将向我们的应用程序添加以下依赖项 -
- Spring Web MVC
- Spring-Security-Web
- Spring-Security-核心
- Spring-Security-标签库
- Spring 安全配置
- Javax Servlet API
- JSTL
添加这些依赖项后,我们的 pom.xml 应类似于以下内容 -
<project xmlns="http://maven.apache.org/POM/4.0.0"
   xmlns:xsi="http://www.w3.org/2001/XMLSchema-instance"
   xsi:schemaLocation="http://maven.apache.org/POM/4.0.0
   https://maven.apache.org/xsd/maven-4.0.0.xsd">
   <modelVersion>4.0.0</modelVersion>
   <groupId>com.tutorial.spring.security</groupId>
   <artifactId>taglibsdemo</artifactId>
   <version>0.0.1-SNAPSHOT</version>
   <packaging>war</packaging>
   <properties>
      <maven.compiler.target>1.8</maven.compiler.target>
      <maven.compiler.source>1.8</maven.compiler.source>
   </properties>
   <dependencies>
      <dependency>
         <groupId>org.springframework</groupId>
         <artifactId>spring-webmvc</artifactId>
         <version>5.0.2.RELEASE</version>
      </dependency>
      <dependency>
         <groupId>org.springframework.security</groupId>
         <artifactId>spring-security-web</artifactId>
         <version>5.0.0.RELEASE</version>
      </dependency>
      <dependency>
         <groupId>org.springframework.security</groupId>
         <artifactId>spring-security-core</artifactId>
         <version>5.0.4.RELEASE</version>
      </dependency>
      <dependency>
         <groupId>org.springframework.security</groupId>
         <artifactId>spring-security-taglibs</artifactId>
         <version>5.0.4.RELEASE</version>
      </dependency>
      <dependency>
         <groupId>org.springframework.security</groupId>
         <artifactId>spring-security-config</artifactId>
         <version>5.0.4.RELEASE</version>
      </dependency>
      <dependency>
         <groupId>javax.servlet</groupId>
         <artifactId>javax.servlet-api</artifactId>
         <version>3.1.0</version>
         <scope>provided</scope>
         </dependency> <dependency>
         <groupId>javax.servlet</groupId>
         <artifactId>jstl</artifactId>
         <version>1.2</version>
      </dependency>
   </dependencies>
   <build>
      <plugins>
         <plugin>
            <groupId>org.apache.maven.plugins</groupId>
            <artifactId>maven-war-plugin</artifactId>
            <version>2.6</version>
            <configuration>
            <failOnMissingWebXml>false</failOnMissingWebXml>
            </configuration>
         </plugin>
      </plugins>
   </build>
</project>
让我们为应用程序创建基础包。我们可以将其命名为 com.taglibsdemo。在该包中,我们为配置文件创建另一个包。因为它将保存配置文件,所以我们可以将其命名为 config。
应用程序配置.java
让我们创建第一个配置类 ApplicationConfig.java。
package com.taglibsdemo.config;

import org.springframework.context.annotation.Bean;
import org.springframework.context.annotation.ComponentScan;
import org.springframework.context.annotation.Configuration;
import org.springframework.web.servlet.config.annotation.EnableWebMvc;
import org.springframework.web.servlet.view.InternalResourceViewResolver;
import org.springframework.web.servlet.view.JstlView;

@EnableWebMvc
@Configuration @ComponentScan({ "com.taglibsdemo.controller"} )
public class ApplicationConfig {
   @Bean
   public InternalResourceViewResolver viewResolver() {
      InternalResourceViewResolver
      viewResolver = new InternalResourceViewResolver();
      viewResolver.setViewClass(JstlView.class);
      viewResolver.setPrefix("/WEB-INF/views/");
      viewResolver.setSuffix(".jsp"); return viewResolver;
   }
}
让我们分解一下这里的代码 -
- @EnableWebMvc - 我们使用@EnableWebMvc来启用Spring MVC。因此,我们将此注释添加到 @Configuration 类中,以从WebMvcConfigurationSupport导入 Spring MVC 配置。WebMvcConfigurationSupport 是提供 MVC Java 配置的主类。不使用此注释可能会导致内容类型和接受标头等问题,通常内容协商不起作用。@EnableWebMvc注册 RequestMappingHandlerMapping、RequestMappingHandlerAdapter 和 ExceptionHandlerExceptionResolver 等,以支持使用 @RequestMapping 、 @ExceptionHandler 等注解来处理带注解的控制器方法的请求。
- @Configuration - 此注释指示该类声明一个或多个 @Bean 方法,并且可以由 Spring IoC 容器处理以在运行时生成 bean 定义和这些 bean 的服务请求。@Configuration 类通常使用 AnnotationConfigApplicationContext 或其支持 Web 的变体 AnnotationConfigWebApplicationContext 进行引导。
- @ComponentScan - @ComponentScan注释用于告诉Spring包扫描带注释的组件。@ComponentScan 还用于使用 @ComponentScan 的 basePackageClasses 或 basePackages 属性指定基础包和基础包类。
- InternalResourceViewResolver - 将提供的 URI 解析为实际 URI,格式为前缀 + 视图名称 + 后缀。
- setViewClass() - 设置用于创建视图的视图类。
- setPrefix() - 设置在构建 URL 时添加到视图名称前面的前缀。
- setSuffix() - 设置构建 URL 时附加到视图名称的后缀。
WebSecurityConfig.java
接下来我们将创建 WebSecurityConfig 类,它将扩展熟悉的 Spring Security 的 WebSecurityConfigurerAdapter 类。
package com.taglibsdemo.config;

import org.springframework.context.annotation.Bean;
import org.springframework.context.annotation.ComponentScan;
import org.springframework.security.config.annotation.web.builders.HttpSecurity;
import org.springframework.security.config.annotation.web.configuration.EnableWebSecurity;
import org.springframework.security.config.annotation.web.configuration.WebSecurityConfigurerAdapter;
import org.springframework.security.core.userdetails.UserDetailsService;
import org.springframework.security.provisioning.InMemoryUserDetailsManager;
import org.springframework.security.web.util.matcher.AntPathRequestMatcher;
import org.springframework.security.core.userdetails.User;
import org.springframework.security.core.userdetails.User.UserBuilder;
@EnableWebSecurity @ComponentScan("com.taglibsdemo")
public class WebSecurityConfig extends WebSecurityConfigurerAdapter {
   @SuppressWarnings("deprecation") @Bean
   public UserDetailsService userdetailsService() {
      UserBuilder users = User.withDefaultPasswordEncoder();
      InMemoryUserDetailsManager manager = new InMemoryUserDetailsManager();
      manager.createUser(users.username("rony").password("rony123").roles("USER").build());
      manager.createUser(users.username("admin").password("admin123").roles("ADMIN").build());
      return manager;
   }
   @Override protected void configure(HttpSecurity http) throws Exception {
      http.authorizeRequests() .antMatchers("/index", "/").permitAll()
      .antMatchers("/admin", "/user").authenticated() .and() .formLogin()
      .and() .logout() .logoutRequestMatcher(
         new AntPathRequestMatcher("/logout")
      );
   }
}
让我们在这里分解代码 -
- WebSecurityConfigurerAdapter - 实现 WebSecurityConfigurer WebSecurityConfigurer 的抽象类,并允许我们重写安全配置方法。
- @EnableWebSecurity - 它使Spring能够自动查找@Configuration类并将其应用到全局WebSecurity。
- 然后,我们使用 InMemoryUserDetailsManager 实例创建用户的方法创建一个 UserDetailsService Bean。我们创建两个用户——一个具有“USER”角色,另一个具有“ADMIN”角色,并将它们添加到 Spring Security。
- 之后,我们以 HttpSecurity 作为参数重写 configure 方法。我们使所有人都可以访问我们的主页或索引页面,并在用户通过身份验证后可以访问管理页面。接下来,我们添加 Spring Security 表单登录和注销。
因此,通过这些步骤我们的安全配置就完成了。现在,我们已准备好进入下一步。
SpringSecurityApplicationInitializer.java
继续,现在我们将创建 SpringSecurityApplicationInitializer.java 类,该类扩展了 Spring Security 的 AbstractSecurityWebApplicationInitializer 类。
package com.taglibsdemo.config;
import org.springframework.security.web.context.AbstractSecurityWebApplicationInitializer;
public class SpringSecurityApplicationInitializer extends
AbstractSecurityWebApplicationInitializer { }
AbstractSecurityWebApplicationInitializer是一个抽象类,它实现了Spring的WebApplicationInitializer。因此,如果类路径包含 spring-web 模块,SpringServletContainerInitializer 将初始化该类的具体实现。
MvcWebApplicationInitializer.java
package com.taglibsdemo.config;
import org.springframework.web.servlet.support.AbstractAnnotationConfigDispatcherServletInitializer;
public class MvcWebApplicationInitializer extends
AbstractAnnotationConfigDispatcherServletInitializer {
   @Override protected Class</?>[] getRootConfigClasses() {
      return new Class[] {WebSecurityConfig.class};
   }
   @Override protected Class</?>[] getServletConfigClasses() {
      return null;
   }
   @Override protected String[] getServletMappings() {
      return new String[] {"/"};
   }
}
- AbstractAnnotationConfigDispatcherServletInitializer - 此类扩展了 WebApplicationInitializer。我们需要这个类作为基类来在Servlet容器环境中初始化Spring应用程序。因此,AbstractAnnotationConfigDispatcherServletInitializer的子类将提供带有@Configuration注释的类、Servlet配置类和DispatcherServlet映射模式。
- getRootConfigClasses() - 此方法必须由扩展 AbstractAnnotationConfigDispatcherServletInitializer 的类实现。它提供“根”应用程序上下文配置。
- getServletConfigClasses() - 也必须实现此方法才能提供 DispatcherServlet 应用程序上下文配置。
- getServletMappings() - 此方法用于指定 DispatcherServlet 的 servlet 映射。
我们已经设置了配置类。现在,我们将创建控制器来为 JSP 页面提供服务。
HelloController.java
package com.taglibsdemo.controller;
import org.springframework.stereotype.Controller;
import org.springframework.web.bind.annotation.GetMapping;
@Controller public class HelloController {
@GetMapping("/")
   public String index() { return "index"; }
   @GetMapping("/user")
   public String user() { return "admin"; }
   @GetMapping("/admin")
   public String admin() { return "admin"; }
}
在这里,我们创建了三个端点——“/”、“/ user ”和“/ admin ”。正如我们之前的配置中所指定的,我们将允许未经授权的访问索引页
“/”。另一方面,“/user”和“/admin”端点将仅被授权访问。
安全的内容服务
继续,我们现在将创建 JSP 页面,这些页面将在访问特定端点时提供服务。
为此,我们在 src/main 文件夹中创建一个名为 webapp 的文件夹。在此文件夹中,我们创建 WEB-INF 文件夹,并进一步像在 ApplicationConfig.java 类中一样添加视图文件夹。在这里,我们将在此文件夹中添加视图。
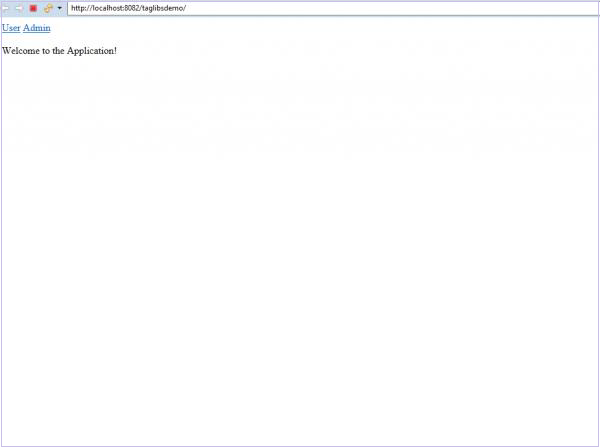
首先添加我们的主页,即index.jsp。
<%@ page language="java" contentType="text/html;
   charset=ISO-8859-1" pageEncoding="ISO-8859-1"%>
<!DOCTYPE html>
<html>
   <head>
      <meta charset="ISO-8859-1">
      <title>Home Page</title>
   </head>
   <body>
      <a href="user">User</a>
      <a href="admin">Admin</a>
      <br>
      <br> Welcome to the Application!
   </body>
</html>
然后我们将创建admin.jsp文件。让我们添加它。
<%@ page language="java" contentType="text/html;
   charset=ISO-8859-1" pageEncoding="ISO-8859-1"%>
<%@ taglib uri="http://www.springframework.org/security/tags" prefix="security"%>
<!DOCTYPE html>
<html>
   <head>
      <meta charset="ISO-8859-1">
      <meta http-equiv="Content-Type" content="text/html; charset=UTF-8">
      <title>Insert title here</title>
   </head>
   <body> Welcome to Admin Page! <a href="logout"> Logout </a>
      <br>
      <br>
      <security:authorize access="hasRole('ADMIN')"> Hello Admin!
      </security:authorize>
   </body>
</html>
在这里,我们添加了 <%@ taglib uri="http://www.springframework.org/security/tags" prefix="security"%>。这将使我们获得前面讨论的 Spring 安全标签库。正如我们所看到的,我们在内容周围添加了“授权”标签。此内容只能由我们的管理员访问。访问此页面的任何其他用户将无法查看此内容。
运行应用程序
现在,我们右键单击该项目并选择 Run On Server。当服务器启动并且我们的应用程序运行时,我们可以在浏览器上访问 localhost:8080/taglibsdemo/ 查看页面。
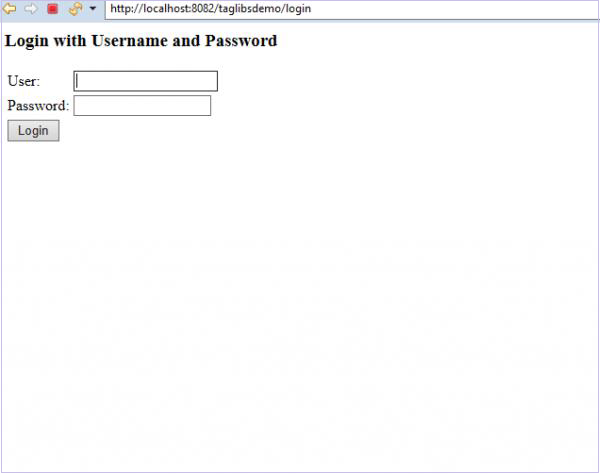
登录页面
现在,如果我们单击应用程序中的“用户”链接,系统将要求我们登录。
在这里,正如我们在控制器中看到的,我们正在为用户和管理链接提供管理页面。但是我们的用户,如果他不是管理员,就无法查看受我们的“授权”标签保护的内容。
我们先以用户身份登录。
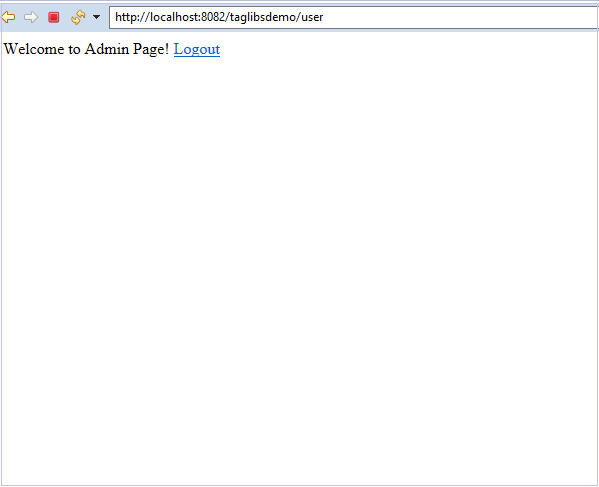
我们可以看到“Hello Admin!” 内容对我们不可见。这是因为当前用户没有管理员角色。
现在让我们注销并以管理员身份登录。
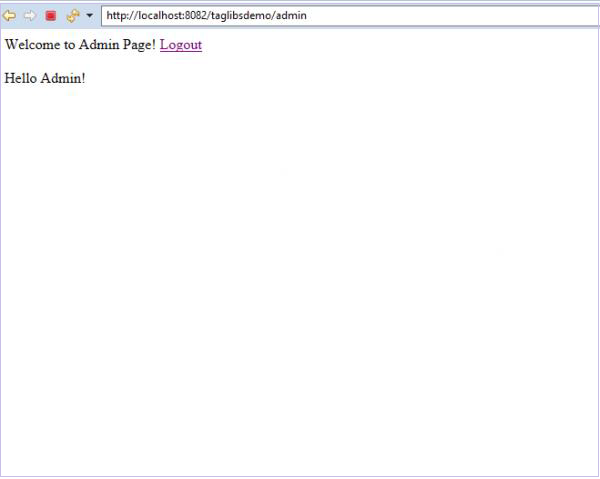
我们现在可以看到受保护的内容“管理员您好!” 因为当前用户具有管理员角色。
结论
我们已经了解了如何使用 Spring Security 标签库来保护我们的内容并访问 Spring Security 上下文中的当前身份验证对象。