Spring 安全 - JWT
内容
- 智威汤逊简介和概述
- 使用 JWT 开始使用 Spring Security(实用指南)
智威汤逊简介和概述
JSON Web Token 或 JWT(更常见的名称)是一种开放的互联网标准 (RFC 7519),用于以紧凑的方式在各方之间安全地传输可信信息。令牌包含编码为 JSON 对象的声明,并使用私有密钥或公钥/私钥对进行数字签名。它们是独立且可验证的,因为它们经过数字签名。JWT 可以进行签名和/或加密。签名的令牌验证令牌中包含的声明的完整性,而加密的令牌则向其他方隐藏声明。
JWT 也可用于信息交换,尽管它们更常用于授权,因为它们比使用内存中随机令牌的会话管理具有很多优势。其中最重要的是允许将身份验证逻辑委托给第三方服务器,例如AuthO等。
JWT 令牌分为 3 部分,即标头、有效负载和签名,格式为
[Header].[Payload].[Signature]
标头- JWT 令牌的标头包含应用于 JWT 的加密操作列表。这可以是签名技术、有关内容类型的元数据信息等。标头以 JSON 对象的形式呈现,该对象被编码为 base64URL。有效 JWT 标头的示例是
{ "alg": "HS256", "typ": "JWT" }
这里,“ alg ”为我们提供了有关所用算法类型的信息,“typ”为我们提供了信息的类型。
Payload - JWT 的有效负载部分包含使用令牌传输的实际数据。这部分也称为 JWT 令牌的“声明”部分。索赔可以分为三种类型:注册索赔、公开索赔和私人索赔。
注册的声明是推荐的但不是强制的声明,例如 iss(发行者)、sub(主题)、aud(受众) 等。
公共声明是那些使用 JWT 的人定义的声明。
私人声明或自定义声明是为了在相关方之间共享信息而创建的用户定义的声明。
有效负载对象的示例可以是。
{ "sub": "12345", "name": "Johnny Hill", "admin": false }
有效负载对象与标头对象一样,也采用 base64Url 编码,并且该字符串构成 JWT 的第二部分。
签名- JWT 的签名部分用于验证消息在此过程中没有更改。如果令牌是用私钥签名的,它还会验证发送者的身份。它是使用编码的标头、编码的有效负载、秘密和标头中指定的算法创建的。签名的一个例子是。
HMACSHA256( base64UrlEncode(header) + "." + base64UrlEncode(payload), secret)
如果我们输入标头、有效负载和签名,我们会得到一个令牌,如下所示。
eyJhbGciOiJSUzI1NiIsInR5cCI6IkpXVCJ9.eyJzdWIiOiIxMjM0NTY3ODkwIiwibmFtZSI6I
kpvaG4gRG9lIiwiYWRtaW4iOmZhbHNlfQ.gWDlJdpCTIHVYKkJSfAVNUn0ZkAjMxskDDm-5Fhe
WJ7xXgW8k5CllcGk4C9qPrfa1GdqfBrbX_1x1E39JY8BYLobAfAg1fs_Ky8Z7U1oCl6HL63yJq_
wVNBHp49hWzg3-ERxkqiuTv0tIuDOasIdZ5FtBdtIP5LM9Oc1tsuMXQXCGR8GqGf1Hl2qv8MCyn
NZJuVdJKO_L3WGBJouaTpK1u2SEleVFGI2HFvrX_jS2ySzDxoO9KjbydK0LNv_zOI7kWv-gAmA
j-v0mHdJrLbxD7LcZJEGRScCSyITzo6Z59_jG_97oNLFgBKJbh12nvvPibHpUYWmZuHkoGvuy5RLUA
现在,可以使用承载模式在授权标头中使用此令牌。
授权 - 持有者<token>
使用 JWT 令牌进行授权是其最常见的应用。令牌通常在服务器中生成并发送到客户端,并存储在会话存储或本地存储中。要访问受保护的资源,客户端将在标头中发送 JWT,如上所述。我们将在下面的部分中看到 Spring Security 中的 JWT 实现。
使用 JWT 开始使用 Spring Security
我们要开发的应用程序将使用 JWT 处理基本的用户身份验证和授权。让我们开始访问 start.spring.io,我们将在其中创建一个具有以下依赖项的 Maven 应用程序。
- 春季网
- 春季安全
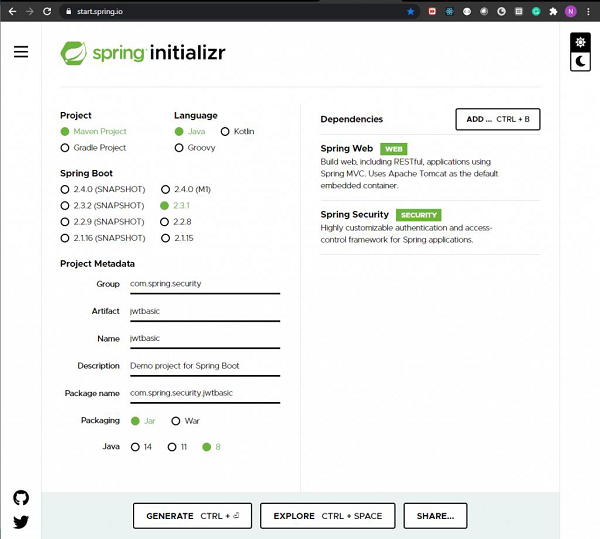
我们生成项目,下载后将其解压到我们选择的文件夹中。然后我们可以使用我们选择的任何 IDE。我将使用 Spring Tools Suite 4,因为它针对 Spring 应用程序进行了最优化。
除了上述依赖项之外,我们还将包含来自 Maven 中央存储库的 io.jsonwebtoken 的 jwt 依赖项,因为它不包含在 spring 初始化程序中。这种依赖关系负责涉及 JWT 的所有操作,包括构建令牌、解析令牌以获取声明等。
<dependency>
   <artifactId>jjwt</artifactId>
   <version>0.9.1</version>
</dependency>
我们的pom.xml文件现在应该与此类似。
<?xml version="1.0" encoding="UTF-8"?>
<project xmlns="http://maven.apache.org/POM/4.0.0"
   xmlns:xsi="http://www.w3.org/2001/XMLSchema-instance"
   xsi:schemaLocation="http://maven.apache.org/POM/4.0.0
   https://maven.apache.org/xsd/maven-4.0.0.xsd">
   <modelVersion>4.0.0</modelVersion>
   <parent>
      <groupId>org.springframework.boot</groupId>
      <artifactId>spring-boot-starter-parent</artifactId>
      <version>2.3.1.RELEASE<version>
      <relativePath />
      <!-- lookup parent from repository -->
   </parent>
   <groupId>com.spring.security</groupId>
   <artifactId>jwtbasic</artifactId>
   <version>0.0.1-SNAPSHOT</version>
   <name>jwtbasic</name>
   <description>Demo project for Spring Boot</description>
   <properties>
      <java.version>1.8</java.version>
   </properties>
   <dependencies>
      <dependency>
         <groupId>org.springframework.boot</groupId>
         <artifactId>spring-boot-starter-security</artifactId>
      </dependency>
      <dependency>
         <groupId>org.springframework.boot</groupId>
         <artifactId>spring-boot-starter-web</artifactId>
      </dependency>
      <dependency>
         <groupId>io.jsonwebtoken</groupId>
         <artifactId>jjwt</artifactId>
         <version>0.9.1</version>
      </dependency>
      <dependency>
         <groupId>javax.xml.bind</groupId>
         <artifactId>jaxb-api</artifactId>
      </dependency>
      <dependency>
         <groupId>org.springframework.boot</groupId>
         <artifactId>spring-boot-starter-test</artifactId>
         <scope>test</scope>
         <exclusions>
      <exclusion>
         <groupId>org.junit.vintage</groupId>
         <artifactId>junit-vintage-engine</artifactId>
         </exclusion>
      </exclusions>
      </dependency>
      <dependency>
      <groupId>org.springframework.security</groupId>
      <artifactId>spring-security-test</artifactId>
      <scope>test<scope>
      <dependency>
   </dependencies>
      <build>
      <plugins>
         <plugin>
         <groupId>org.springframework.boot</groupId>
         <artifactId>spring-boot-maven-plugin</artifactId>
         </plugin>
      </plugins>
   </build>
</project>
现在我们的项目已经设置完毕,我们将创建控制器类 Hello Controller,它公开一个 Get 端点。
package com.spring.security.jwtbasic.controllers;
import org.springframework.web.bind.annotation.GetMapping;
import org.springframework.web.bind.annotation.RestController;
@RestController
public class HelloController {
   @GetMapping("/hello")
   public String hello() {
      return "hello";
   }
}
现在我们将创建一个名为 config 的包,在其中添加扩展Spring Security 的WebSecurityConfigurerAdapter类的配置类。这将为我们提供项目配置和应用程序安全性所需的所有功能和定义。现在,我们通过实现生成相同实例的方法来提供BcryptPasswordEncoder实例。我们用 @Bean 注释该方法以添加到 Spring 上下文中。
package com.spring.security.jwtbasic.config;
import org.springframework.beans.factory.annotation.Autowired;
import org.springframework.context.annotation.Bean;
import org.springframework.context.annotation.Configuration;
import org.springframework.security.authentication.AuthenticationManager;
import org.springframework.security.config.annotation.authentication.builders.AuthenticationManagerBuilder;
import org.springframework.security.config.annotation.web.builders.HttpSecurity;
import org.springframework.security.config.annotation.web.configuration.WebSecurityConfigurerAdapter;
import org.springframework.security.config.http.SessionCreationPolicy;
import org.springframework.security.core.userdetails.UserDetailsService;
import org.springframework.security.crypto.bcrypt.BCryptPasswordEncoder;
import org.springframework.security.crypto.password.PasswordEncoder;
import org.springframework.security.web.authentication.UsernamePasswordAuthenticationFilter;
import com.spring.security.jwtbasic.jwtutils.JwtAuthenticationEntryPoint;
import com.spring.security.jwtbasic.jwtutils.JwtFilter;
@Configuration
public class WebSecurityConfig extends WebSecurityConfigurerAdapter {
   @Bean
   public PasswordEncoder passwordEncoder() {
      return new BCryptPasswordEncoder();
   }
}
JWT 包含一个秘密,我们将在 application.properties 文件中定义该秘密,如下所示。
secret=somerandomsecret
现在让我们创建一个名为 jwtutils 的包。该包将包含与 JWT 操作相关的所有类和接口,其中包括。
- 生成代币
- 验证令牌
- 检查签名
- 验证声明和权限
在此包中,我们创建第一个类,称为令牌管理器。此类将负责使用 io.jsonwebtoken.Jwts 创建和验证令牌。
package com.spring.security.jwtbasic.jwtutils;
import java.io.Serializable;
import java.util.Base64;
import java.util.Date;
import java.util.HashMap;
import java.util.Map;
import org.springframework.beans.factory.annotation.Value;
import org.springframework.security.core.userdetails.UserDetails;
import org.springframework.stereotype.Component;
import io.jsonwebtoken.Claims; import io.jsonwebtoken.Jwts;
import io.jsonwebtoken.SignatureAlgorithm;
@Component
public class TokenManager implements Serializable {
   /**
   *
   */
   private static final long serialVersionUID = 7008375124389347049L; public static final long TOKEN_VALIDITY = 10 * 60 * 60; @Value("${secret}")
   private String jwtSecret;
   public String generateJwtToken(UserDetails userDetails) {
      Map<String, Object> claims = new HashMap<>();
      return Jwts.builder().setClaims(claims).setSubject(userDetails.getUsername())
         .setIssuedAt(new Date(System.currentTimeMillis()))
         .setExpiration(new Date(System.currentTimeMillis() + TOKEN_VALIDITY * 1000))
         .signWith(SignatureAlgorithm.HS512, jwtSecret).compact();
   }
   public Boolean validateJwtToken(String token, UserDetails userDetails) {
      String username = getUsernameFromToken(token);
      Claims claims = Jwts.parser().setSigningKey(jwtSecret).parseClaimsJws(token).getBody();
      Boolean isTokenExpired = claims.getExpiration().before(new Date());
      return (username.equals(userDetails.getUsername()) && !isTokenExpired);
   }
   public String getUsernameFromToken(String token) {
      final Claims claims = Jwts.parser().setSigningKey(jwtSecret).parseClaimsJws(token).getBody();
      return claims.getSubject();
   }
}
在这里,由于所有令牌都应该有一个到期日期,因此我们从令牌有效性常量开始。在这里,我们希望我们的令牌在生成后 10 分钟内有效。当我们生成令牌时,我们将使用这个值。然后,我们使用 @Value 注释将歌唱键的值从 application.properties 文件中提取到 jwtSecret 字段中。
我们这里有两种方法 -
- generateJwtToken() - 此方法用于在用户成功进行身份验证时生成令牌。要在此处创建令牌,我们使用用户名、令牌发行日期和令牌到期日期。正如我们之前讨论的,这将形成令牌或声明的有效负载部分。为了生成令牌,我们使用 Jwts 的 builder() 方法。此方法返回一个新的 JwtBuilder 实例,可用于创建紧凑的 JWT 序列化字符串。
为了设置声明,我们使用 setClaims() 方法,然后设置每个声明。对于这个令牌,我们有 setSubject(username)、发行日期和到期日期。我们还可以像上面讨论的那样提出自定义声明。这可以是我们想要的任何值,其中可能包括用户角色、用户权限等。
然后我们设置令牌的签名部分。这是使用 signWith() 方法完成的,我们设置我们喜欢使用的哈希算法和密钥。然后,我们使用compact()方法构建JWT,并根据JWT紧凑序列化规则将其序列化为紧凑的、URL安全的字符串。
validateJwtToken() - 现在已经处理了令牌的生成,我们应该关注令牌作为请求的一部分时的验证过程。验证令牌意味着验证请求是否经过身份验证,并且令牌是生成并发送给用户的令牌。在这里,我们需要解析令牌以获取用户名、角色、权限、有效期等声明。
为了验证令牌,我们需要首先解析它。这是使用 Jwts 的 parser() 方法完成的。然后,我们需要设置用于生成令牌的签名密钥,然后在令牌上使用 parseClaimsJws() 方法来根据构建器的当前配置状态解析紧凑的序列化 JWS 字符串,并返回生成的 Claims JWS 实例。然后使用 getBody() 方法返回生成令牌时使用的声明实例。
从获得的声明实例中,我们提取主题和到期日期以验证令牌的有效性。用户名应该是用户的用户名,并且令牌不应过期。如果满足这两个条件,我们将返回 true,这表示令牌有效。
我们要创建的下一个类是JwtUserDetailsService。这个类将扩展Spring security 的UserDetailsService,我们将实现loadUserByUsername()方法,如下所示 -
package com.spring.security.jwtbasic.jwtutils;
import java.util.ArrayList;
import org.springframework.security.core.userdetails.User;
import org.springframework.security.core.userdetails.UserDetails;
import org.springframework.security.core.userdetails.UserDetailsService;
import org.springframework.security.core.userdetails.UsernameNotFoundException;
import org.springframework.stereotype.Service;
@Service
public class JwtUserDetailsService implements UserDetailsService {
   @Override
   public UserDetails loadUserByUsername(String username) throws UsernameNotFoundException {
      if ("randomuser123".equals(username)) {
         return new User("randomuser123",
            "$2a$10$slYQmyNdGzTn7ZLBXBChFOC9f6kFjAqPhccnP6DxlWXx2lPk1C3G6",
            new ArrayList<>());
      } else {
         throw new UsernameNotFoundException("User not found with username: " + username);
      }
   }
}
在这里,由于这是一个基本应用程序,其唯一目的是演示 JWT 身份验证,因此我们使用了一组用户详细信息,而不是使用数据库。为了方便起见,我们将用户名指定为“ randomuser123 ”,并将密码“ password ”编码为“$2a$10$slYQmyNdGzTn7ZLBXBChFOC9f6kFjAqPhccnP6DxlWXx2lPk1C3G6”。
接下来,我们为请求和响应模型创建类。这些模型决定了我们的请求和响应格式如何进行身份验证。下面给出的第一个快照是请求模型。正如我们所看到的,我们将在请求中接受两个属性——用户名和密码。
package com.spring.security.jwtbasic.jwtutils.models;
import java.io.Serializable;
public class JwtRequestModel implements Serializable {
   /**
   *
   */
   private static final long serialVersionUID = 2636936156391265891L;
   private String username;
   private String password;
   public JwtRequestModel() {
   }
   public JwtRequestModel(String username, String password) {
      super();
      this.username = username; this.password = password;
   }
   public String getUsername() {
      return username;
   }
   public void setUsername(String username) {
      this.username = username;
   }
   public String getPassword() {
      return password;
   }
   public void setPassword(String password) {
      this.password = password;
   }
}
以下是身份验证成功后的响应模型的代码。正如我们所看到的,在身份验证成功后,我们将把令牌发送回用户。
package com.spring.security.jwtbasic.jwtutils.models;
import java.io.Serializable;
public class JwtResponseModel implements Serializable {
   /**
   *
   */
   private static final long serialVersionUID = 1L;
   private final String token;
   public JwtResponseModel(String token) {
      this.token = token;
   }
   public String getToken() {
      return token;
   }
}
现在为了进行身份验证,让我们创建一个控制器,如下所示。
package com.spring.security.jwtbasic.jwtutils;
import org.springframework.beans.factory.annotation.Autowired;
import org.springframework.http.ResponseEntity;
import org.springframework.security.authentication.AuthenticationManager;
import org.springframework.security.authentication.BadCredentialsException;
import org.springframework.security.authentication.DisabledException;
import org.springframework.security.authentication.UsernamePasswordAuthenticationToken;
import org.springframework.security.core.userdetails.UserDetails;
import org.springframework.web.bind.annotation.CrossOrigin;
import org.springframework.web.bind.annotation.PostMapping;
import org.springframework.web.bind.annotation.RequestBody;
import org.springframework.web.bind.annotation.RestController;
import com.spring.security.jwtbasic.jwtutils.models.JwtRequestModel;
import com.spring.security.jwtbasic.jwtutils.models.JwtResponseModel;
@RestController
@CrossOrigin
public class JwtController {
   @Autowired
   private JwtUserDetailsService userDetailsService;
   @Autowired
   private AuthenticationManager authenticationManager;
   @Autowired
   private TokenManager tokenManager;
   @PostMapping("/login")
   public ResponseEntity<> createToken(@RequestBody JwtRequestModel
   request) throws Exception {
      try {
         authenticationManager.authenticate(
            new
            UsernamePasswordAuthenticationToken(request.getUsername(),
            request.getPassword())
         );
      } catch (DisabledException e) {
         throw new Exception("USER_DISABLED", e);
      } catch (BadCredentialsException e) {
         throw new Exception("INVALID_CREDENTIALS", e);
      }
      final UserDetails userDetails = userDetailsService.loadUserByUsername(request.getUsername());
      final String jwtToken = tokenManager.generateJwtToken(userDetails);
      return ResponseEntity.ok(new JwtResponseModel(jwtToken));
   }
}
如果我们查看代码,我们可以看到,我们自动装配了三个依赖项,即JwtUserDetailsService、 AuthenticationManager 和TokenManager。虽然我们已经看到了上面JwtUserDetailsService和TokenManager类的实现,但身份验证管理器 bean 是我们将在WebSecurityConfig类中创建的一个。
AuthenticationManager类将负责我们的身份验证。我们将使用UsernamePasswordAuthenticationToken模型来验证请求。如果身份验证成功,我们将为用户生成一个 JWT,该 JWT 可以在后续请求的 Authorization 标头中发送以获取任何资源。
正如我们所看到的,我们正在使用JwtUserDetailsS ervice 类的loadUserByUsername()方法和TokenManager类中的generateJwtToken()。
如上所述,生成的 JWT 作为成功身份验证的响应发送给用户。
现在是我们创建过滤器的时候了。过滤器类将用于跟踪我们的请求并检测它们是否在标头中包含有效令牌。如果令牌有效,我们将继续请求,否则我们将发送 401 错误(未经授权)。
package com.spring.security.jwtbasic.jwtutils;
import java.io.IOException;
import javax.servlet.FilterChain;
import javax.servlet.ServletException;
import javax.servlet.http.HttpServletRequest;
import javax.servlet.http.HttpServletResponse;
import org.springframework.beans.factory.annotation.Autowired;
import org.springframework.security.authentication.UsernamePasswordAuthenticationToken;
import org.springframework.security.core.context.SecurityContextHolder;
import org.springframework.security.core.userdetails.UserDetails;
import org.springframework.security.web.authentication.WebAuthenticationDetailsSource;
import org.springframework.stereotype.Component;
import org.springframework.web.filter.OncePerRequestFilter;
import io.jsonwebtoken.ExpiredJwtException;
@Component
public class JwtFilter extends OncePerRequestFilter {
   @Autowired
   private JwtUserDetailsService userDetailsService;
   @Autowired
   private TokenManager tokenManager;
   @Override
   protected void doFilterInternal(HttpServletRequest request,
      HttpServletResponse response, FilterChain filterChain)
      throws ServletException, IOException {

      String tokenHeader = request.getHeader("Authorization");
      String username = null;
      String token = null;
      if (tokenHeader != null && tokenHeader.startsWith("Bearer ")) {
         token = tokenHeader.substring(7);
         try {
            username = tokenManager.getUsernameFromToken(token);
         } catch (IllegalArgumentException e) {
            System.out.println("Unable to get JWT Token");
         } catch (ExpiredJwtException e) {
            System.out.println("JWT Token has expired");
         }
      } else {
         System.out.println("Bearer String not found in token");
      }
      if (null != username &&SecurityContextHolder.getContext().getAuthentication() == null) {
         UserDetails userDetails = userDetailsService.loadUserByUsername(username);
         if (tokenManager.validateJwtToken(token, userDetails)) {
            UsernamePasswordAuthenticationToken
            authenticationToken = new UsernamePasswordAuthenticationToken(
            userDetails, null,
            userDetails.getAuthorities());
            authenticationToken.setDetails(new
            WebAuthenticationDetailsSource().buildDetails(request));
            SecurityContextHolder.getContext().setAuthentication(authenticationToken);
         }
      }
      filterChain.doFilter(request, response);
   }
}
正如我们在上面看到的,我们也在这里自动装配了JwtUserDetailsService和TokenManager类。我们扩展了SpringSecurity 的OncePerRequestFilter,确保过滤器针对每个请求运行。我们已经为OncePerRequestFilter类的重写方法 doFilterInternal() 提供了实现。
这里的方法从标头中提取令牌并借助TokenManager类的validateJwtToken()方法对其进行验证。在验证过程中,它会检查用户名和到期日期。如果两个值都有效,我们会将身份验证保存在 Spring Security 上下文中,并让代码继续执行过滤器链中的下一个过滤器。如果任何验证失败或令牌存在问题,或者未找到令牌,我们会抛出适当的异常并发回适当的响应,同时阻止请求继续进行。
为我们的请求创建过滤器后,我们现在创建 JwtAutheticationEntryPoint 类。该类扩展了 Spring 的 AuthenticationEntryPoint 类,并拒绝每个未经身份验证的请求,并将错误代码 401 发送回客户端。我们重写了 AuthenticationEntryPoint 类的 begin() 方法来做到这一点。
package com.spring.security.jwtbasic.jwtutils;
import java.io.IOException;
import java.io.Serializable;
import javax.servlet.ServletException;
import javax.servlet.http.HttpServletRequest;
import javax.servlet.http.HttpServletResponse;
import org.springframework.security.core.AuthenticationException;
import org.springframework.security.web.AuthenticationEntryPoint;
import org.springframework.stereotype.Component;
@Component
public class JwtAuthenticationEntryPoint implements AuthenticationEntryPoint,
Serializable {
   @Override
   public void commence(HttpServletRequest request, HttpServletResponse
   response,
   AuthenticationException authException) throws
   IOException, ServletException {
      response.sendError(HttpServletResponse.SC_UNAUTHORIZED,
   "Unauthorized");
      }
}
现在,让我们回到WebSecurityConfig类并完成其余的配置。如果我们还记得的话,我们将需要我们的 Jwt 控制器类的AuthenticationManager bean,并将我们刚刚创建的过滤器添加到我们的配置中。我们还将配置哪些请求需要进行身份验证,哪些请求不需要进行身份验证。我们还将AuthenticationEntryPoint添加到请求中以发回 401 错误响应。因为,我们在使用 jwt 时也不需要维护会话变量,我们可以使会话成为STATELESS。
package com.spring.security.jwtbasic.config;
import org.springframework.beans.factory.annotation.Autowired;
import org.springframework.context.annotation.Bean;
import org.springframework.context.annotation.Configuration;
import org.springframework.security.authentication.AuthenticationManager;
import org.springframework.security.config.annotation.authentication.builders.AuthenticationManagerBuilder;
import org.springframework.security.config.annotation.web.builders.HttpSecurity;
import org.springframework.security.config.annotation.web.configuration.WebSecurityConfigurerAdapter;
import org.springframework.security.config.http.SessionCreationPolicy;
import org.springframework.security.core.userdetails.UserDetailsService;
import org.springframework.security.crypto.bcrypt.BCryptPasswordEncoder;
import org.springframework.security.crypto.password.PasswordEncoder;
import org.springframework.security.web.authentication.UsernamePasswordAuthenticationFilter;
import com.spring.security.jwtbasic.jwtutils.JwtAuthenticationEntryPoint;
import com.spring.security.jwtbasic.jwtutils.JwtFilter;
@Configuration
public class WebSecurityConfig extends WebSecurityConfigurerAdapter {
   @Autowired
   private JwtAuthenticationEntryPoint authenticationEntryPoint;
   @Autowired
   private UserDetailsService userDetailsService;
   @Autowired
   private JwtFilter filter;
   @Bean
   public PasswordEncoder passwordEncoder() {
      return new BCryptPasswordEncoder();
   }
   @Override
   protected void configure(AuthenticationManagerBuilder auth) throws Exception {
      auth.userDetailsService(userDetailsService).passwordEncoder(passwordEncoder());
   }
   @Bean
   @Override
   public AuthenticationManager authenticationManagerBean() throws
   Exception {
      return super.authenticationManagerBean();
   }
   @Override
   protected void configure(HttpSecurity http) throws Exception {
      http.csrf().disable()
      .authorizeRequests().antMatchers("/login").permitAll()
      .anyRequest().authenticated()
      .and()
      .exceptionHandling().authenticationEntryPoint(authenticationEntryPoint)
      .and()
      .sessionManagement().sessionCreationPolicy(SessionCreationPolicy.STATELESS);
      http.addFilterBefore(filter, UsernamePasswordAuthenticationFilter.class);
   }
}
正如我们所看到的,我们已经完成了所有这些,现在我们的应用程序已准备就绪。让我们启动应用程序并使用邮递员来发出我们的请求。
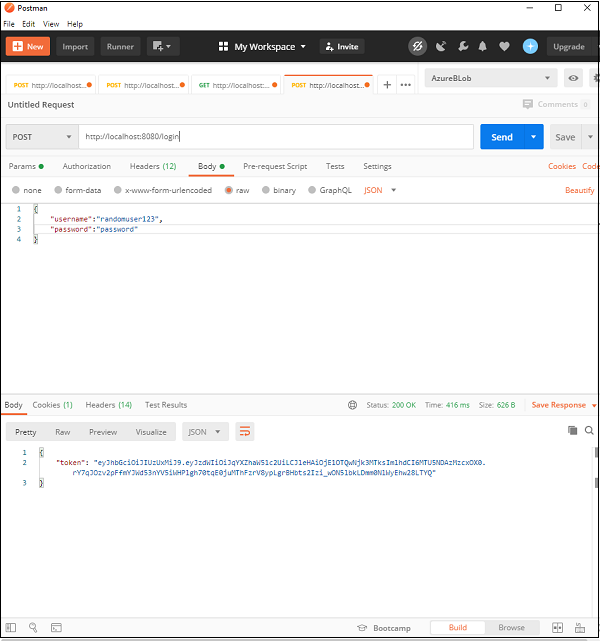
在这里,我们发出了第一个获取令牌的请求,正如我们所看到的,在提供正确的用户名/密码组合后,我们将取回令牌。
现在,在标头中使用该标记,让我们调用 /hello 端点。
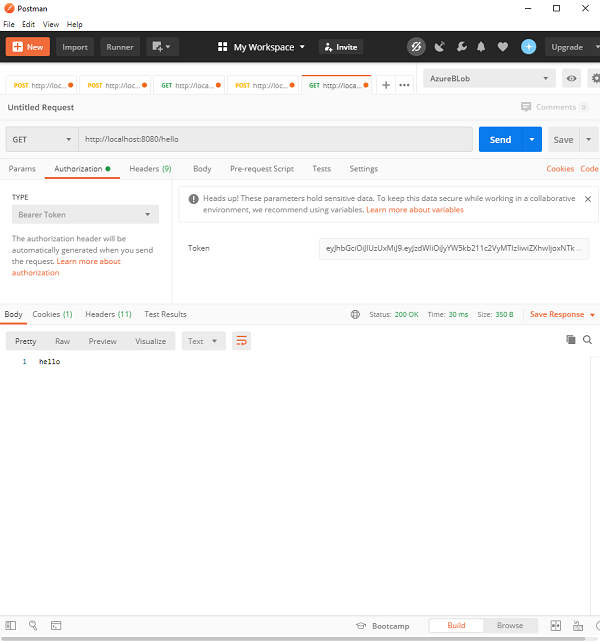
正如我们所看到的,由于请求已通过身份验证,我们得到了所需的响应。现在,如果我们篡改令牌或不发送 Authorization 标头,我们将收到应用程序中配置的 401 错误。这确保了使用 JWT 保护我们的请求。