- iOS教程
- iOS - 主页
- iOS - 入门
- iOS - 环境设置
- iOS - Objective-C 基础知识
- iOS - 第一个 iPhone 应用程序
- iOS - 操作和出口
- iOS - 代表
- iOS - UI 元素
- iOS - 加速度计
- iOS - 通用应用程序
- iOS - 相机管理
- iOS - 位置处理
- iOS-SQLite 数据库
- iOS - 发送电子邮件
- iOS - 音频和视频
- iOS - 文件处理
- iOS - 访问地图
- iOS - 应用内购买
- iOS - iAd 集成
- iOS - 游戏套件
- iOS - 故事板
- iOS - 自动布局
- iOS - 推特和脸书
- iOS - 内存管理
- iOS - 应用程序调试
- iOS 有用资源
- iOS - 快速指南
- iOS - 有用的资源
- iOS - 讨论
iOS - 快速指南
iOS - 入门
总体概述
iOS(以前称为 iPhone OS)是苹果公司开发的移动操作系统,其首次发布于 2007 年,适用于 iPhone 和 iPod Touch。iPad(第一代)于 2010 年 4 月发布,iPad Mini 于 2012 年 11 月发布。
iOS设备的更新非常频繁,根据经验,我们发现每年至少会推出一个版本的iPhone和iPad。现在,我们推出了iPhone5,其前身是iPhone、iPhone 3gs、iPhone 4、iPhone 4s。同样,iPad 也从 iPad(第一代)发展到 iPad(第四代)以及额外的 iPad Mini 版本。
iOS SDK已经从1.0发展到6.0。iOS 6.0,最新的 SDK 是 Xcode 4.5 及更高版本中唯一官方支持的版本。我们有丰富的Apple文档,我们可以根据我们的部署目标找到可以使用哪些方法和库。在当前版本的 Xcode 中,我们将能够在 iOS 4.3、5.0 和 6.0 的部署目标之间进行选择。
通过作为设备的一部分提供的以下一些功能,可以感受到 iOS 的强大功能。
- 地图
- 西里
- 脸书和推特
- 多点触摸
- 加速度计
- 全球定位系统
- 高端处理器
- 相机
- 苹果浏览器
- 强大的API
- 游戏中心
- 在应用程序内购买
- 提醒事项
- 广泛的手势
使用iPhone/iPad的用户数量大幅增加。这为开发者创造了通过在 Apple App Store 上为 iPhone 和 iPad 创建应用程序来赚钱的机会。
对于 iOS 新手来说,Apple 设计了一个应用程序商店,用户可以在其中购买为其 iOS 设备开发的应用程序。开发人员可以在 App Store 中创建免费和付费应用程序。要开发应用程序并分发到商店,开发人员需要注册 iOS 开发人员计划,每年费用为 99 美元,并需要一台配备 Mountain Lion 或更高版本的 Mac,以便使用最新的 Xcode 进行开发。
注册成为苹果开发者
如果您拥有任何 Apple 设备并且作为开发人员,您肯定需要它,那么 Apple ID 是最有必要的。它是免费的,因此拥有它没有任何问题。拥有 Apple 帐户的好处如下 -
访问开发工具。
全球开发者大会 (WWDC) 视频。
可以受邀加入 iOS 开发者计划团队。
要注册 Apple 帐户,请按照以下步骤操作 -
步骤 1 - 单击链接https://developer.apple.com/programs/register/并选择“创建 Apple ID”
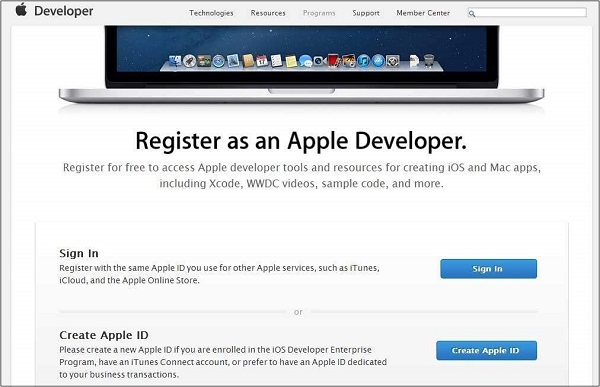
步骤 2 - 提供必要的信息,这些信息在页面中给出是不言自明的。
步骤 3 - 使用您的电子邮件验证来验证您的帐户,并且该帐户将变为活动状态。
步骤 4 - 现在您将能够下载 Xcode 等开发人员工具,它与 iOS 模拟器和 iOS SDK 一起打包,以及其他开发人员资源。
苹果 iOS 开发者计划
新开发者遇到的第一个问题是 – 为什么我应该注册 iOS 开发者计划?答案很简单; Apple 始终致力于为用户提供优质的应用程序。如果没有注册费,则可能会上传垃圾应用程序,从而给苹果的应用程序审核团队带来麻烦。
加入 iOS 开发者计划的好处如下:
在真实的 iOS 设备上运行您开发的应用程序。
将应用程序分发到应用程序商店。
访问开发者预览版。
加入 iOS 开发者计划的步骤如下 -
步骤 1 - 要注册,请单击链接 - (https://developer.apple.com/programs/ios/)。
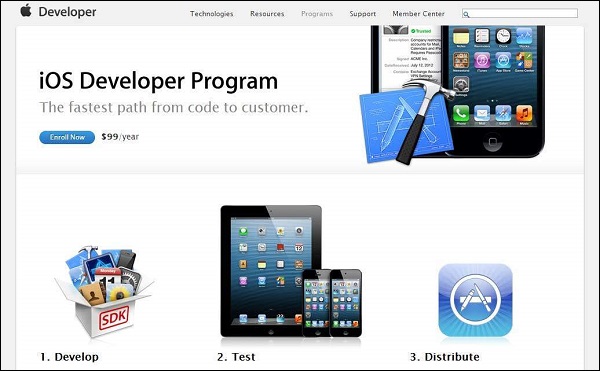
步骤 2 - 在显示的页面中单击立即注册。
步骤 3 - 您可以登录现有的 Apple 帐户(如果您有)或创建一个新的 Apple ID。
步骤 4 - 此后,您必须在个人帐户和公司帐户之间进行选择。如果您的团队中有多名开发人员,请使用公司帐户。个人账户无法添加会员。
步骤 5 - 输入个人信息后(对于新注册的用户),您可以使用信用卡付款(仅接受的付款方式)来购买并激活程序。
步骤 6 - 现在您将通过选择页面中的会员中心选项来访问开发人员资源。
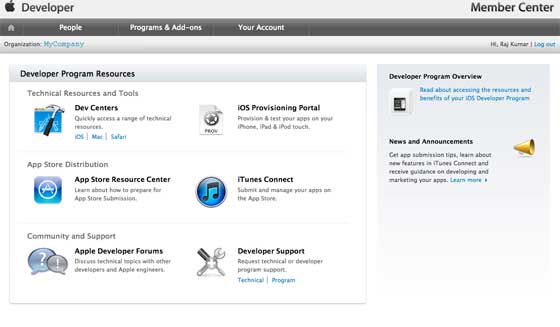
步骤 7 - 在这里您将能够执行以下操作 -
创建配置文件。
管理您的团队和设备。
通过 iTunes Connect 管理应用程序到应用程序商店。
获取论坛和技术支持。
iOS - 环境设置
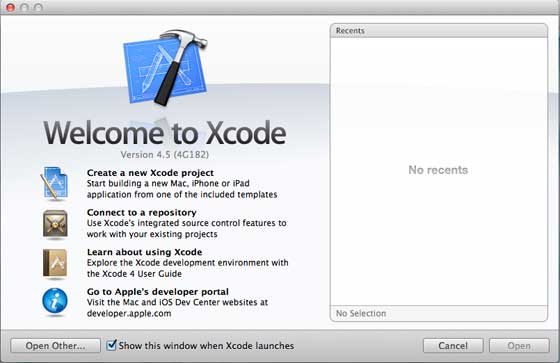
iOS - Xcode 安装
步骤 1 - 从https://developer.apple.com/downloads/下载最新版本的 Xcode
步骤 2 - 双击 Xcode dmg 文件。
步骤 3 - 您将发现一个已安装并打开的设备。
步骤 4 - 显示的窗口中将有两个项目,即 Xcode 应用程序和应用程序文件夹的快捷方式。
步骤 5 - 将 Xcode 拖到应用程序,它将复制到您的应用程序。
步骤 6 - 现在 Xcode 将作为其他应用程序的一部分提供,您可以从中选择并运行。
您还可以选择从 Mac 应用商店下载 Xcode,然后按照屏幕上给出的分步过程进行安装。
界面生成器
Interface Builder 是一个可以轻松创建 UI 界面的工具。您拥有一组丰富的 UI 元素,可供使用而开发。您只需拖放到 UI 视图中即可。我们将在接下来的页面中了解如何添加 UI 元素、为 UI 元素创建出口和操作。

右下角有对象库,其中包含整个必要的 UI 元素。用户界面通常称为xibs,这是其文件扩展名。每个 xib 都链接到相应的视图控制器。
iOS模拟器
iOS模拟器实际上由两种类型的设备组成,即iPhone和iPad,它们的版本不同。iPhone版本包括iPhone(普通)、iPhone Retina、iPhone 5。iPad有iPad和iPad Retina。下面显示了 iPhone 模拟器的屏幕截图。
您可以在 iOS 模拟器中模拟位置,以体验应用程序的纬度和经度效果。您还可以在模拟器中模拟内存警告和通话状态。您可以将模拟器用于大多数用途,但是您无法测试加速度计等设备功能。因此,您可能总是需要一台 iOS 设备来彻底测试应用程序的所有场景。
iOS-目标C
iOS开发中使用的语言是objective C。它是一种面向对象的语言,因此对于那些有一定面向对象编程语言背景的人来说会很容易。
接口与实现
在 Objective C 中,声明类的文件称为接口文件,定义类的文件称为实现文件。
一个简单的接口文件MyClass.h如下所示 -
@interface MyClass:NSObject {
   // class variable declared here
}

// class properties declared here
// class methods and instance methods declared here
@end
实现文件MyClass.m如下 -
@implementation MyClass
   // class methods defined here
@end
对象创建
对象创建如下:
MyClass *objectName = [[MyClass alloc]init] ;
方法
方法在 Objective C 中声明如下:
-(returnType)methodName:(typeName) variable1 :(typeName)variable2;
一个例子如下所示。
-(void)calculateAreaForRectangleWithLength:(CGfloat)length
andBreadth:(CGfloat)breadth;
您可能想知道andBreadth字符串的用途;实际上它是一个可选字符串,它可以帮助我们轻松阅读和理解该方法,特别是在调用时。要在同一个类中调用此方法,我们使用以下语句 -
[self calculateAreaForRectangleWithLength:30 andBreadth:20];
如上所述,andBreadth的使用帮助我们理解宽度是20。Self用于指定它是一个类方法。
类方法
可以直接访问类方法,无需为类创建对象。它们没有任何与之关联的变量和对象。一个例子如下所示。
+(void)simpleClassMethod;
可以通过使用类名(假设类名为 MyClass)来访问它,如下所示 -
[MyClass simpleClassMethod];
实例方法
只有在为类创建对象后才能访问实例方法。内存分配给实例变量。下面显示了一个示例实例方法。
-(void)simpleInstanceMethod;
为类创建对象后可以访问它,如下所示 -
MyClass  *objectName = [[MyClass alloc]init] ;
[objectName simpleInstanceMethod];
Objective C 中的重要数据类型
| 先生。 | 数据类型 |
|---|---|
| 1 | NS字符串 它用于表示字符串。 |
| 2 | CG浮动 它用于表示浮点值(也允许使用普通浮点数,但最好使用 CGfloat)。 |
| 3 | NS整数 它用于表示整数。 |
| 4 | 布尔值 它用于表示布尔值(YES 或 NO 是允许的 BOOL 类型)。 |
打印日志
NSLog - 用于打印语句。它将分别在发布和调试模式下打印在设备日志和调试控制台中。例如,
NSlog(@"");
控制结构
大多数控制结构与 C 和 C++ 中的相同,除了一些添加内容(例如 for in 语句)。
特性
对于外部类访问该类,使用变量属性。例如,
@property(nonatomic , strong) NSString *myString;
访问属性
您可以使用点运算符来访问属性。要访问上述属性,我们将执行以下操作。
self.myString = @"Test";
您还可以使用 set 方法,如下所示 -
[self setMyString:@"Test"];
类别
类别用于向现有类添加方法。通过这种方式,我们可以将方法添加到我们甚至没有定义实际类的实现文件的类中。我们班级的样本类别如下 -
@interface MyClass(customAdditions)
- (void)sampleCategoryMethod;
@end

@implementation MyClass(categoryAdditions)

-(void)sampleCategoryMethod {
   NSLog(@"Just a test category");
}
数组
NSMutableArray 和 NSArray 是 Objective C 中使用的数组类。顾名思义,前者是可变的,后者是不可变的。一个例子如下所示。
NSMutableArray *aMutableArray = [[NSMutableArray alloc]init];
[anArray addObject:@"firstobject"];
NSArray *aImmutableArray = [[NSArray alloc]
initWithObjects:@"firstObject",nil];
字典
NSMutableDictionary 和 NSDictionary 是 Objective C 中使用的字典类。顾名思义,前者是可变的,后者是不可变的。一个例子如下所示。
NSMutableDictionary *aMutableDictionary = [[NSMutableArray alloc]init];
[aMutableDictionary setObject:@"firstobject" forKey:@"aKey"];
NSDictionary*aImmutableDictionary= [[NSDictionary alloc]initWithObjects:[NSArray arrayWithObjects:
@"firstObject",nil] forKeys:[ NSArray arrayWithObjects:@"aKey"]];
iOS - 第一个 iPhone 应用程序
创建第一个应用程序
现在我们将创建一个简单的单视图应用程序(一个空白应用程序),它将在 iOS 模拟器上运行。
步骤如下。
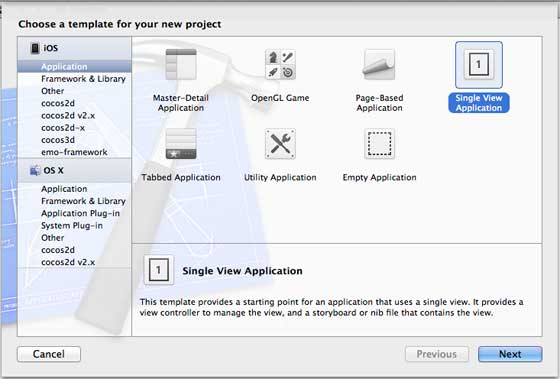
步骤 1 - 打开 Xcode 并选择创建新的 Xcode 项目。
步骤 2 - 选择“单一视图应用程序”。
步骤 3 - 输入产品名称,即应用程序名称、组织名称,然后输入公司标识符。
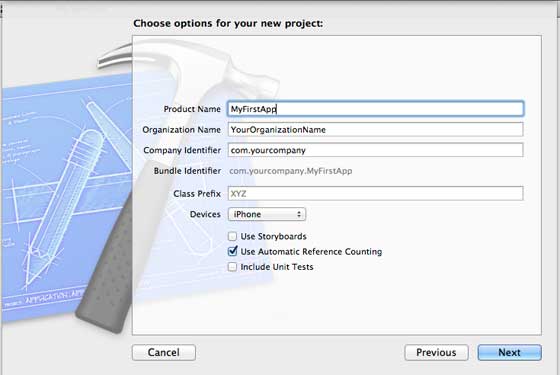
步骤 4 - 确保选择“使用自动引用计数”,以便在超出范围时自动释放分配的资源。点击下一步。
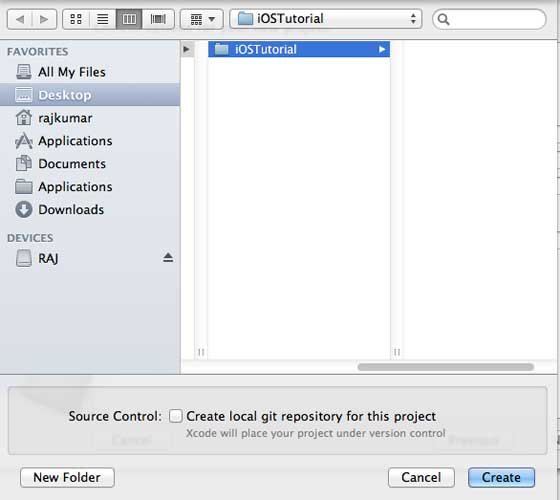
步骤 5 - 选择项目的目录并选择创建。
步骤 6 - 您将看到如下屏幕 -
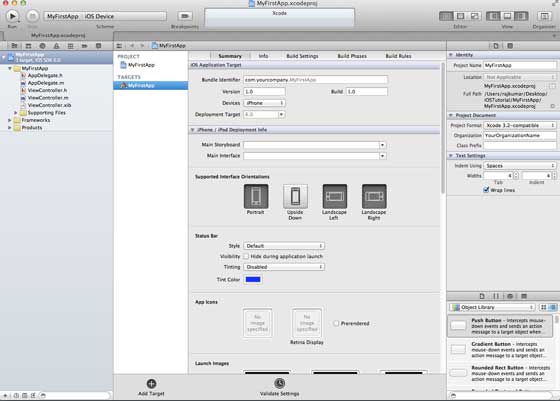
在上面的屏幕中,您将能够选择支持的方向、构建和发布设置。有一个现场部署目标,我们要支持的设备版本,让我们选择4.3,这是现在允许的最低部署目标。目前,这些都不是必需的,让我们专注于运行应用程序。
步骤 7 - 现在,在“运行”按钮附近的下拉列表中选择“iPhone 模拟器”,然后选择“运行”。

第 8 步- 就是这样;您已成功运行您的第一个应用程序。您将得到如下输出 -
现在让我们更改背景颜色,以便开始使用界面生成器。选择ViewController.xib。选择右侧的背景选项,更改颜色并运行。
在上面的项目中,默认情况下,部署目标将设置为 iOS 6.0,并且将启用自动布局。为了确保我们的应用程序在 iOS 4.3 及以上版本的设备上运行,我们已经在创建此应用程序时修改了部署目标,但我们没有禁用自动布局。
要禁用自动布局,我们需要在每个 nib(即 xib 文件)的文件检查器中取消选择自动布局复选框。下图给出了 Xcode 项目 IDE 的各个部分(由 Apple Xcode 4 用户文档提供)。

文件检查器位于检查器选择器栏中,如上所示,并且可以在那里取消选中自动布局。当您只想定位 iOS 6 设备时,可以使用自动布局。此外,如果将部署目标提高到 iOS 6,您将能够使用许多新功能,例如存折。现在,我们坚持使用 iOS 4.3 作为部署目标。
第一个 iOS 应用程序的代码
您将发现为您的应用程序生成的五个不同文件。它们列出如下 -
- AppDelegate.h
- AppDelegate.m
- 视图控制器.h
- 视图控制器.m
- 视图控制器.xib
AppDelegate.h
// Header File that provides all UI related items.
#import <UIKit/UIKit.h>

// Forward declaration (Used when class will be defined /imported in future)
@class ViewController;

// Interface for Appdelegate
@interface AppDelegate : UIResponder <UIApplicationDelegate>

// Property window
@property (strong, nonatomic) UIWindow *window;

// Property Viewcontroller

@property (strong, nonatomic) ViewController *viewController;
//this marks end of interface
@end
代码中的重要项目-
AppDelegate继承自处理iOS事件的UIResponder。
实现 UIApplicationDelegate 的委托方法,提供关键的应用程序事件,如完成启动、即将终止等。
UIWindow 对象来管理和协调 iOS 设备屏幕上的各种视图。它就像加载所有其他视图的基础视图。一般来说,一个应用程序只有一个窗口。
UIViewController 来处理屏幕流。
AppDelegate.m
// Imports the class Appdelegate's interface
import "AppDelegate.h"

// Imports the viewcontroller to be loaded
#import "ViewController.h"

// Class definition starts here
@implementation AppDelegate


// Method to intimate us that the application launched successfully
- (BOOL)application:(UIApplication *)application
didFinishLaunchingWithOptions:(NSDictionary *)launchOptions {
   self.window = [[UIWindow alloc] initWithFrame:[[UIScreen mainScreen] bounds]];

   // Override point for customization after application launch.
   self.viewController = [[ViewController alloc]
   initWithNibName:@"ViewController" bundle:nil];
   self.window.rootViewController = self.viewController;
   [self.window makeKeyAndVisible];
   return YES;
}

- (void)applicationWillResignActive:(UIApplication *)application {
   /* Use this method to release shared resources, save user data,
   invalidate timers, and store enough application state information
   to restore your application to its current state in case it is
   terminated later. If your application supports background
   execution, this method is called instead of
   applicationWillTerminate: when the user quits.*/
}

- (void)applicationWillEnterForeground:(UIApplication *)application {
   /* Called as part of the transition from the background to the
   inactive state. Here you can undo many of the changes made on
   entering the background.*/
}

- (void)applicationDidBecomeActive:(UIApplication *)application {
   /* Restart any tasks that were paused (or not yet started) while
   the application was inactive. If the application was previously in
   the background, optionally refresh the user interface.*/
}

- (void)applicationWillTerminate:(UIApplication *)application {
   /* Called when the application is about to terminate. Save data if
   appropriate. See also applicationDidEnterBackground:. */
}

- (void)applicationWillTerminate:(UIApplication *)application {
   /* Called when the application is about to terminate. Save data if appropriate.
   See also applicationDidEnterBackground:. */
}
@end
代码中的重要项目-
UIApplication 委托在这里定义。上面定义的所有方法都是 UI 应用程序委托,不包含用户定义的方法。
UIWindow对象被分配来保存应用程序分配的。
UIViewController 被分配为窗口的初始视图控制器。
为了使窗口可见,调用 makeKeyAndVisible 方法。
视图控制器.h
#import <UIKit/UIKit.h>

// Interface for class ViewController
@interface ViewController : UIViewController

@end
代码中的重要项目-
ViewController 类继承了 UIViewController,它为 iOS 应用程序提供了基本的视图管理模型。
视图控制器.m
#import "ViewController.h"

// Category, an extension of ViewController class
@interface ViewController ()

@end

@implementation ViewController

- (void)viewDidLoad {
   [super viewDidLoad];
   // Do any additional setup after loading the view, typically from a nib.
}

- (void)didReceiveMemoryWarning {
   [super didReceiveMemoryWarning];
   // Dispose of any resources that can be recreated.
}
@end
代码中的重要项目-
这里实现的两个方法是在基类 UIViewController 中定义的。
在视图加载后调用的 viewDidLoad 中进行初始设置。
didReceiveMemoryWarning 方法在出现内存警告时被调用。
iOS - 操作和出口
iOS 中的操作和出口分别称为ibActions和ibOutlets,其中ib代表界面构建器。这些与 UI 元素相关,我们将在直观地了解如何实现它们后对其进行探索。
行动和出路——涉及的步骤
步骤 1 - 让我们使用我们的第一个 iPhone 应用程序。
步骤 2 - 从导航器部分的文件中选择 ViewController.xib 文件。
步骤 3 - 现在,您可以从窗口右侧的库窗格中选择 UI 元素,如下所示。
步骤 4 - 您可以将 UI 元素拖放到界面生成器中的视图中。
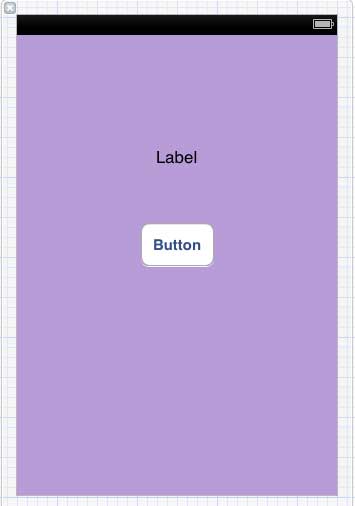
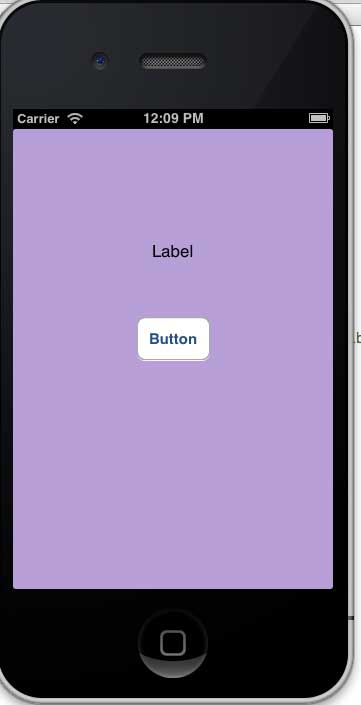
步骤 5 - 让我们向视图添加标签和圆角矩形按钮。
步骤 6 - 从右上角的工作区工具栏中的编辑器选择器按钮,如下所示。
选择助理编辑器按钮。
步骤 7 - 我们将在中间的编辑器区域看到两个窗口,一个是 ViewController.xib 文件,另一个是 ViewController.h。
步骤 8 - 现在,右键单击标签并选择、按住并拖动新的参考插座,如下所示。
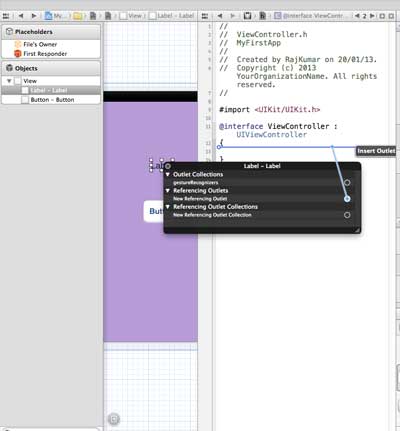
步骤 9 - 将 ViewController.h 放入大括号之间。如果文件中没有大括号,请在执行此操作之前添加 ViewController。您会发现一个弹出窗口,如下所示。

步骤 10 - 输入插座的标签名称,这里我们使用标签 myTitleLabel。点击connect,ibOutlet就完成了。
步骤 11 - 类似地,要添加操作,请右键单击圆形矩形按钮,选择内部修饰并将其拖动到大括号下方。
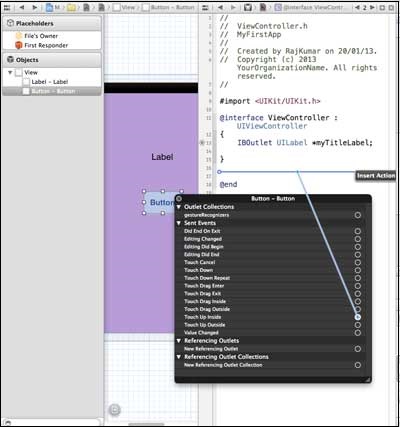
步骤 12 - 删除它并将其命名为 setTitleLabel。
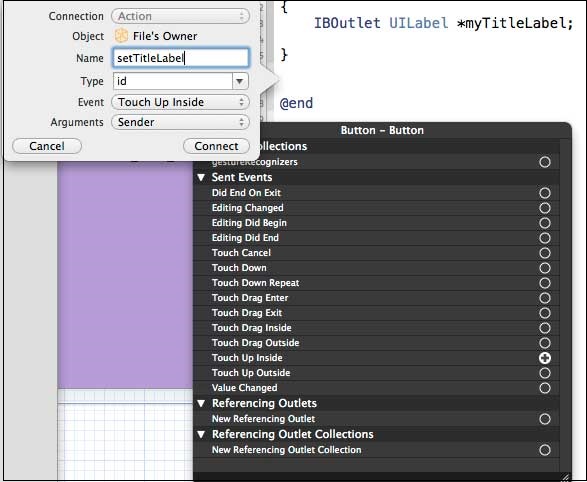
步骤 13 - 选择 ViewController.m 文件,您将找到如下所示的方法。
-(IBAction) setTitleLabel:(id)sender {
}
步骤 14 - 在上述方法中添加如下所示的语句。
[myTitleLabel setText:@"Hello"];
步骤 15 - 现在让我们通过选择运行按钮来运行程序。您将看到以下输出。
步骤 16 - 现在单击按钮。
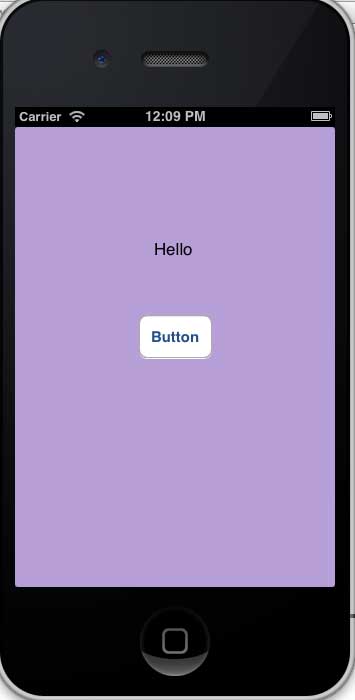
步骤 17 - 我们创建的标签已通过按钮上的操作更改。
步骤 18 - 从上面的示例中,我们可以得出结论,IBOutlet 创建了对 UIElement 的引用(此处为 UILabel)。类似地,IBAction 将 UIButton 与一个方法链接起来,该方法在内部触摸事件时调用。
步骤 19 - 您可以通过在创建操作时选择不同的事件来尝试操作。
iOS - 代表
代表示例
假设对象 A 调用对象 B 来执行操作。一旦操作完成,对象 A 应该知道 B 已完成任务并采取必要的操作。这是在代表的帮助下实现的。
上面例子中的关键概念是 -
A是B的委托对象。
B 将拥有 A 的引用。
A 将实现 B 的委托方法。
B将通过委托方法通知A。
创建委托的步骤
步骤 1 - 首先,创建一个单一视图应用程序。
步骤 2 - 然后选择文件 → 新建 → 文件...
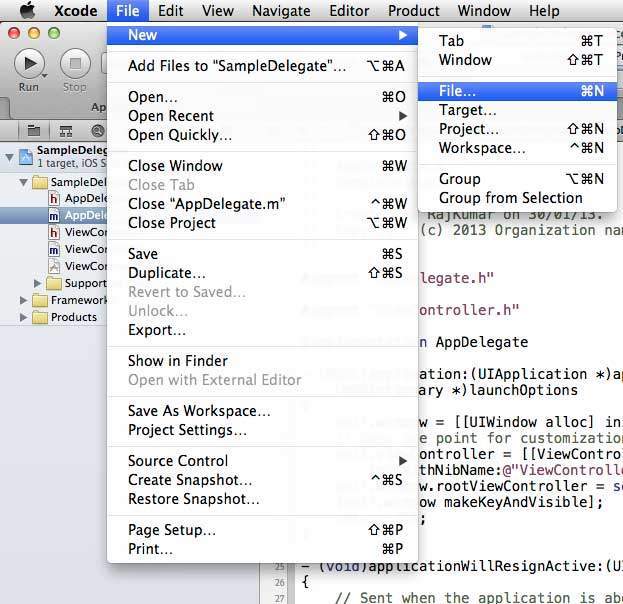
步骤 3 - 然后选择 Objective C Class 并单击 Next。
步骤 4 - 为该类命名,例如 SampleProtocol,其子类为 NSObject,如下所示。
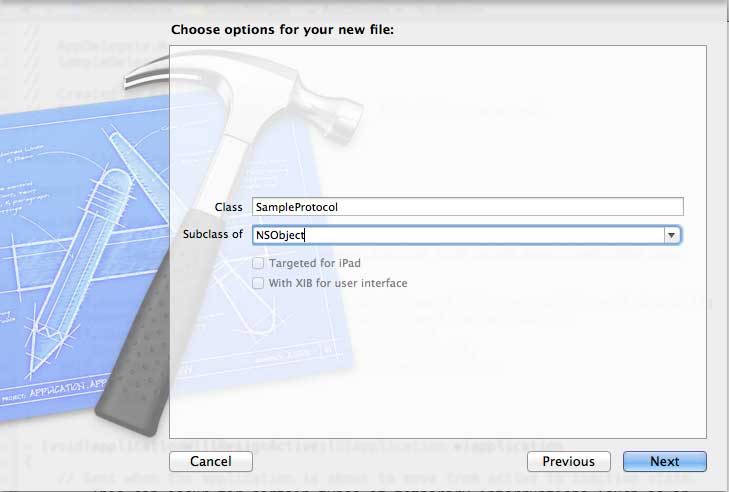
步骤 5 - 然后选择创建。
步骤 6 - 将协议添加到 SampleProtocol.h 文件,更新后的代码如下 -
#import <Foundation/Foundation.h>

// Protocol definition starts here
@protocol SampleProtocolDelegate <NSObject>
@required
- (void) processCompleted;
@end

// Protocol Definition ends here
@interface SampleProtocol : NSObject {
   // Delegate to respond back
   id <SampleProtocolDelegate> _delegate;
}
@property (nonatomic,strong) id delegate;

-(void)startSampleProcess; // Instance method
@end
步骤 7 - 通过更新 SampleProtocol.m 文件来实现实例方法,如下所示。
#import "SampleProtocol.h"

@implementation SampleProtocol

-(void)startSampleProcess {
   [NSTimer scheduledTimerWithTimeInterval:3.0 target:self.delegate
	selector:@selector(processCompleted) userInfo:nil repeats:NO];
}
@end
步骤 8 - 通过将标签从对象库拖动到 UIView 中,在 ViewController.xib 中添加 UILabel,如下所示。
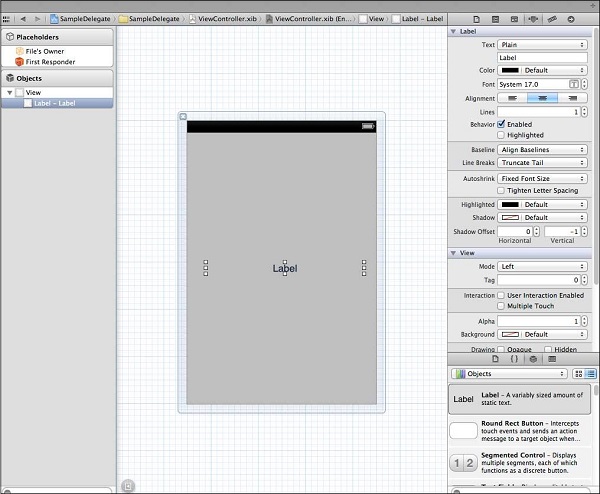
步骤 9 - 为标签创建一个 IBOutlet 并将其命名为 myLabel 并按如下方式更新代码以采用 ViewController.h 中的 SampleProtocolDelegate。
#import <UIKit/UIKit.h>
#import "SampleProtocol.h"

@interface ViewController : UIViewController<SampleProtocolDelegate> {
   IBOutlet UILabel *myLabel;
}
@end
步骤10实现委托方法,创建SampleProtocol对象并调用startSampleProcess方法。更新后的 ViewController.m 文件如下 -
#import "ViewController.h"

@interface ViewController ()

@end

@implementation ViewController

- (void)viewDidLoad {
   [super viewDidLoad];
   SampleProtocol *sampleProtocol = [[SampleProtocol alloc]init];
   sampleProtocol.delegate = self;
   [myLabel setText:@"Processing..."];
   [sampleProtocol startSampleProcess];
   // Do any additional setup after loading the view, typically from a nib.
}

- (void)didReceiveMemoryWarning {
   [super didReceiveMemoryWarning];
   // Dispose of any resources that can be recreated.
}

#pragma mark - Sample protocol delegate
-(void)processCompleted {
   [myLabel setText:@"Process Completed"];
}
@end
步骤 11我们将看到如下输出。最初,标签显示“处理...”,一旦 SampleProtocol 对象调用委托方法,该标签就会更新。

iOS - UI 元素
什么是 UI 元素?
UI 元素是我们在应用程序中可以看到的视觉元素。其中一些元素响应用户交互,例如按钮、文本字段,而其他元素则提供信息,例如图像、标签。
如何添加UI元素?
我们可以在代码中以及在界面生成器的帮助下添加 UI 元素。根据需要,我们可以使用其中之一。
我们的焦点
我们将更多地关注通过应用程序中的代码添加 UI 元素。使用界面生成器简单直接,我们只需拖放 UI 元素即可。
我们的方法
我们将创建一个简单的 iOS 应用程序并用它来解释一些 UI 元素。
步骤 1 - 创建一个基于视图的应用程序,就像我们在第一个 iOS 应用程序中所做的那样。
步骤 2 - 我们将仅更新 ViewController.h 和 ViewController.m 文件。
步骤 3 - 然后我们向 ViewController.m 文件添加一个特定于创建 UI 元素的方法。
步骤 4 - 我们将在 viewDidLoad 方法中调用此方法。
步骤 5 - 重要的代码行已在代码中进行了解释,并在这些行上方添加了单行注释。
UI 元素列表
UI 特定元素及其相关功能解释如下 -
| 先生。 | UI 特定元素 |
|---|---|
| 1 | 文本字段
它是一个 UI 元素,使应用程序能够获取用户输入。 |
| 2 | 输入类型 - 文本字段
我们可以使用 UITextField 的键盘属性来设置用户可以给出的输入类型。 |
| 3 | 纽扣
它用于处理用户操作。 |
| 4 | 标签
它用于显示静态内容。 |
| 5 | 工具栏
如果我们想根据当前视图操纵某些东西,则可以使用它。 |
| 6 | 状态栏
显示设备的关键信息。 |
| 7 | 导航栏
它包含导航控制器的导航按钮,导航控制器是一堆可以推送和弹出的视图控制器。 |
| 8 | 标签栏
它通常用于在同一视图内的各种子任务、视图或模型之间切换。 |
| 9 | 图像视图
它用于显示简单的图像或图像序列。 |
| 10 | 滚动视图
它用于显示超出屏幕面积的内容。 |
| 11 | 表格视图
它用于显示多行和多节中的可滚动数据列表。 |
| 12 | 拆分视图
它用于显示两个窗格,主窗格控制详细窗格上的信息。 |
| 13 | 文本视图
它用于显示可选择编辑的可滚动文本信息列表。 |
| 14 | 视图转换
它解释了视图之间的各种视图转换。 |
| 15 | 采摘者
它用于显示从列表中选择特定数据。 |
| 16 | 开关
它用作操作的禁用和启用。 |
| 17 号 | 滑块
它用于允许用户在允许的值范围内对值或过程进行调整。 |
| 18 | 警报
它用于向用户提供重要信息。 |
| 19 | 图标
它是用于操作或描述与应用程序相关的事物的图像表示。 |
iOS - 加速度计
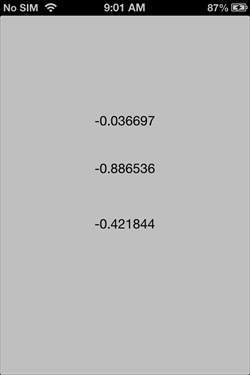
加速度计用于检测设备在x、y、z三个方向上的位置变化。我们可以知道设备当前相对于地面的位置。为了测试这个示例,您需要在设备上运行它,并且在模拟器上不起作用。
加速度计 – 涉及的步骤
步骤 1 - 创建一个简单的基于视图的应用程序。
步骤 2 - 在ViewController.xib中添加三个标签并创建 ibOutlet,将它们命名为 xlabel、ylabel 和 zlabel。
步骤 3 - 更新 ViewController.h 如下 -
#import <UIKit/UIKit.h>

@interface ViewController : UIViewController<UIAccelerometerDelegate> {
   IBOutlet UILabel *xlabel;
   IBOutlet UILabel *ylabel;
   IBOutlet UILabel *zlabel;
}
@end
步骤 4 - 更新ViewController.m如下 -
#import "ViewController.h"

@interface ViewController ()
@end

@implementation ViewController

- (void)viewDidLoad {
   [super viewDidLoad];
   [[UIAccelerometer sharedAccelerometer]setDelegate:self];
   //Do any additional setup after loading the view,typically from a nib
}

- (void)didReceiveMemoryWarning {
   [super didReceiveMemoryWarning];
   // Dispose of any resources that can be recreated.
}

- (void)accelerometer:(UIAccelerometer *)accelerometer didAccelerate:
   (UIAcceleration *)acceleration {
   [xlabel setText:[NSString stringWithFormat:@"%f",acceleration.x]];
   [ylabel setText:[NSString stringWithFormat:@"%f",acceleration.y]];
   [zlabel setText:[NSString stringWithFormat:@"%f",acceleration.z]];
}
@end
输出
当我们在iPhone设备中运行该应用程序时,我们将得到以下输出 -
iOS - 通用应用程序
通用应用程序是在单个二进制文件中为 iPhone 和 iPad 设计的应用程序。通用应用程序允许代码重用和快速更新。
普遍应用——涉及的步骤
步骤 1 - 创建一个简单的基于视图的应用程序。
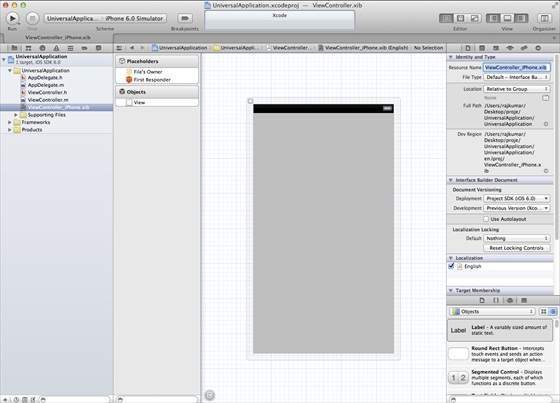
步骤 2 - 将文件名ViewController.xib文件更改为ViewController_iPhone.xib,如下所示,在右侧的文件检查器中。
步骤 3 - 选择文件→新建→文件...,然后选择“用户界面”小节并选择查看。点击下一步。

步骤 4 - 选择设备系列为iPad,然后单击下一步。
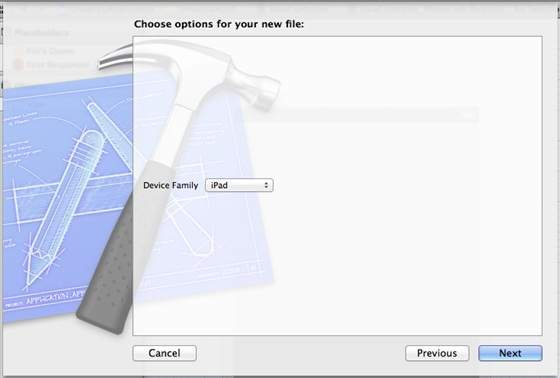
步骤 5 - 将文件保存为ViewController_iPad.xib并选择“创建”。
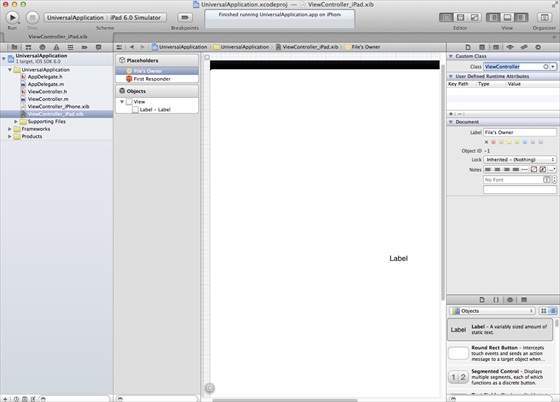
步骤 6 - 在ViewController_iPhone.xib和ViewController_iPad.xib的屏幕中央添加标签。
步骤 7 - 在ViewController_iPad.xib中,选择身份检查器并将自定义类设置为ViewController。
步骤 8 - 更新 AppDelegate.m 中的 application:DidFinishLaunching:withOptions 方法,如下所示 -
- (BOOL)application:(UIApplication *)application
   didFinishLaunchingWithOptions:(NSDictionary *)launchOptions {
   self.window = [[UIWindow alloc] initWithFrame:[[UIScreen
   mainScreen] bounds]];

   // Override point for customization after application launch.
   if (UI_USER_INTERFACE_IDIOM() == UIUserInterfaceIdiomPhone) {
      self.viewController = [[ViewController alloc]
      initWithNibName:@"ViewController_iPhone" bundle:nil];
   } else {
      self.viewController = [[ViewController alloc] initWithNibName:
      @"ViewController_iPad" bundle:nil];
   }
   self.window.rootViewController = self.viewController;
   [self.window makeKeyAndVisible];
   return YES;
}
步骤 9 - 将项目摘要中的设备更新为通用,如下所示 -
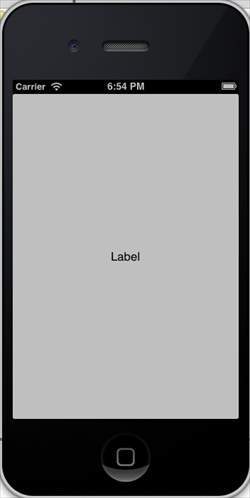
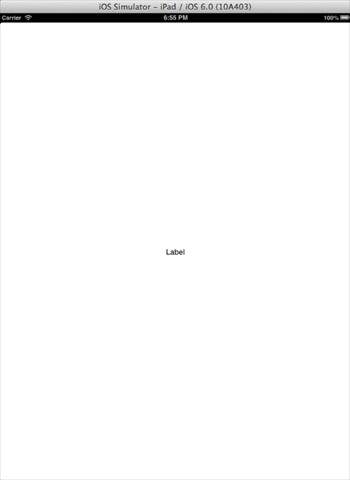
输出
当我们运行该应用程序时,我们将得到以下输出 -
当我们在 iPad 模拟器中运行该应用程序时,我们将得到以下输出 -
iOS - 相机管理
相机是移动设备的常见功能之一。我们可以用相机拍照并在我们的应用程序中使用它,而且也很简单。
相机管理 - 涉及的步骤
步骤 1 - 创建一个简单的基于视图的应用程序。
步骤 2 -在ViewController.xib中添加一个按钮并为该按钮创建 IBAction。
步骤 3 - 添加图像视图并创建 IBOutlet,将其命名为 imageView。
步骤 4 - 更新ViewController.h如下 -
#import <UIKit/UIKit.h>

@interface ViewController : UIViewController<UIImagePickerControllerDelegate> {
   UIImagePickerController *imagePicker;
   IBOutlet UIImageView *imageView;
}

- (IBAction)showCamera:(id)sender;
@end
步骤 5 - 更新ViewController.m如下 -
#import "ViewController.h"

@interface ViewController ()
@end

@implementation ViewController

- (void)viewDidLoad {
   [super viewDidLoad];
}

- (void)didReceiveMemoryWarning {
   [super didReceiveMemoryWarning];
   // Dispose of any resources that can be recreated.
}

- (IBAction)showCamera:(id)sender {
   imagePicker.allowsEditing = YES;

   if ([UIImagePickerController isSourceTypeAvailable:
   UIImagePickerControllerSourceTypeCamera]) {
      imagePicker.sourceType = UIImagePickerControllerSourceTypeCamera;
   } else {
      imagePicker.sourceType =
      UIImagePickerControllerSourceTypePhotoLibrary;
   }
   [self presentModalViewController:imagePicker animated:YES];
}

-(void)imagePickerController:(UIImagePickerController *)picker
   didFinishPickingMediaWithInfo:(NSDictionary *)info {
      UIImage *image = [info objectForKey:UIImagePickerControllerEditedImage];

      if (image == nil) {
         image = [info objectForKey:UIImagePickerControllerOriginalImage];
      }
   imageView.image = image;
}

-(void)imagePickerControllerDidCancel:(UIImagePickerController *)picker {
   [self dismissModalViewControllerAnimated:YES];
}
@end
输出
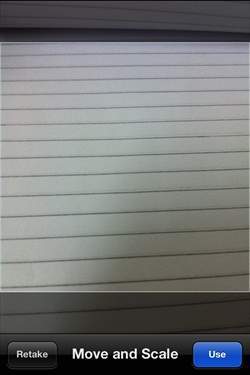
当我们运行应用程序并单击“显示相机”按钮时,我们将得到以下输出 -

拍照后,我们可以编辑图片,即移动和缩放,如下所示 -
iOS - 位置处理
只要用户允许应用程序在核心位置框架的帮助下访问该信息,我们就可以轻松地在 iOS 中定位用户的当前位置。
位置处理 - 涉及的步骤
步骤 1 - 创建一个简单的基于视图的应用程序。
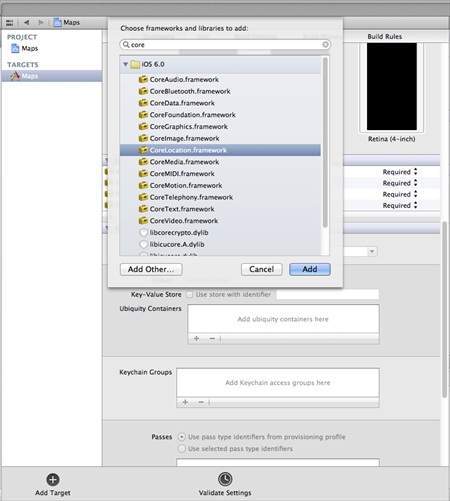
步骤 2 - 选择您的项目文件,然后选择目标,然后添加 CoreLocation.framework,如下所示 -
步骤 3 - 在ViewController.xib中添加两个标签并创建 ibOutlet,分别将标签命名为latitudeLabel和longitudeLabel。
步骤 4 - 通过选择文件 → 新建 → 文件... → 选择Objective C 类并单击下一步来创建新文件。
步骤 5 - 将类命名为LocationHandler,“子类”为 NSObject。
步骤 6 - 选择创建。
步骤 7 - 更新LocationHandler.h如下 -
#import <Foundation/Foundation.h>
#import <CoreLocation/CoreLocation.h>

@protocol LocationHandlerDelegate <NSObject>

@required
-(void) didUpdateToLocation:(CLLocation*)newLocation
   fromLocation:(CLLocation*)oldLocation;
@end

@interface LocationHandler : NSObject<CLLocationManagerDelegate> {
   CLLocationManager *locationManager;
}
@property(nonatomic,strong) id<LocationHandlerDelegate> delegate;

+(id)getSharedInstance;
-(void)startUpdating;
-(void) stopUpdating;

@end
步骤 8 - 更新LocationHandler.m如下 -
#import "LocationHandler.h"
static LocationHandler *DefaultManager = nil;

@interface LocationHandler()

-(void)initiate;

@end

@implementation LocationHandler

+(id)getSharedInstance{
   if (!DefaultManager) {
      DefaultManager = [[self allocWithZone:NULL]init];
      [DefaultManager initiate];
   }
   return DefaultManager;
}

-(void)initiate {
   locationManager = [[CLLocationManager alloc]init];
   locationManager.delegate = self;
}

-(void)startUpdating{
   [locationManager startUpdatingLocation];
}

-(void) stopUpdating {
   [locationManager stopUpdatingLocation];
}

-(void)locationManager:(CLLocationManager *)manager didUpdateToLocation:
   (CLLocation *)newLocation fromLocation:(CLLocation *)oldLocation {
   if ([self.delegate respondsToSelector:@selector
   (didUpdateToLocation:fromLocation:)]) {
      [self.delegate didUpdateToLocation:oldLocation
      fromLocation:newLocation];
   }
}
@end
步骤 9 -如下更新ViewController.h ,我们已实现LocationHandler 委托并创建两个 ibOutlet -
#import <UIKit/UIKit.h>
#import "LocationHandler.h"

@interface ViewController : UIViewController<LocationHandlerDelegate> {
   IBOutlet UILabel *latitudeLabel;
   IBOutlet UILabel *longitudeLabel;
}
@end
步骤 10 - 更新ViewController.m如下 -
#import "ViewController.h"

@interface ViewController ()
@end

@implementation ViewController

- (void)viewDidLoad {
   [super viewDidLoad];
   [[LocationHandler getSharedInstance]setDelegate:self];
   [[LocationHandler getSharedInstance]startUpdating];
}

- (void)didReceiveMemoryWarning {
   [super didReceiveMemoryWarning];
   // Dispose of any resources that can be recreated.
}

-(void)didUpdateToLocation:(CLLocation *)newLocation
 fromLocation:(CLLocation *)oldLocation {
   [latitudeLabel setText:[NSString stringWithFormat:
   @"Latitude: %f",newLocation.coordinate.latitude]];
   [longitudeLabel setText:[NSString stringWithFormat:
   @"Longitude: %f",newLocation.coordinate.longitude]];
}
@end
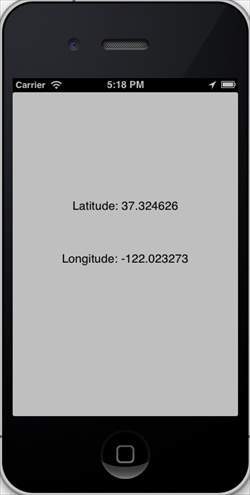
输出
当我们运行该应用程序时,我们将得到以下输出 -
iOS-SQLite 数据库
SQLite 可在 iOS 中用于处理数据。它使用 sqlite 查询,这对于了解 SQL 的人来说更容易。
涉及的步骤
步骤 1 - 创建一个简单的基于视图的应用程序。
步骤 2 - 选择您的项目文件,然后选择目标,然后在选择框架中添加libsqlite3.dylib库。
步骤 3 - 通过选择文件→新建→文件...→选择Objective C 类并单击下一步来创建新文件。
步骤 4 - 将类命名为DBManager,“子类”为 NSObject。
步骤 5 - 选择创建。
步骤 6 - 更新DBManager.h如下 -
#import <Foundation/Foundation.h>
#import <sqlite3.h>

@interface DBManager : NSObject {
   NSString *databasePath;
}

+(DBManager*)getSharedInstance;
-(BOOL)createDB;
-(BOOL) saveData:(NSString*)registerNumber name:(NSString*)name
   department:(NSString*)department year:(NSString*)year;
-(NSArray*) findByRegisterNumber:(NSString*)registerNumber;

@end
步骤 7 - 更新DBManager.m如下 -
#import "DBManager.h"
static DBManager *sharedInstance = nil;
static sqlite3 *database = nil;
static sqlite3_stmt *statement = nil;

@implementation DBManager

+(DBManager*)getSharedInstance {
   if (!sharedInstance) {
      sharedInstance = [[super allocWithZone:NULL]init];
      [sharedInstance createDB];
   }
   return sharedInstance;
}

-(BOOL)createDB {
   NSString *docsDir;
   NSArray *dirPaths;

   // Get the documents directory
   dirPaths = NSSearchPathForDirectoriesInDomains
   (NSDocumentDirectory, NSUserDomainMask, YES);
   docsDir = dirPaths[0];

   // Build the path to the database file
   databasePath = [[NSString alloc] initWithString:
   [docsDir stringByAppendingPathComponent: @"student.db"]];
   BOOL isSuccess = YES;
   NSFileManager *filemgr = [NSFileManager defaultManager];

   if ([filemgr fileExistsAtPath: databasePath ] == NO) {
      const char *dbpath = [databasePath UTF8String];
      if (sqlite3_open(dbpath, &database) == SQLITE_OK) {
         char *errMsg;
         const char *sql_stmt =
         "create table if not exists studentsDetail (regno integer
         primary key, name text, department text, year text)";

         if (sqlite3_exec(database, sql_stmt, NULL, NULL, &errMsg) != SQLITE_OK) {
            isSuccess = NO;
            NSLog(@"Failed to create table");
         }
         sqlite3_close(database);
         return  isSuccess;
      } else {
         isSuccess = NO;
         NSLog(@"Failed to open/create database");
      }
   }
   return isSuccess;
}

- (BOOL) saveData:(NSString*)registerNumber name:(NSString*)name
   department:(NSString*)department year:(NSString*)year; {
   const char *dbpath = [databasePath UTF8String];

   if (sqlite3_open(dbpath, &database) == SQLITE_OK) {
      NSString *insertSQL = [NSString stringWithFormat:@"insert into
      studentsDetail (regno,name, department, year) values
      (\"%d\",\"%@\", \"%@\", \"%@\")",[registerNumber integerValue],
      name, department, year];
      const char *insert_stmt = [insertSQL UTF8String];
      sqlite3_prepare_v2(database, insert_stmt,-1, &statement, NULL);

      if (sqlite3_step(statement) == SQLITE_DONE) {
         return YES;
      } else {
         return NO;
      }
      sqlite3_reset(statement);
   }
   return NO;
}

- (NSArray*) findByRegisterNumber:(NSString*)registerNumber {
   const char *dbpath = [databasePath UTF8String];

   if (sqlite3_open(dbpath, &database) == SQLITE_OK) {
      NSString *querySQL = [NSString stringWithFormat:
      @"select name, department, year from studentsDetail where
      regno=\"%@\"",registerNumber];
      const char *query_stmt = [querySQL UTF8String];
      NSMutableArray *resultArray = [[NSMutableArray alloc]init];

      if (sqlite3_prepare_v2(database, query_stmt, -1, &statement, NULL) == SQLITE_OK) {
         if (sqlite3_step(statement) == SQLITE_ROW) {
            NSString *name = [[NSString alloc] initWithUTF8String:
            (const char *) sqlite3_column_text(statement, 0)];
            [resultArray addObject:name];

            NSString *department = [[NSString alloc] initWithUTF8String:
            (const char *) sqlite3_column_text(statement, 1)];
            [resultArray addObject:department];

            NSString *year = [[NSString alloc]initWithUTF8String:
            (const char *) sqlite3_column_text(statement, 2)];
            [resultArray addObject:year];
            return resultArray;
         } else {
            NSLog(@"Not found");
            return nil;
         }
         sqlite3_reset(statement);
      }
   }
   return nil;
}
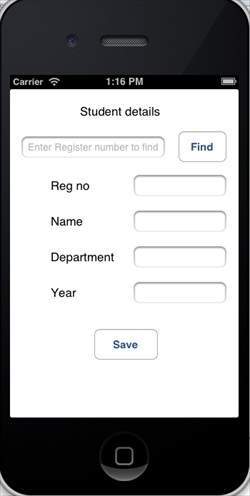
步骤 8 - 更新ViewController.xib文件如下 -
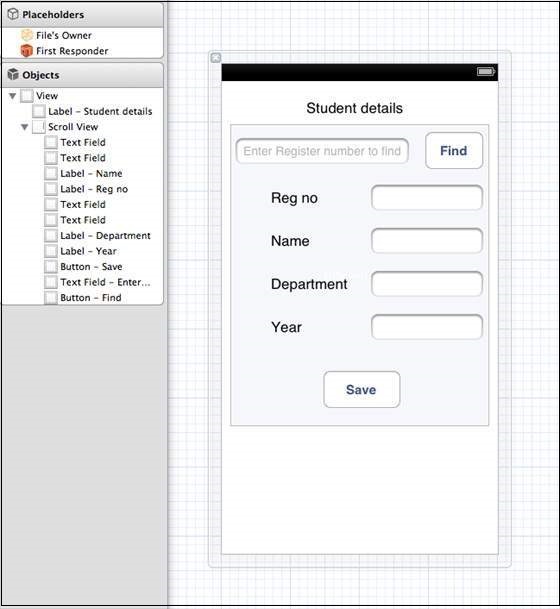
步骤 9 - 为上述文本字段创建 IBOutlet。
步骤 10 - 为上述按钮创建 IBAction。
步骤 11 - 更新ViewController.h如下 -
#import <UIKit/UIKit.h>
#import "DBManager.h"

@interface ViewController : UIViewController<UITextFieldDelegate> {
   IBOutlet UITextField *regNoTextField;
   IBOutlet UITextField *nameTextField;
   IBOutlet UITextField *departmentTextField;
   IBOutlet UITextField *yearTextField;
   IBOutlet UITextField *findByRegisterNumberTextField;
   IBOutlet UIScrollView *myScrollView;
}

-(IBAction)saveData:(id)sender;
-(IBAction)findData:(id)sender;
@end
步骤 12 - 更新ViewController.m如下 -
#import "ViewController.h"

@interface ViewController ()
@end

@implementation ViewController

- (id)initWithNibName:(NSString *)nibNameOrNil bundle:(NSBundle *)
   nibBundleOrNil {
   self = [super initWithNibName:nibNameOrNil bundle:nibBundleOrNil];

   if (self) {
      // Custom initialization
   }
   return self;
}

- (void)viewDidLoad {
   [super viewDidLoad];
   // Do any additional setup after loading the view from its nib.
}

- (void)didReceiveMemoryWarning {
   [super didReceiveMemoryWarning];
   // Dispose of any resources that can be recreated.
}

-(IBAction)saveData:(id)sender {
   BOOL success = NO;
   NSString *alertString = @"Data Insertion failed";

   if (regNoTextField.text.length>0 &&nameTextField.text.length>0 &&
      departmentTextField.text.length>0 &&yearTextField.text.length>0 ) {
      success = [[DBManager getSharedInstance]saveData:
      regNoTextField.text name:nameTextField.text department:
      departmentTextField.text year:yearTextField.text];
   } else {
      alertString = @"Enter all fields";
   }

   if (success == NO) {
      UIAlertView *alert = [[UIAlertView alloc]initWithTitle:
      alertString message:nil
      delegate:nil cancelButtonTitle:@"OK" otherButtonTitles:nil];
      [alert show];
   }
}

-(IBAction)findData:(id)sender {
   NSArray *data = [[DBManager getSharedInstance]findByRegisterNumber:
   findByRegisterNumberTextField.text];

   if (data == nil) {
      UIAlertView *alert = [[UIAlertView alloc]initWithTitle:
      @"Data not found" message:nil delegate:nil cancelButtonTitle:
      @"OK" otherButtonTitles:nil];
      [alert show];
      regNoTextField.text = @"";
      nameTextField.text =@"";
      departmentTextField.text = @"";
      yearTextField.text =@"";
   } else {
      regNoTextField.text = findByRegisterNumberTextField.text;
      nameTextField.text =[data objectAtIndex:0];
      departmentTextField.text = [data objectAtIndex:1];
      yearTextField.text =[data objectAtIndex:2];
   }
}

#pragma mark - Text field delegate
-(void)textFieldDidBeginEditing:(UITextField *)textField {
   [myScrollView setFrame:CGRectMake(10, 50, 300, 200)];
   [myScrollView setContentSize:CGSizeMake(300, 350)];
}

-(void)textFieldDidEndEditing:(UITextField *)textField {
   [myScrollView setFrame:CGRectMake(10, 50, 300, 350)];

}

-(BOOL) textFieldShouldReturn:(UITextField *)textField {
   [textField resignFirstResponder];
   return YES;
}
@end
输出
当我们运行应用程序时,我们将得到以下输出,我们可以在其中添加和查找学生详细信息 -
iOS - 发送电子邮件
我们可以使用iOS设备的电子邮件应用程序发送电子邮件。
涉及的步骤
步骤 1 - 创建一个简单的基于视图的应用程序。
步骤 2 - 选择您的项目文件,然后选择目标,然后添加MessageUI.framework。
步骤 3 - 在ViewController.xib中添加一个按钮并创建一个用于发送电子邮件的操作。
步骤 4 - 更新ViewController.h如下 -
#import <UIKit/UIKit.h>
#import <MessageUI/MessageUI.h>

@interface ViewController : UIViewController<MFMailComposeViewControllerDelegate> {
   MFMailComposeViewController *mailComposer;
}

-(IBAction)sendMail:(id)sender;

@end
步骤 5 - 更新ViewController.m如下 -
#import "ViewController.h"

@interface ViewController ()
@end

@implementation ViewController

- (void)viewDidLoad {
   [super viewDidLoad];
}

- (void)didReceiveMemoryWarning {
   [super didReceiveMemoryWarning];
   // Dispose of any resources that can be recreated.
}

-(void)sendMail:(id)sender {
   mailComposer = [[MFMailComposeViewController alloc]init];
   mailComposer.mailComposeDelegate = self;
   [mailComposer setSubject:@"Test mail"];
   [mailComposer setMessageBody:@"Testing message
   for the test mail" isHTML:NO];
   [self presentModalViewController:mailComposer animated:YES];
}

#pragma mark - mail compose delegate
-(void)mailComposeController:(MFMailComposeViewController *)controller
   didFinishWithResult:(MFMailComposeResult)result error:(NSError *)error{

   if (result) {
      NSLog(@"Result : %d",result);
   }

   if (error) {
      NSLog(@"Error : %@",error);
   }

   [self dismissModalViewControllerAnimated:YES];
}
@end
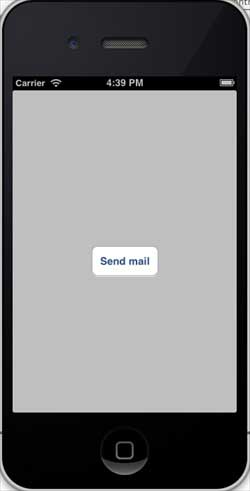
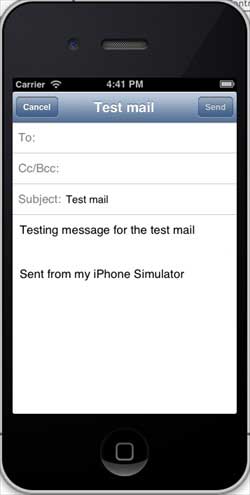
输出
当我们运行该应用程序时,我们将得到以下输出 -
单击“发送电子邮件”后,我们将得到以下输出 -
iOS - 音频和视频
音频和视频在最新的设备中非常常见。iOS 中分别通过AVFoundation.framework和MediaPlayer.framework对其进行支持。
涉及的步骤
步骤 1 - 创建一个简单的基于视图的应用程序。
步骤 2 - 选择您的项目文件,选择目标,然后我们应该添加AVFoundation.framework和MediaPlayer.framework。
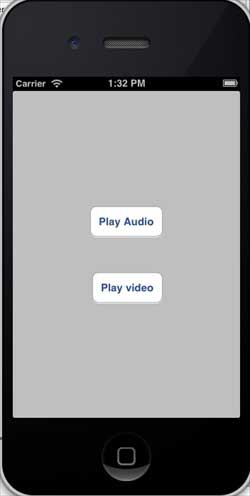
步骤 3 - 在 ViewController.xib 中添加两个按钮,并分别创建一个用于播放音频和视频的操作。
步骤 4 - 更新ViewController.h如下 -
#import <UIKit/UIKit.h>
#import <AVFoundation/AVFoundation.h>
#import <MediaPlayer/MediaPlayer.h>

@interface ViewController : UIViewController {
   AVAudioPlayer *audioPlayer;
   MPMoviePlayerViewController *moviePlayer;
}
-(IBAction)playAudio:(id)sender;
-(IBAction)playVideo:(id)sender;
@end
步骤 5 - 更新ViewController.m如下 -
#import "ViewController.h"

@interface ViewController ()
@end

@implementation ViewController

- (void)viewDidLoad {
   [super viewDidLoad];
}

- (void)didReceiveMemoryWarning {
   [super didReceiveMemoryWarning];
   // Dispose of any resources that can be recreated.
}

-(IBAction)playAudio:(id)sender {
   NSString *path = [[NSBundle mainBundle]
   pathForResource:@"audioTest" ofType:@"mp3"];
   audioPlayer = [[AVAudioPlayer alloc]initWithContentsOfURL:
   [NSURL fileURLWithPath:path] error:NULL];
   [audioPlayer play];
}

-(IBAction)playVideo:(id)sender {
   NSString *path = [[NSBundle mainBundle]pathForResource:
   @"videoTest" ofType:@"mov"];
   moviePlayer = [[MPMoviePlayerViewController
   alloc]initWithContentURL:[NSURL fileURLWithPath:path]];
   [self presentModalViewController:moviePlayer animated:NO];
}
@end
笔记
我们需要添加音频和视频文件以确保获得预期的输出。
输出
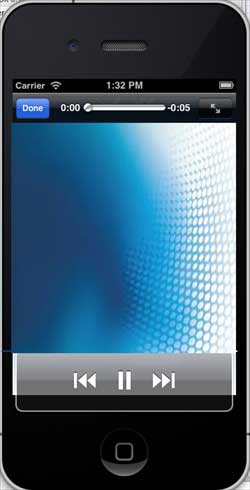
当我们运行该应用程序时,我们将得到以下输出 -
当我们点击播放视频时,我们将得到如下所示的输出 -
当我们点击播放音频时,您将听到音频。
iOS - 文件处理
文件处理无法用应用程序直观地解释,因此下面解释用于处理文件的关键方法。请注意,应用程序包仅具有读取权限,我们无法修改文件。您无论如何都可以修改应用程序的文档目录。
文件处理中使用的方法
下面讨论用于访问和操作文件的方法。这里我们必须将 FilePath1、FilePath2 和 FilePath 字符串替换为我们所需的完整文件路径以获得所需的操作。
检查路径中是否存在文件
NSFileManager *fileManager = [NSFileManager defaultManager];

//Get documents directory
NSArray *directoryPaths = NSSearchPathForDirectoriesInDomains
(NSDocumentDirectory, NSUserDomainMask, YES);
NSString *documentsDirectoryPath = [directoryPaths objectAtIndex:0];

if ([fileManager fileExistsAtPath:@""]==YES) {
   NSLog(@"File exists");
}
比较两个文件内容
if ([fileManager contentsEqualAtPath:@"FilePath1" andPath:@" FilePath2"]) {
   NSLog(@"Same content");
}
检查是否可写、可读、可执行
if ([fileManager isWritableFileAtPath:@"FilePath"]) {
   NSLog(@"isWritable");
}

if ([fileManager isReadableFileAtPath:@"FilePath"]) {
   NSLog(@"isReadable");
}

if ( [fileManager isExecutableFileAtPath:@"FilePath"]) {
   NSLog(@"is Executable");
}
移动文件
if([fileManager moveItemAtPath:@"FilePath1"
   toPath:@"FilePath2" error:NULL]) {
   NSLog(@"Moved successfully");
}
复制文件
if ([fileManager copyItemAtPath:@"FilePath1"
   toPath:@"FilePath2"  error:NULL]) {
   NSLog(@"Copied successfully");
}
删除文件
if ([fileManager removeItemAtPath:@"FilePath" error:NULL]) {
   NSLog(@"Removed successfully");
}
读取文件
NSData *data = [fileManager contentsAtPath:@"Path"];
写入文件
[fileManager createFileAtPath:@"" contents:data attributes:nil];
iOS - 访问地图
地图总是对我们定位很有帮助。地图使用 MapKit 框架集成到 iOS 中。
涉及的步骤
步骤 1 - 创建一个简单的基于视图的应用程序。
步骤 2 - 选择您的项目文件,然后选择目标,然后添加 MapKit.framework。
步骤 3 - 我们还应该添加 Corelocation.framework。
步骤 4 - 将 MapView 添加到 ViewController.xib 并创建一个 ibOutlet 并将其命名为 mapView。
步骤 5 - 通过选择文件 → 新建 → 文件... → 选择 Objective C 类并单击下一步来创建新文件。
步骤 6 - 将类命名为 MapAnnotation,“子类”为 NSObject。
步骤 7 - 选择创建。
步骤 8 - 更新 MapAnnotation.h 如下 -
#import <Foundation/Foundation.h>
#import <MapKit/MapKit.h>

@interface MapAnnotation : NSObject<MKAnnotation>
@property (nonatomic, strong) NSString *title;
@property (nonatomic, readwrite) CLLocationCoordinate2D coordinate;

- (id)initWithTitle:(NSString *)title andCoordinate:
   (CLLocationCoordinate2D)coordinate2d;

@end
步骤 9 - 更新MapAnnotation.m如下 -
#import "MapAnnotation.h"

@implementation MapAnnotation
-(id)initWithTitle:(NSString *)title andCoordinate:
   (CLLocationCoordinate2D)coordinate2d {

   self.title = title;
   self.coordinate =coordinate2d;
   return self;
}
@end
步骤 10 - 更新ViewController.h如下 -
#import <UIKit/UIKit.h>
#import <MapKit/MapKit.h>
#import <CoreLocation/CoreLocation.h>

@interface ViewController : UIViewController<MKMapViewDelegate> {
   MKMapView *mapView;
}
@end
步骤 11 - 更新ViewController.m如下 -
#import "ViewController.h"
#import "MapAnnotation.h"

@interface ViewController ()
@end

@implementation ViewController

- (void)viewDidLoad {
   [super viewDidLoad];
   mapView = [[MKMapView alloc]initWithFrame:
   CGRectMake(10, 100, 300, 300)];
   mapView.delegate = self;
   mapView.centerCoordinate = CLLocationCoordinate2DMake(37.32, -122.03);
   mapView.mapType = MKMapTypeHybrid;