- BabylonJS 教程
- BabylonJS - 主页
- BabylonJS - 简介
- BabylonJS - 环境设置
- BabylonJS - 概述
- BabylonJS - 基本元素
- BabylonJS - 材料
- BabylonJS - 动画
- BabylonJS - 相机
- BabylonJS - 灯
- BabylonJS - 参数化形状
- BabylonJS - 网格
- 矢量位置和旋转
- BabylonJS - 贴花
- BabylonJS - Curve3
- BabylonJS - 动态纹理
- BabylonJS - 视差映射
- BabylonJS - 镜头光晕
- BabylonJS - 创建屏幕截图
- BabylonJS - 反射探针
- 标准渲染管线
- BabylonJS - 着色器材质
- BabylonJS - 骨骼和骨骼
- BabylonJS - 物理引擎
- BabylonJS - 播放声音和音乐
- BabylonJS 有用资源
- BabylonJS - 快速指南
- BabylonJS - 有用的资源
- BabylonJS - 讨论
BabylonJS - 物理引擎
Babylon.js 有物理引擎插件系统,有助于向场景添加交互。它显示了两个对象之间的碰撞和弹跳,使其更像现实生活中的交互。演示将显示球相互碰撞并四处移动碰撞和随后的休息。我们注意到与台球等游戏相同的Behave,玩家用棍子击球,球与其他球碰撞等等。在这里,物理引擎试图给出球的真实视图当它们撞击地面时会发生碰撞和弹跳。该引擎具有类和 API,可帮助应用应用脉冲、力、改变速度、回调函数,以便在需要时以及当网格体与其他网格体发生碰撞时我们需要执行某些操作时调用。
有 3 个物理插件可以使用 -
- Cannon.js
- Oimo.js
- Energy.js
演示
<!doctype html>
<html>
   <head>
      <meta charset = "utf-8">
      <title>BabylonJs - Ball/Ground Demo</title>
      <script type = "text/javascript" src="https://cdn.babylonjs.com/Oimo.js"></script>
      <script src = "babylon.js"></script>
      <style>
         canvas {width: 100%; height: 100%;}
      </style>
   </head>

   <body>
      <canvas id = "renderCanvas"></canvas>
      <script type = "text/javascript">
         var canvas = document.getElementById("renderCanvas");
         var engine = new BABYLON.Engine(canvas, true);
         var v3 = BABYLON.Vector3;

         var createScene = function () {
            // This creates a basic Babylon Scene object (non-mesh)
            var scene = new BABYLON.Scene(engine);

            var camera = new BABYLON.ArcRotateCamera("Camera", 0.86, 1.37, 250, BABYLON.Vector3.Zero(), scene);

            camera.attachControl(canvas);
            camera.maxZ = 5000;
            camera.lowerRadiusLimit = 120;
            camera.upperRadiusLimit = 430;
            camera.lowerBetaLimit =0.75;
            camera.upperBetaLimit =1.58 ;

            new BABYLON.HemisphericLight("hemi", new BABYLON.Vector3(0, 1, 0), scene);

            var randomNumber = function (min, max) {
               if (min == max) {
                  return (min);
               }
               var random = Math.random();
               return ((random * (max - min)) + min);
            };

            var mat = new BABYLON.StandardMaterial("ground", scene);
            var t = new BABYLON.Texture("images/gr1.jpg", scene);
            t.uScale = t.vScale = 10;
            mat.diffuseTexture = t;
            mat.specularColor = BABYLON.Color3.Black();

            var g = BABYLON.Mesh.CreateBox("ground", 200, scene);

            g.position.y = -20;
            g.position.x = 0
            g.scaling.y = 0.01;
            g.material = mat;

            scene.enablePhysics(new BABYLON.Vector3(0, -10, 0), new BABYLON.OimoJSPlugin());

            g.physicsImpostor = new BABYLON.PhysicsImpostor(g, BABYLON.PhysicsImpostor.BoxImpostor, {
               mass: 0,
               restitution: 0.9
            }, scene);

            var getPosition = function(y) {
               return new v3(randomNumber(-100, 100), y, randomNumber(-100, 100));
            };

            var allspheres = [];
            var y = 50;
            var max = 50;

            for (var index = 0; index < max; index++) {
               var redSphere = BABYLON.Mesh.CreateSphere("s" + index, 32, 8, scene);
               redSphere.position = getPosition(y);
               redSphere.physicsImpostor = new BABYLON.PhysicsImpostor(redSphere, BABYLON.PhysicsImpostor.SphereImpostor,{
                  mass: 1, restitution:0.9
               }, scene);

               redSphere.physicsImpostor.applyImpulse(new BABYLON.Vector3(1, 2, -1), new BABYLON.Vector3(1, 2, 0));

               var redMat = new BABYLON.StandardMaterial("ground", scene);
               redMat.diffuseColor = new BABYLON.Color3(0.4, 0.4, 0.4);
               redMat.specularColor = new BABYLON.Color3(0.4, 0.4, 0.4);
               redMat.emissiveColor = BABYLON.Color3.Red();
               redSphere.material = redMat;

               // push all spheres in the allspheres variable
               allspheres.push(redSphere);
               y += 10; // increment height
            }
            scene.registerBeforeRender(function() {
               allspheres.forEach(function(obj) {
                  // if the sphers falls down its updated again over here
                  // If object falls
                  if (obj.position.y < -100) {
                     obj.position = getPosition(200);
                  }
               });
            })
            return scene;
         };
         var scene = createScene();
         engine.runRenderLoop(function() {
            scene.render();
         });
      </script>
   </body>
</html>
输出
上面的代码行生成以下输出 -
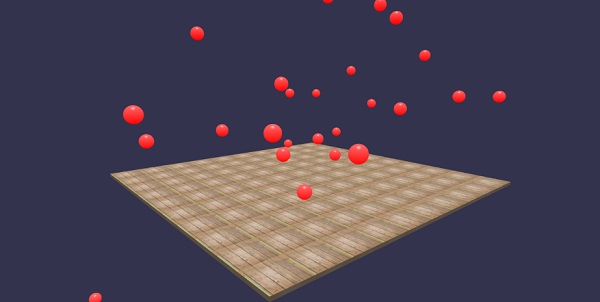
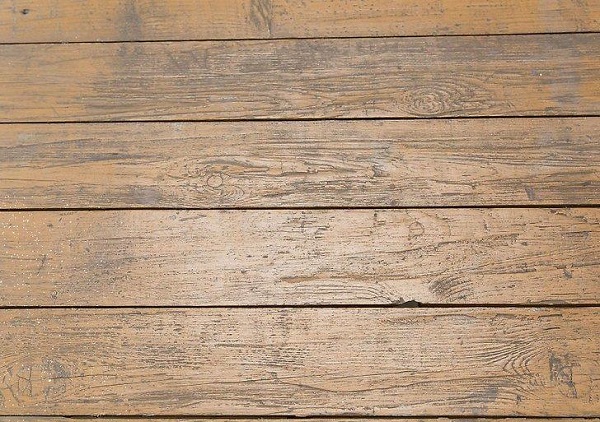
在这个演示中,我们使用了图像images/gr1.jpg。图片存储在本地的images/文件夹中,也粘贴在下面以供参考。您可以下载您选择的任何图像并在演示链接中使用。
图片/gr1.jpg
解释
scene.enablePhysics(new BABYLON.Vector3(0,-10,0), new BABYLON.OimoJSPlugin());
上面的行启用了物理插件。您可以使用您选择的插件。我们使用了 OimoJsplugin()。
g.physicsImpostor = newBABYLON.PhysicsImpostor(g, BABYLON.PhysicsImpostor.BoxImpostor, {
   mass: 0,
   restitution: 0.9
}, scene);
对于交互,物理引擎使用 impostor。当应用于impostor时,对象的形状无法改变。如果改变,就必须创建一个新的冒名顶替者。
对于球体,我们将设置冒名顶替者,并为其添加脉冲以获得弹跳效果,如下所示 -
redSphere.physicsImpostor = new BABYLON.PhysicsImpostor(
   redSphere, BABYLON.PhysicsImpostor.SphereImpostor, {
      mass: 1,
      restitution:0.9
   }, scene
);

redSphere.physicsImpostor.applyImpulse(
   new BABYLON.Vector3(1, 2, -1),
   new BABYLON.Vector3(1, 2, 0)
);
物理Imposter的参数
考虑物理效应的以下参数 -
目的
这里的对象是您要应用交互的对象。例如,球体、盒子等。
类型
类型可以是以下之一 -
- 巴比伦.PhysicsImpostor.SphereImpostor;
- BABYLON.PhysicsImpostor.BoxImpostor;
- 巴比伦.PhysicsImpostor.PlaneImpostor;
- BABYLON.PhysicsImpostor.MeshImpostor;
- BABYLON.PhysicsImpostor.CylinderImpostor;
- BABYLON.PhysicsImpostor.ParticleImpostor;
- BABYLON.PhysicsImpostor.HeightmapImpostor;
大量的
唯一的强制参数是质量,即物体的质量(以千克为单位)。0 作为值将创建静态冒名顶替者 - 对地板有益。
归还
这是碰撞时身体“回馈”的力量。较低的值将不会产生反弹,而值为 1 将产生非常有弹性的交互。
scene.registerBeforeRender(function() {
   allspheres.forEach(function(obj) {
      // if the sphers falls down its updated again over here
      // If object falls
      if (obj.position.y < -100) {
         obj.position = getPosition(200);
      }
   });
})
上面的代码带回了地面上掉落的球体。它会不断更新任何掉落球体的地面。在浏览器中尝试上面的演示以查看物理效果。