- VueJS Tutorial
- VueJS - Home
- VueJS - Overview
- VueJS - Environment Setup
- VueJS - Introduction
- VueJS - Instances
- VueJS - Template
- VueJS - Components
- VueJS - Computed Properties
- VueJS - Watch Property
- VueJS - Binding
- VueJS - Events
- VueJS - Rendering
- VueJS - Transition & Animation
- VueJS - Directives
- VueJS - Routing
- VueJS - Mixins
- VueJS - Render Function
- VueJS - Reactive Interface
- VueJS - Examples
- VueJS Useful Resources
- VueJS - Quick Guide
- VueJS - Useful Resources
- VueJS - Discussion
VueJS - 绑定
在本章中,我们将学习如何借助VueJS 提供的名为v-bind的绑定指令来操作 HTML 属性或为其赋值、更改样式以及分配类。
让我们考虑一个示例来了解为什么需要以及何时使用 v-bind 指令进行数据绑定。
例子
<html>
   <head>
      <title>VueJs Instance</title>
      <script type = "text/javascript" src = "js/vue.js"></script>
   </head>
   <body>
      <div id = "databinding">
         {{title}}<br/>
         <a href = "hreflink" target = "_blank"> Click Me </a> <br/>
         <a href = "{{hreflink}}" target = "_blank">Click Me </a>  <br/>
         <a v-bind:href = "hreflink" target = "_blank">Click Me </a>   <br/>
      </div>
      <script type = "text/javascript">
         var vm = new Vue({
            el: '#databinding',
            data: {
               title : "DATA BINDING",
               hreflink : "http://www.google.com"
            }
         });
      </script>
   </body>
</html>
在上面的示例中,我们显示了一个标题变量和三个锚链接。我们还为数据对象中的 href 分配了一个值。
现在,如果我们检查浏览器中的输出并进行检查,我们将看到前两个锚链接的 href 不正确,如以下屏幕截图所示。
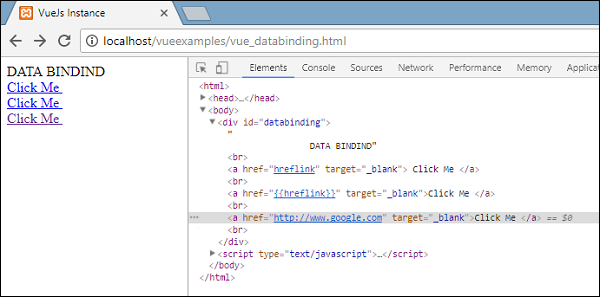
第一个 clickme 将 href 显示为 hreflink,第二个 clickme 将其显示为 {{hreflink}},而最后一个按我们的要求显示正确的 url。
因此,要为 HTML 属性赋值,我们需要使用指令 v-bind 对其进行绑定,如下所示。
<a v-bind:href = "hreflink" target = "_blank">Click Me </a>
VueJS 还提供了 v-bind 的简写形式,如下所示。
<a :href = "hreflink" target = "_blank">Click Me </a>
如果我们在浏览器中看到检查元素,锚标记不会显示 v-bind 属性,但是,它会显示纯 HTML。当我们检查 DOM 时,看不到任何 VueJS 属性。
绑定 HTML 类
要绑定 HTML 类,我们需要使用v-bind: class。让我们考虑一个示例并在其中绑定类。
例子
<html>
   <head>
      <title>VueJs Instance</title>
      <script type = "text/javascript" src = "js/vue.js"></script>
   </head>
   <body>
      <style>
         .active {
            background: red;
         }
      </style>
      <div id = "classbinding">
         <div v-bind:class = "{active:isactive}"><b>{{title}}</b></div>
      </div>
      <script type = "text/javascript">
         var vm = new Vue({
            el: '#classbinding',
            data: {
               title : "CLASS BINDING",
               isactive : true
            }
         });
      </script>
   </body>
</html>
有一个用 v-bind 创建的 div:class=”{active: isactive}”。
这里,isactive是一个基于 true 或 false 的变量。它将把类 active 应用于 div。在数据对象中,我们已将 isactive 变量指定为 true。.active样式中定义了一个类,其背景色为红色。
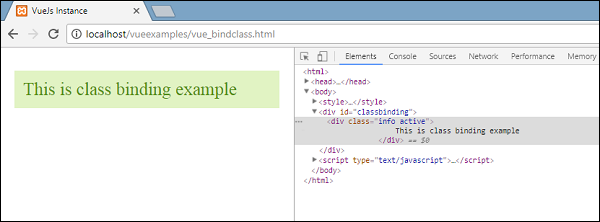
如果变量 isactive 为 true,则将应用颜色,否则不会应用颜色。以下将是浏览器中的输出。
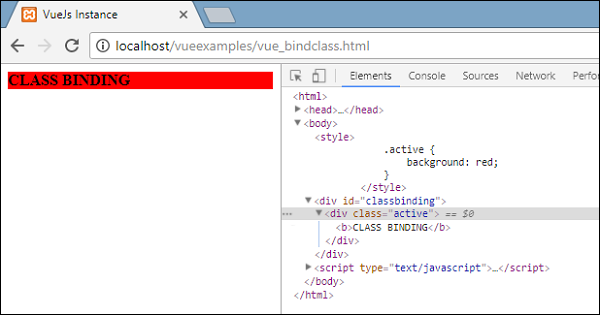
在上面的显示中,我们可以看到背景颜色是红色。class = ”active” 应用于 div。
现在,让我们将变量的值更改为 false 并查看输出。变量 isactive 更改为 false,如以下代码所示。
<html>
   <head>
      <title>VueJs Instance</title>
      <script type = "text/javascript" src = "js/vue.js"></script>
   </head>
   <body>
      <style>
         .active {
            background: red;
         }
      </style>
      <div id = "classbinding">
         <div v-bind:class = "{active:isactive}"><b>{{title}}</b></div>
      </div>
      <script type = "text/javascript">
         var vm = new Vue({
            el: '#classbinding',
            data: {
               title : "CLASS BINDING",
               isactive : false
            }
         });
      </script>
   </body>
</html>
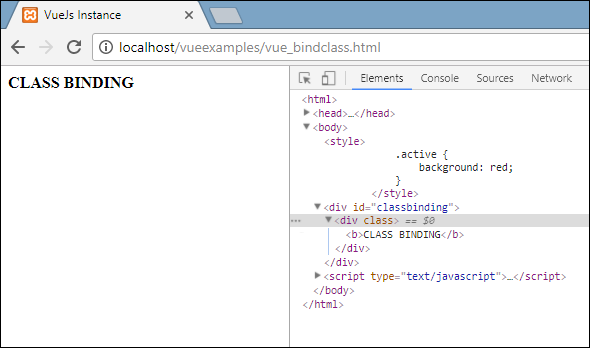
在上面的显示中,我们可以看到 active 类没有应用于 div。
我们还可以使用 v-bind 属性将多个类分配给 HTML 标签。
例子
<html>
   <head>
      <title>VueJs Instance</title>
      <script type = "text/javascript" src = "js/vue.js"></script>
   </head>
   <body>
      <style>
         .info {
            color: #00529B;
            background-color: #BDE5F8;
         }
         div {
            margin: 10px 0;
            padding: 12px;
         }
         .active {
            color: #4F8A10;
            background-color: #DFF2BF;
         }
         .displayError{
            color: #D8000C;
            background-color: #FFBABA;
         }
      </style>
      <div id = "classbinding">
         <div class = "info"  v-bind:class = "{ active: isActive, 'displayError': hasError }">
            {{title}}
         </div>
      </div>
      <script type = "text/javascript">
         var vm = new Vue({
            el: '#classbinding',
            data: {
               title : "This is class binding example",
               isActive : false,
               hasError : false
            }
         });
      </script>
   </body>
</html>
对于上面代码中的div,我们应用了一个普通的类,例如class = ”info”。基于 isActive 和 hasError 变量,其他类将应用于该 div。
输出
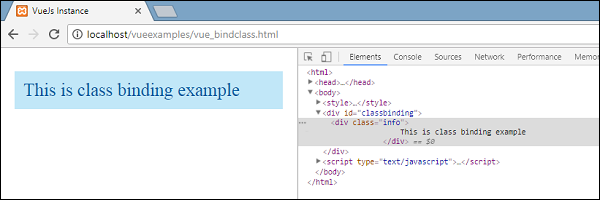
这是一个普通的应用类。现在这两个变量都是假的。让我们将isActive变量设置为 true 并查看输出。
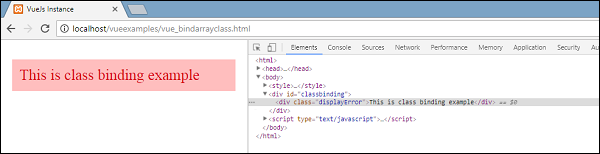
在上面的显示中,在 DOM 中我们可以看到分配给 div 的两个类:info 和 active。让我们将 hasError 变量设为 true,将 isActive 设为 false。
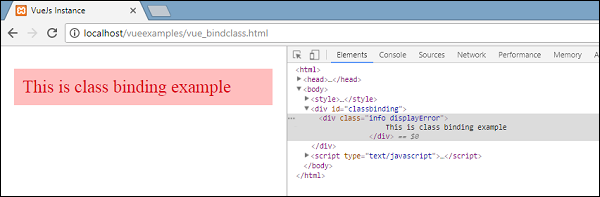
现在,当我们在上面的显示中看到时,info 和 displayError 类已应用于 div。这就是我们如何根据条件应用多个类的方法。
我们还可以将类作为数组传递。让我们举个例子来理解这一点。
例子
<html>
   <head>
      <title>VueJs Instance</title>
      <script type = "text/javascript" src = "js/vue.js"></script>
   </head>
   <body>
      <style>
         .info {
            color: #00529B;
            background-color: #BDE5F8;
         }
         div {
            margin: 10px 0;
            padding: 12px;
            font-size : 25px;
         }
         .active {
            color: #4F8A10;
            background-color: #DFF2BF;
         }
         .displayError{
            color: #D8000C;
            background-color: #FFBABA;
         }
      </style>
      <div id = "classbinding">
         <div v-bind:class = "[infoclass, errorclass]">{{title}}</div>
      </div>
      <script type = "text/javascript">
         var vm = new Vue({
            el: '#classbinding',
            data: {
               title : "This is class binding example",
               infoclass : 'info',
               errorclass : 'displayError'
            }
         });
      </script>
   </body>
</html>
输出
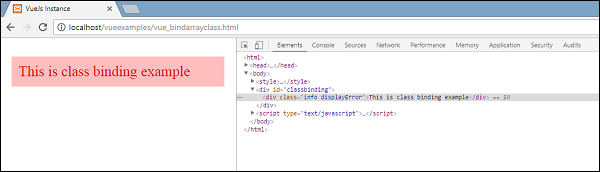
正如我们在上面看到的,这两个类都应用于 div。让我们使用一个变量,并根据变量的值分配类。
<html>
   <head>
      <title>VueJs Instance</title>
      <script type = "text/javascript" src = "js/vue.js"></script>
   </head>
   <body>
      <style>
         .info {
            color: #00529B;
            background-color: #BDE5F8;
         }
         div {
            margin: 10px 0;
            padding: 12px;
            font-size : 25px;
         }
         .active {
            color: #4F8A10;
            background-color: #DFF2BF;
         }
         .displayError{
            color: #D8000C;
            background-color: #FFBABA;
         }
      </style>
      <div id = "classbinding">
         <div v-bind:class = "[isActive ? infoclass : '', haserror ? errorclass : '']">{{title}}</div>
      </div>
      <script type = "text/javascript">
         var vm = new Vue({
            el: '#classbinding',
            data: {
               title : "This is class binding example",
               infoclass : 'info',
               errorclass : 'displayError',
               isActive : true,
               haserror : false
            }
         });
      </script>
   </body>
</html>
我们使用了两个变量isActive和haserror,同样的变量也用于 div 类绑定,如下面的 div 标签所示。
<div v-bind:class = "[isActive ? infoclass : '', haserror ? errorclass : '']">{{title}}</div>
如果 isActive 为 true,则 infoclass 将分配给它。haserror 也是如此,如果为 true,则仅将 errorClass 应用于它。
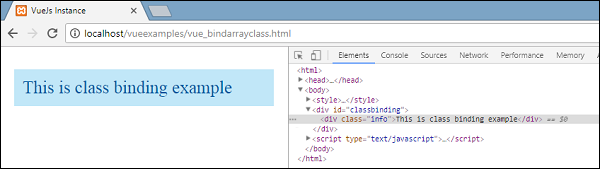
现在,让我们将 haserror 变量设置为 true,将 isActive 变量设置为 false。
我们现在将为组件中的类添加 v-bind。在下面的示例中,我们向组件模板和组件添加了一个类。
例子
<html>
   <head>
      <title>VueJs Instance</title>
      <script type = "text/javascript" src = "js/vue.js"></script>
   </head>
   <body>
      <style>
         .info {
            color: #00529B;
            background-color: #BDE5F8;
         }
         div {
            margin: 10px 0;
            padding: 12px;
            font-size : 25px;
         }
         .active {
            color: #4F8A10;
            background-color: #DFF2BF;
         }
         .displayError{
            color: #D8000C;
            background-color: #FFBABA;
         }
      </style>
      <div id = "classbinding">
         <new_component class = "active"></new_component>
      </div>
      <script type = "text/javascript">
         var vm = new Vue({
            el: '#classbinding',
            data: {
               title : "This is class binding example",
               infoclass : 'info',
               errorclass : 'displayError',
               isActive : false,
               haserror : true
            },
            components:{
               'new_component' : {
                  template : '<div class = "info">Class Binding for component</div>'
               }
            }
         });
      </script>
   </body>
</html>
以下是浏览器中的输出。它将这两个类应用于最终 div。
<div class = ”info active”></div>

根据真/假,在要显示的组件部分中添加一个变量。
<html>
   <head>
      <title>VueJs Instance</title>
      <script type = "text/javascript" src = "js/vue.js"></script>
   </head>
   <body>
      <style>
         .info {
            color: #00529B;
            background-color: #BDE5F8;
         }
         div {
            margin: 10px 0;
            padding: 12px;
            font-size : 25px;
         }
         .active {
            color: #4F8A10;
            background-color: #DFF2BF;
         }
         .displayError{
            color: #D8000C;
            background-color: #FFBABA;
         }
      </style>
      <div id = "classbinding">
         <new_component v-bind:class = "{active:isActive}"></new_component>
      </div>
      <script type = "text/javascript">
         var vm = new Vue({
            el: '#classbinding',
            data: {
               title : "This is class binding example",
               infoclass : 'info',
               errorclass : 'displayError',
               isActive : false,
               haserror : true
            },
            components:{
               'new_component' : {
                  template : '<div class = "info">Class Binding for component</div>'
               }
            }
         });
      </script>
   </body>
</html>
由于变量为 false,因此不会应用 active 类,而会应用 info 类,如下图所示。

绑定内联样式
对象语法
例子
<html>
   <head>
      <title>VueJs Instance</title>
      <script type = "text/javascript" src = "js/vue.js"></script>
   </head>
   <body>
      <div id = "databinding">
         <div v-bind:style = "{ color: activeColor, fontSize: fontSize + 'px' }">{{title}}</div>
      </div>
      <script type = "text/javascript">
         var vm = new Vue({
            el: '#databinding',
            data: {
               title : "Inline style Binding",
               activeColor: 'red',
               fontSize :'30'
            }
         });
      </script>
   </body>
</html>
输出

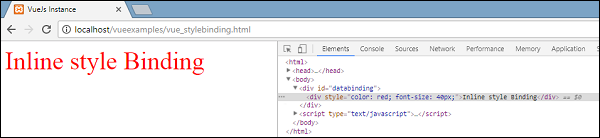
在上面的示例中,对于 div,应用了样式并从数据对象中获取数据。
<div v-bind:style = "{ color: activeColor, fontSize: fontSize + 'px' }">{{title}}</div>
data: {
   title : "Inline style Binding",
   activeColor: 'red',
   fontSize :'30'
}
我们还可以通过将所有值分配给一个变量,然后将该变量分配给 div 来完成相同的操作。
例子
<html>
   <head>
      <title>VueJs Instance</title>
      <script type = "text/javascript" src = "js/vue.js"></script>
   </head>
   <body>
      <div id = "databinding">
         <div v-bind:style = "styleobj">{{title}}</div>
      </div>
      <script type = "text/javascript">
         var vm = new Vue({
            el: '#databinding',
            data: {
               title : "Inline style Binding",
               styleobj : {
                  color: 'red',
                  fontSize :'40px'
               }
            }
         });
      </script>
   </body>
</html>
颜色和 fontSize 被分配给名为 styleobj 的对象,并且同样被分配给 div。
<div v-bind:style = "styleobj">{{title}}</div>
输出
表单输入绑定
到目前为止,在我们创建的示例中,我们已经看到 v-model 绑定了输入文本元素以及绑定到分配的变量的值。让我们在本节中了解更多信息。
例子
<html>
<head>
<title>VueJs Instance</title>
<script type = "text/javascript" src = "js/vue.js"></script>
</head>
<body>
<div id = "databinding">
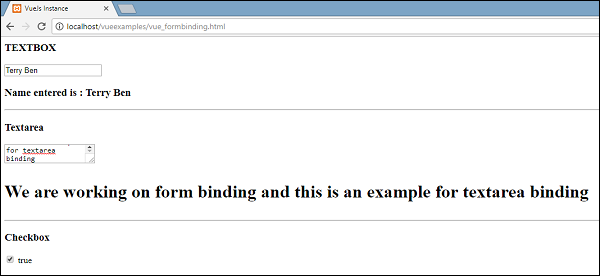
<h3>TEXTBOX</h3>
<input v-model = "name" placeholder = "Enter Name" />
<h3>Name entered is : {{name}}</h3>
<hr/>
<h3>Textarea</h3>
<textarea v-model = "textmessage" placeholder = "Add Details"></textarea>
<h1><p>{{textmessage}}</p></h1>
<hr/>
<h3>Checkbox</h3>
<input type = "checkbox" id = "checkbox" v-model = "checked"> {{checked}}
</div>
<script type = "text/javascript">
var vm = new Vue({
el: '#databinding',
data: {
name:'',
textmessage:'',
checked : false
}
});
</script>
</body>
</html>
无论我们在文本框中输入什么,都会显示在下面。v-model 被分配了值名称,并且该名称显示在 {{name}} 中,该名称显示在文本框中键入的任何内容。
输出
让我们看看更多示例以及如何使用它。
收音机和选择
例子
<html>
<head>
<title>VueJs Instance</title>
<script type = "text/javascript" src = "js/vue.js"></script>
</head>
<body>
<div id = "databinding">
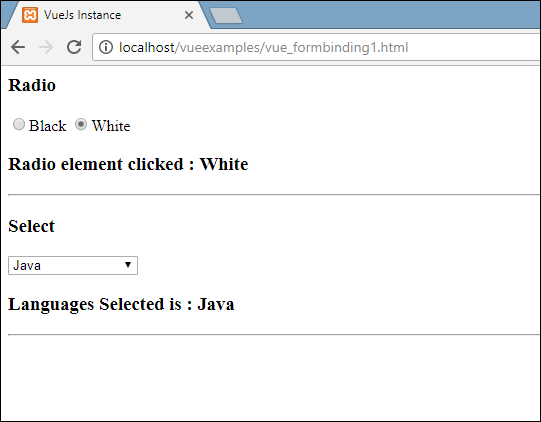
<h3>Radio</h3>
<input type = "radio" id = "black" value = "Black" v-model = "picked">Black
<input type = "radio" id = "white" value = "White" v-model = "picked">White
<h3>Radio element clicked : {{picked}} </h3>
<hr/>
<h3>Select</h3>
<select v-model = "languages">
<option disabled value = "">Please select one</option>
<option>Java</option>
<option>Javascript</option>
<option>Php</option>
<option>C</option>
<option>C++</option>
</select>
<h3>Languages Selected is : {{ languages }}</h3>
<hr/>
</div>
<script type = "text/javascript">
var vm = new Vue({
el: '#databinding',
data: {
picked : 'White',
languages : "Java"
}
});
</script>
</body>
</html>
输出
修饰符
我们在示例中使用了三个修饰符 - 修剪、数字和惰性。
例子
<html>
   <head>
      <title>VueJs Instance</title>
      <script type = "text/javascript" src = "js/vue.js"></script>
   </head>
   <body>
      <div id = "databinding">
         <span style = "font-size:25px;">Enter Age:</span> <input v-model.number = "age" type = "number">
         <br/>
         <span style = "font-size:25px;">Enter Message:</span> <input v-model.lazy = "msg">
         <h3>Display Message : {{msg}}</h3>
         <br/>
         <span style = "font-size:25px;">Enter Message : </span><input v-model.trim = "message">
         <h3>Display Message : {{message}}</h3>
      </div>
      <script type = "text/javascript">
         var vm = new Vue({
            el: '#databinding',
            data: {
               age : 0,
               msg: '',
               message : ''
            }
         });
      </script>
   </body>
</html>
输出
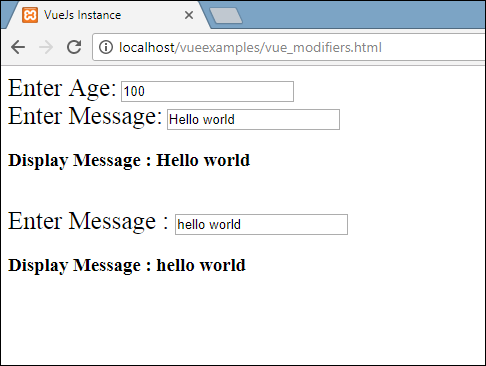
数字修饰符仅允许输入数字。除了数字之外,它不会接受任何其他输入。
<span style = "font-size:25px;">Enter Age:</span> <input v-model.number = "age" type = "number">
一旦完全输入并且用户离开文本框,惰性修改器将显示文本框中存在的内容。
<span style = "font-size:25px;">Enter Message:</span> <input v-model.lazy = "msg">
修剪修改器将删除在开头和结尾输入的所有空格。
<span style = "font-size:25px;">Enter Message : </span><input v-model.trim = "message">