- VB.Net基础教程
- VB.Net - 主页
- VB.Net - 概述
- VB.Net - 环境设置
- VB.Net - 程序结构
- VB.Net - 基本语法
- VB.Net - 数据类型
- VB.Net - 变量
- VB.Net - 常量
- VB.Net - 修饰符
- VB.Net - 语句
- VB.Net - 指令
- VB.Net - 运算符
- VB.Net - 决策
- VB.Net - 循环
- VB.Net - 字符串
- VB.Net - 日期和时间
- VB.Net - 数组
- VB.Net - 集合
- VB.Net - 函数
- VB.Net - 订阅者
- VB.Net - 类和对象
- VB.Net - 异常处理
- VB.Net - 文件处理
- VB.Net - 基本控件
- VB.Net - 对话框
- VB.Net - 高级表单
- VB.Net - 事件处理
- VB.Net 高级教程
- VB.Net - 正则表达式
- VB.Net - 数据库访问
- VB.Net - Excel 工作表
- VB.Net - 发送电子邮件
- VB.Net - XML 处理
- VB.Net - 网页编程
- VB.Net 有用资源
- VB.Net - 快速指南
- VB.Net - 有用的资源
- VB.Net - 讨论
VB.Net - Excel 工作表
VB.Net 为 Microsoft Excel 2010 的 COM 对象模型与您的应用程序之间的互操作性提供支持。
要在应用程序中利用此互操作性,您需要在 Windows 窗体应用程序中导入命名空间Microsoft.Office.Interop.Excel 。
从 VB.Net 创建 Excel 应用程序
让我们开始在 Microsoft Visual Studio 中按照以下步骤创建 Window 窗体应用程序:文件 → 新建项目 → Windows 窗体应用程序
最后,选择“确定”,Microsoft Visual Studio 将创建您的项目并显示以下 Form1。
在窗体中插入按钮控件 Button1。
将 Microsoft Excel 对象库的引用添加到您的项目中。为此 -
从项目菜单中选择添加引用。

在 COM 选项卡上,找到 Microsoft Excel 对象库,然后单击选择。
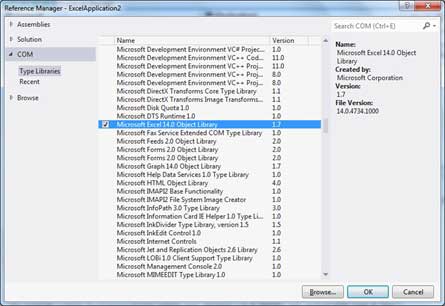
单击“确定”。
双击代码窗口并填充Button1的Click事件,如下所示。
' Add the following code snippet on top of Form1.vb
Imports Excel = Microsoft.Office.Interop.Excel
Public Class Form1
Private Sub Button1_Click(sender As Object, e As EventArgs) Handles Button1.Click
Dim appXL As Excel.Application
Dim wbXl As Excel.Workbook
Dim shXL As Excel.Worksheet
Dim raXL As Excel.Range
' Start Excel and get Application object.
appXL = CreateObject("Excel.Application")
appXL.Visible = True
' Add a new workbook.
wbXl = appXL.Workbooks.Add
shXL = wbXl.ActiveSheet
' Add table headers going cell by cell.
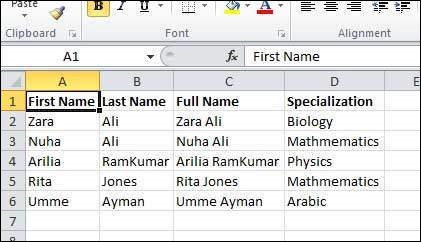
shXL.Cells(1, 1).Value = "First Name"
shXL.Cells(1, 2).Value = "Last Name"
shXL.Cells(1, 3).Value = "Full Name"
shXL.Cells(1, 4).Value = "Specialization"
' Format A1:D1 as bold, vertical alignment = center.
With shXL.Range("A1", "D1")
.Font.Bold = True
.VerticalAlignment = Excel.XlVAlign.xlVAlignCenter
End With
' Create an array to set multiple values at once.
Dim students(5, 2) As String
students(0, 0) = "Zara"
students(0, 1) = "Ali"
students(1, 0) = "Nuha"
students(1, 1) = "Ali"
students(2, 0) = "Arilia"
students(2, 1) = "RamKumar"
students(3, 0) = "Rita"
students(3, 1) = "Jones"
students(4, 0) = "Umme"
students(4, 1) = "Ayman"
' Fill A2:B6 with an array of values (First and Last Names).
shXL.Range("A2", "B6").Value = students
' Fill C2:C6 with a relative formula (=A2 & " " & B2).
raXL = shXL.Range("C2", "C6")
raXL.Formula = "=A2 & "" "" & B2"
' Fill D2:D6 values.
With shXL
.Cells(2, 4).Value = "Biology"
.Cells(3, 4).Value = "Mathmematics"
.Cells(4, 4).Value = "Physics"
.Cells(5, 4).Value = "Mathmematics"
.Cells(6, 4).Value = "Arabic"
End With
' AutoFit columns A:D.
raXL = shXL.Range("A1", "D1")
raXL.EntireColumn.AutoFit()
' Make sure Excel is visible and give the user control
' of Excel's lifetime.
appXL.Visible = True
appXL.UserControl = True
' Release object references.
raXL = Nothing
shXL = Nothing
wbXl = Nothing
appXL.Quit()
appXL = Nothing
Exit Sub
Err_Handler:
MsgBox(Err.Description, vbCritical, "Error: " & Err.Number)
End Sub
End Class
当使用 Microsoft Visual Studio 工具栏上的“开始”按钮执行并运行上述代码时,它将显示以下窗口 -

单击该按钮将显示以下 Excel 工作表。系统将要求您保存工作簿。