RichFaces - 选择组件
在本章中,我们将了解 RichFaces Technology 提供的不同选择组件。
<丰富:选择列表>
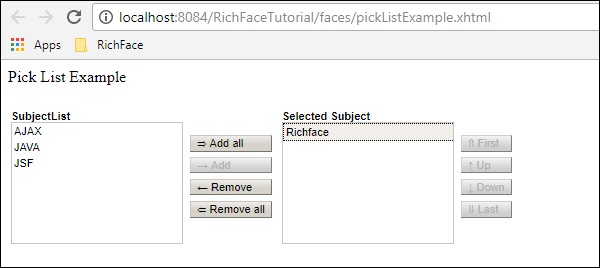
使用此标签,我们可以从填充的列表中选择一个值。它还允许我们向另一个列表添加和删除一个列表组件。以下示例演示了其工作原理。继续创建一个 xhtml 文件并将其命名为“pickListExample.xhtml”,然后将以下代码放入其中。
<?xml version = "1.0" encoding = "UTF-8"?>
<!DOCTYPE html>
<html xmlns  =  "http://www.w3.org/1999/xhtml"
   xmlns:h = "http://java.sun.com/jsf/html"
   xmlns:f = "http://java.sun.com/jsf/core"
   xmlns:ui = "http://java.sun.com/jsf/facelets"
   xmlns:a4j = "http://richfaces.org/a4j"
   xmlns:rich = "http://richfaces.org/rich">

   <h:head>
      <title>PickList Example</title>
   </h:head>

   <h:body>
      <h:form>
         <h:outputText value  =  "Pick List Example"/>
         <br/>
         <br/>

         <rich:pickList value = "#{managedBean.subjectList}"
            sourceCaption = "SubjectList"
            targetCaption = "Selected Subject"
            listWidth = "170px"
            listHeight = "120px"
            orderable = "true">

            <f:selectItems value = "#{managedBean.subjectList}"
               itemValue = "#{subject}" itemLabel = "#{subject.subjectName}"/>
         </rich:pickList>
      </h:form>
   </h:body>

</html>
我们需要修改 ManagedBean.java 文件以填充 xhtml 文件中的列表组件。以下是我们修改后的 Java 文件的快照。
import java.util.Arrays;
import java.util.List;
import javax.faces.bean.ManagedBean;
import javax.faces.bean.RequestScoped;

@ManagedBean
@RequestScoped

public class managedBean {
   String message;
   String job;
   private List<String> SubjectList = Arrays.asList(
      "Richface","AJAX","JAVA","JSF","DOTNET","python");

   public String getMessage() {
      return message;
   }
   public void setMessage(String message) {
      System.out.println("setMessage method is getting called with--"+message);
      this.message = message;
   }
   public String getJob() {
      return job;
   }
   public void setJob(String job) {
      System.out.println("setJob method is getting called with--"+job);
      this.job = job;
   }
   public List<String> getSubjectList() {
      return SubjectList;
   }
   public void setSubjectList(List<String> SubjectList) {
      this.SubjectList = SubjectList;
   }
}
上面的代码将在浏览器中产生以下输出。pickList 标签的“value”属性只不过是bean 类的“getSubjectList()”。“itemValue”是对象类的缩写,对应的“itemLabel”是实例值名称。在此示例中,我们的 pickList 标签自动创建两个名为“sourceCaption”和“targetCaption”的单独列表。属性orderable用于维护目标List中的选择顺序。
<丰富:排序列表>
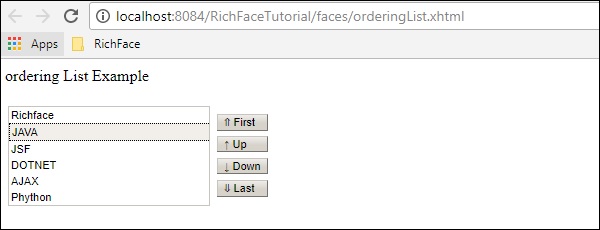
该标签用于呈现整个列表。<orderingList> 将自动提供一些类似按钮的功能来在列表中传播,它有助于对选定的项目进行排序。在下面的示例中,我们将使用以下代码为“OrderingListExample.xhtml”创建一个 orderingList。
<?xml version = "1.0" encoding = "UTF-8"?>
<!DOCTYPE html>
<html xmlns = "http://www.w3.org/1999/xhtml"
   xmlns:h = "http://java.sun.com/jsf/html"
   xmlns:f = "http://java.sun.com/jsf/core"
   xmlns:ui = "http://java.sun.com/jsf/facelets"
   xmlns:a4j = "http://richfaces.org/a4j"
   xmlns:rich = "http://richfaces.org/rich">

   <h:head>
      <title>OrderingList Example</title>
   </h:head>

   <h:body>
      <h:form>
         <h:outputText value = "ordering List Example"/><br/><br/>
         <rich:orderingList value = "#{managedBean.subjectList}"
            itemValue = "#{subject}"
            itemLabel = "#{subject.subjectName}" >
         </rich:orderingList>
      </h:form>
   </h:body>

</html>
我们不需要更改我们的 bean 类,因为我们使用不同的标签来再次填充相同的列表以实现不同的表示。与前面的示例一样,即使在这里,值属性也保存来自“getSubjectList()”的整个列表。“itemValue”和“itemLabel”分别保存对象类和相应实例变量的值。
上面的代码将在浏览器中产生以下输出。
<丰富:ListShuttle>
ListShuttle 标签在 RichFaces 3 中可用。它有助于在一个列表中传播并将相同的值放入另一个列表中。在 RichFaces 4 中,此标记已被取消,因为可以通过另一个名为 <rich:pickList> 的新标记来实现相同的功能,如上所述。如果您使用的是RichFaces 3.0,那么您可以按以下方式使用此标签。
<rich:listShuttle sourceValue = "#{toolBar.freeItems}"
   targetValue = "#{toolBar.items}" var = "items" listsHeight = "150"
   sourceListWidth = "130" targetListWidth = "130"
   sourceCaptionLabel = "Available Items"
   targetCaptionLabel = "Currently Active Items"
   converter = "listShuttleconverter">

   <rich:column width = "18">
      <h:graphicImage value = "#{items.iconURI}"></h:graphicImage>
   </rich:column>

   <rich:column>
      <h:outputText value = "#{items.label}"></h:outputText>
   </rich:column>

   <a4j:support event = "onlistchanged" reRender = "toolBar" />
   <a4j:support event = "onorderchanged" reRender = "toolBar" />
</rich:listShuttle>
使用 pickList 比使用此标签非常方便,因为使用 pickList 只需编写两行代码即可实现相同的功能。