- 请求教程
- 请求 - 主页
- 请求 - 概述
- 请求 - 环境设置
- 请求 - Http 请求如何工作?
- 请求 - 处理请求
- 处理 HTTP 请求的响应
- 请求 - HTTP 请求标头
- 请求 - 处理 GET 请求
- 处理 POST、PUT、PATCH 和 DELETE 请求
- 请求 - 文件上传
- 请求 - 使用 Cookie
- 请求 - 处理错误
- 请求 - 处理超时
- 请求 - 处理重定向
- 请求 - 处理历史记录
- 请求 - 处理会话
- 请求 - SSL 认证
- 请求 - 身份验证
- 请求 - 事件挂钩
- 请求 - 代理
- 请求 - 使用请求进行网页抓取
- 请求有用的资源
- 请求 - 快速指南
- 请求 - 有用的资源
- 请求 - 讨论
请求 - 快速指南
请求 - 概述
Requests 是一个 HTTP 库,它提供了简单的功能来处理 Web 应用程序中的 http 请求/响应。该库是用 python 开发的。
Python Requests 的官方网站https://2.python-requests.org/en/master/定义请求如下 -
Requests 是一个优雅而简单的 Python HTTP 库,专为人类而构建。
请求的特点
下面讨论请求的功能 -
要求
python requests 库具有易于使用的方法可用于处理 Http 请求。传递参数和处理请求类型(如 GET、POST、PUT、DELETE 等)非常容易。
回复
您可以获得所需格式的响应,支持的格式有文本格式、二进制响应、json 响应和原始响应。
标头
该库允许您根据您的要求读取、更新或发送新标头。
超时
使用 python requests 库可以轻松地将超时添加到您请求的 URL 中。碰巧您正在使用第三方 URL 并等待响应。
在 URL 上设置超时始终是一个好习惯,因为我们可能希望 URL 在该超时内做出响应,并因超时而出现响应或错误。不这样做可能会导致无限期地等待该请求。
错误处理
requests 模块提供对错误处理的支持,其中一些是连接错误、超时错误、TooManyRedirects、Response.raise_for_status 错误等。
cookie
该库允许您读取、写入和更新所请求的 URL。
会议
为了维护数据,您需要在请求之间进行会话。因此,如果同一主机被多次调用,您可以重复使用 TCP 连接,从而提高性能。
SSL 证书
SSL 证书是一种安全功能,附带安全 URL。当您使用请求时,它还会验证给定 https URL 的 SSL 证书。默认情况下,请求库中启用 SSL 验证,如果证书不存在,则会抛出错误。
验证
HTTP 身份验证位于服务器端,当客户端请求 URL 时,服务器端会要求提供一些身份验证信息,例如用户名、密码。这是对客户端和服务器之间交换的请求和响应的附加安全性。
使用Python请求库的优点
以下是使用 Python 请求库的优点 -
易于使用并从给定的 URL 获取数据。
请求库可用于从网站上抓取数据。
使用请求,您可以获取、发布、删除、更新给定 URL 的数据。
cookie和session的处理非常简单。
在身份验证模块支持的帮助下还可以保证安全性。
请求 - 环境设置
在本章中,我们将致力于安装 Requests。要开始使用 Requests 模块,我们需要先安装 Python。所以我们将致力于以下工作 -
- 安装Python
- 安装请求
安装Python
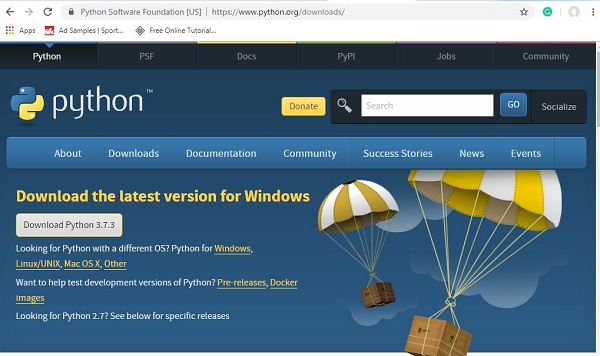
访问 Python 官方网站:https://www.python.org/downloads/如下所示,单击适用于 Windows、Linux/Unix 和 Mac OS 的最新版本。根据您可用的 64 位或 32 位操作系统下载 Python。
下载后,单击 .exe 文件并按照步骤在系统上安装 python。
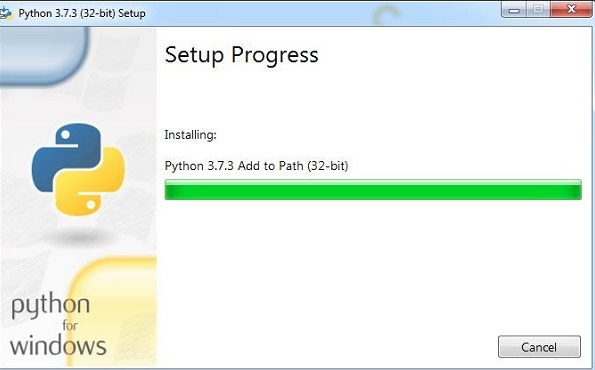
通过上述安装,Python 包管理器(即 pip)也会默认安装。要使其在您的系统上全局运行,请将 python 的位置直接添加到 PATH 变量中。安装开始时会显示相同的内容,请记住选中“添加到路径”复选框。如果您忘记检查它,请按照以下给出的步骤添加到 PATH。
要添加到 PATH,请按照以下步骤操作:
右键单击计算机图标,然后单击属性 > 高级系统设置。
它将显示如下所示的屏幕 -

单击环境变量,如上所示。它将显示如下所示的屏幕 -
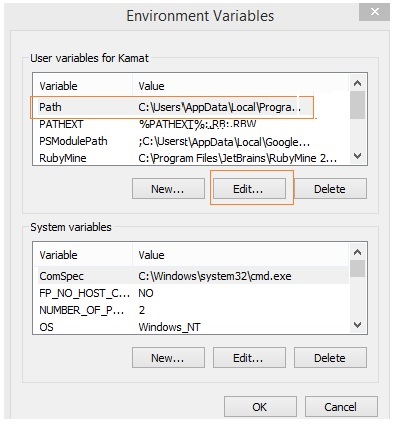
选择 Path 并单击 Edit 按钮,在末尾添加 python 的位置路径。现在,让我们检查一下 python 版本。
检查Python版本
E:\prequests>python --version
Python 3.7.3
安装请求
现在我们已经安装了 python,我们将安装 Requests。
一旦安装了 python,python 包管理器即 pip 也将被安装。以下是检查 pip 版本的命令。
E:\prequests>pip --version
pip 19.1.1 from c:\users\xxxxx\appdata\local\programs\python\python37\lib\site-p
ackages\pip (python 3.7)
我们已经安装了pip,版本是19.1.1。现在,将使用 pip 安装 Requests 模块。
命令如下:
pip install requests
E:\prequests>pip install requests
Requirement already satisfied: requests in c:\users\xxxx\appdata\local\programs
\python\python37\lib\site-packages (2.22.0)
Requirement already satisfied: certifi>=2017.4.17 in c:\users\kamat\appdata\loca
l\programs\python\python37\lib\site-packages (from requests) (2019.3.9)
Requirement already satisfied: urllib3!=1.25.0,!=1.25.1,<1.26,>=1.21.1 in c:\use
rs\xxxxx\appdata\local\programs\python\python37\lib\site-packages (from requests
) (1.25.3)
Requirement already satisfied: idna<2.9,>=2.5 in c:\users\xxxxxxx\appdata\local\pr
ograms\python\python37\lib\site-packages (from requests) (2.8)
Requirement already satisfied: chardet<3.1.0,>=3.0.2 in c:\users\xxxxx\appdata\l
ocal\programs\python\python37\lib\site-packages (from requests) (3.0.4)
我们已经安装了该模块,因此在命令提示符中显示“要求已满足”;如果未安装,它将下载安装所需的软件包。
要检查已安装的请求模块的详细信息,您可以使用以下命令 -
pip show requests
E:\prequests>pip show requests
Name: requests
Version: 2.22.0
Summary: Python HTTP for Humans.
Home-page: http://python-requests.org
Author: Kenneth Reitz
Author-email: me@kennethreitz.org
License: Apache 2.0
Location: c:\users\xxxxx\appdata\local\programs\python\python37\lib\site-package
S
Requires: certifi, idna, urllib3, chardet
Required-by:
Requests模块的版本是2.22.0。
请求 - Http 请求如何工作?
Python 的 Requests 是一个 HTTP 库,它将帮助我们在客户端和服务器之间交换数据。假设您有一个带有表单的 UI,其中需要输入用户详细信息,因此一旦输入,您就必须提交数据,该数据只不过是从客户端到服务器的 Http POST 或 PUT 请求以保存数据。
当你想要数据时,你需要从服务器获取它,这又是一个 Http GET 请求。客户端请求数据时与服务器响应所需数据之间的数据交换,客户端和服务器之间的这种关系非常重要。
请求是向给定的 URL 发出的,它可以是安全的或不安全的 URL。
可以使用 GET、POST、PUT、DELETE 来完成对 URL 的请求。最常用的是GET方法,主要用于从服务器获取数据时。
您还可以将数据作为查询字符串发送到 URL,例如:
https://jsonplaceholder.typicode.com/users?id=9&username=Delphine
因此,在这里,我们将 id = 9 和 username = Delphine 传递给 URL。所有值都在问号(?)之后以键/值对的形式发送,并且多个参数传递到由 & 分隔的 URL。
使用请求库,使用字符串字典如下调用 URL。
其中 URL 的数据作为字符串字典发送。如果您想传递 id=9 和用户名=Delphine,您可以执行以下操作:
payload = {'id': '9', 'username': 'Delphine'}
请求库的调用方式如下:
res = requests.get('https://jsonplaceholder.typicode.com/users', params=payload')
使用 POST,我们可以执行以下操作:
res = requests.post('https://jsonplaceholder.typicode.com/users', data = {'id':'9', 'username':'Delphine'})
使用 PUT
res = requests.put('https://jsonplaceholder.typicode.com/users', data = {'id':'9', 'username':'Delphine'})
使用删除
res = requests.delete('https://jsonplaceholder.typicode.com/users')
Http 请求的响应可以是文本编码形式、二进制编码、json 格式或原始响应。请求和响应的细节将在后续章节中详细解释。
请求 - 处理请求
在本章中,我们将了解如何使用请求模块。我们将研究以下内容 -
- 发出 HTTP 请求。
- 将参数传递给 HTTP 请求。
发出 HTTP 请求
要发出 Http 请求,我们需要首先导入请求模块,如下所示:
import requests
现在让我们看看如何使用 requests 模块调用 URL。
让我们在代码中使用 URL - https://jsonplaceholder.typicode.com/users来测试请求模块。
例子
import requests
getdata = requests.get('https://jsonplaceholder.typicode.com/users')
print(getdata.status_code)
url- https://jsonplaceholder.typicode.com/users使用 requests.get() 方法调用。URL 的响应对象存储在 getdata 变量中。当我们打印变量时,它会给出 200 响应代码,这意味着我们已成功获得响应。
输出
E:\prequests>python makeRequest.py
<Response [200]>
要从响应中获取内容,我们可以使用getdata.content来执行此操作,如下所示 -
例子
import requests
getdata = requests.get('https://jsonplaceholder.typicode.com/users')
print(getdata.content)
getdata.content,将打印响应中的所有可用数据。
输出
E:\prequests>python makeRequest.py
b'[\n {\n  "id": 1,\n  "name": "Leanne Graham",\n  "username": "Bret",\n
"email": "Sincere@april.biz",\n  "address": {\n  "street": "Kulas Light
",\n  "suite": "Apt. 556",\n  "city": "Gwenborough",\n  "zipcode": "
92998-3874",\n  "geo": {\n "lat": "-37.3159",\n  "lng": "81.149
6"\n }\n },\n  "phone": "1-770-736-8031 x56442",\n  "website": "hild
egard.org",\n  "company": {\n "name": "Romaguera-Crona",\n  "catchPhr
ase": "Multi-layered client-server neural-net",\n  "bs": "harness real-time
e-markets"\n }\n }
将参数传递给 HTTP 请求
仅仅请求 URL 是不够的,我们还需要向 URL 传递参数。
参数主要作为键/值对传递,例如 -
https://jsonplaceholder.typicode.com/users?id=9&username=Delphine
因此,我们有 id=9 和 username=Delphine。现在,将了解如何将此类数据传递给 requests Http 模块。
例子
import requests
payload = {'id': 9, 'username': 'Delphine'}
getdata = requests.get('https://jsonplaceholder.typicode.com/users', params=payload)
print(getdata.content)
详细信息存储在键/值对中的对象有效负载中,并传递给 get() 方法内的 params。
输出
E:\prequests>python makeRequest.py
b'[\n {\n "id": 9,\n "name": "Glenna Reichert",\n "username": "Delphin
e",\n "email": "Chaim_McDermott@dana.io",\n "address": {\n "street":
"Dayna Park",\n "suite": "Suite 449",\n "city": "Bartholomebury",\n
"zipcode": "76495-3109",\n "geo": {\n "lat": "24.6463",\n
"lng": "-168.8889"\n }\n },\n "phone": "(775)976-6794 x41206",\n "
website": "conrad.com",\n "company": {\n "name": "Yost and Sons",\n
"catchPhrase": "Switchable contextually-based project",\n "bs": "aggregate
real-time technologies"\n }\n }\n]'
我们现在在响应中获取 id=9 和 username=Delphine 详细信息。
如果您想查看传递参数后 URL 的外观,请使用 URL 的响应对象。
例子
import requests
payload = {'id': 9, 'username': 'Delphine'}
getdata = requests.get('https://jsonplaceholder.typicode.com/users', params=payload)
print(getdata.url)
输出
E:\prequests>python makeRequest.py
https://jsonplaceholder.typicode.com/users?id=9&username=Delphine
处理 HTTP 请求的响应
在本章中,我们将详细了解从请求模块收到的响应。我们将讨论以下细节 -
- 得到回应
- JSON 响应
- 原始响应
- 二元响应
得到回应
我们将使用 request.get() 方法向 URL 发出请求。
import requests
getdata = requests.get('https://jsonplaceholder.typicode.com/users');
getdata 具有响应对象。它包含响应的所有详细信息。我们可以使用 ( .text ) 和 (.content )通过两种方式获得响应。使用response.text将以文本格式返回数据,如下所示:
例子
E:\prequests>python makeRequest.py
[
 {
   "id": 1,
   "name": "Leanne Graham",
   "username": "Bret",
   "email": "Sincere@april.biz",
   "address": {
   "street": "Kulas Light",
   "suite": "Apt. 556",
   "city": "Gwenborough",
   "zipcode": "92998-3874",
   "geo": {
   "lat": "-37.3159",
   "lng": "81.1496"
   }
  },
   "phone": "1-770-736-8031 x56442",
   "website": "hildegard.org",
   "company": {
   "name": "Romaguera-Crona",
   "catchPhrase": "Multi-layered client-server neural-net",
   "bs": "harness real-time e-markets"
  }
},
您将看到响应与当您查看 URL 源代码时在浏览器中的显示方式相同,如下所示:
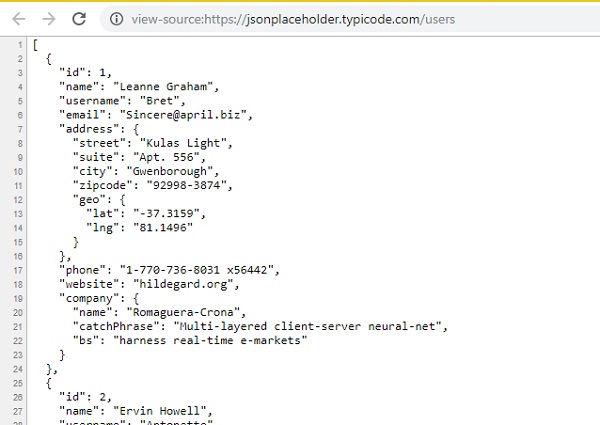
您还可以尝试使用 .html URL 并使用 response.text 查看内容,它将与浏览器中查看 .html URL 的源内容相同。
现在,让我们尝试使用同一 URL 的 response.content 并查看输出。
例子
import requests
getdata = requests.get('https://jsonplaceholder.typicode.com/users')
print(getdata.content)
输出
E:\prequests>python makeRequest.py
b'[\n {\n "id": 1,\n "name": "Leanne Graham",\n "username": "Bret",\n
"email": "Sincere@april.biz",\n "address": {\n "street": "Kulas Light
",\n "suite": "Apt. 556",\n "city": "Gwenborough",\n "zipcode": "
92998-3874",\n "geo": {\n "lat": "-37.3159",\n "lng": "81.149
6"\n }\n },\n "phone": "1-770-736-8031 x56442",\n "website": "hild
egard.org",\n "company": {\n "name": "Romaguera-Crona",\n "catchPhr
ase": "Multi-layered client-server neural-net",\n "bs": "harness real-time
e-markets"\n }\n },\n {\n "id": 2,\n "name": "Ervin Howell",\n "us
ername": "Antonette",\n "email": "Shanna@melissa.tv",\n "address": {\n
"street": "Victor Plains",\n "suite": "Suite 879",\n "city": "Wisoky
burgh",\n "zipcode": "90566-7771",\n "geo": {\n "lat": "-43.950
9",\n "lng": "-34.4618"\n }\n },\n "phone": "010-692-6593 x091
25",\n "website": "anastasia.net",\n "company": {\n "name": "Deckow-C
rist",\n "catchPhrase": "Proactive didactic contingency",\n "bs": "syn
ergize scalable supply-chains"\n }\n },\n {\n "id": 3,\n "name": "Cle
mentine Bauch",\n "username": "Samantha",\n "email":
"Nathan@yesenia.net",
\n "address": {\n "street": "Douglas Extension",\n "suite": "Suite
847",\n "city": "McKenziehaven",\n "zipcode": "59590-4157",\n "ge
o": {\n "lat": "-68.6102",\n "lng": "-47.0653"\n }\n },\n
响应以字节为单位给出。您将在回复的开头看到一个字母b 。通过 requests 模块,您可以获得所使用的编码,也可以根据需要更改编码。例如,要获取编码,您可以使用response.encoding。
print(getdata.encoding)
输出
utf-8
您可以按如下方式更改编码 - 您可以使用您选择的编码。
getdata.encoding = 'ISO-8859-1'
JSON 响应
您还可以使用 response.json() 方法获取 json 格式的 Http 请求的响应,如下所示:
例子
import requests
getdata = requests.get('https://jsonplaceholder.typicode.com/users')
print(getdata.json())
输出
E:\prequests>python makeRequest.py
[{'id': 1, 'name': 'Leanne Graham', 'username': 'Bret', 'email': 'Sincere@april.
biz', 'address': {'street': 'Kulas Light', 'suite': 'Apt. 556', 'city': 'Gwenbor
ough', 'zipcode': '92998-3874', 'geo': {'lat': '-37.3159', 'lng': '81.1496'}},
'
phone': '1-770-736-8031 x56442', 'website': 'hildegard.org', 'company': {'name':
'Romaguera-Crona', 'catchPhrase': 'Multi-layered client-server neural-net', 'bs
': 'harness real-time e-markets'}}]
原始响应
如果您需要 Http URL 的原始响应,您可以使用response.raw,同时在 get 方法中添加stream=True,如下所示:
例子
import requests
getdata = requests.get('https://jsonplaceholder.typicode.com/users', stream=True)
print(getdata.raw)
输出
E:\prequests>python makeRequest.py
<urllib3.response.HTTPResponse object at 0x000000A8833D7B70>
要从原始数据中读取更多内容,您可以执行以下操作:
print(getdata.raw.read(50))
输出
E:\prequests>python makeRequest.py
b'\x1f\x8b\x08\x00\x00\x00\x00\x00\x00\x03\x95\x98[o\xe38\x12\x85\xdf\xe7W\x10y\
xda\x01F\x82.\xd4m\x9f\xdc\x9dd\xba\xb7\x93\xf4\x06q\xef4\x06\x83A@K\x15\x89m'
二元响应
为了获得二进制响应,我们可以使用response.content。
例子
import requests
getdata = requests.get('https://jsonplaceholder.typicode.com/users')
print(getdata.content)
输出
E:\prequests>python makeRequest.py
b'[\n {\n "id": 1,\n "name": "Leanne Graham",\n "username": "Bret",\n
"email": "Sincere@april.biz",\n "address": {\n "street": "Kulas Light
",\n "suite": "Apt. 556",\n "city": "Gwenborough",\n "zipcode": "
92998-3874",\n "geo": {\n "lat": "-37.3159",\n "lng": "81.149
6"\n }\n },\n "phone": "1-770-736-8031 x56442",\n "website": "hild
egard.org",\n "company": {\n "name": "Romaguera-Crona",\n "catchPhr
ase": "Multi-layered client-server neural-net",\n "bs": "harness real-time
e-markets"\n }\n },\n {\n "id": 2,\n "name": "Ervin Howell",\n "us
ername": "Antonette",\n "email": "Shanna@melissa.tv",\n "address": {\n
"street": "Victor Plains",\n "suite": "Suite 879",\n "city": "Wisoky
burgh",\n "zipcode": "90566-7771",\n "geo": {\n "lat": "-43.950
9",\n "lng": "-34.4618"\n }\n },\n "phone": "010-692-6593 x091
25",\n "website": "anastasia.net",\n "company": {\n "name": "Deckow-C
rist",\n "catchPhrase": "Proactive didactic contingency",\n "bs": "syn
ergize scalable supply-chains"\n }\n },\n {\n "id": 3,\n "name": "Cle
mentine Bauch",\n "username": "Samantha",\n "email": "Nathan@yesenia.net",
\n "address": {\n "street": "Douglas Extension",\n "suite": "Suite
847",\n "city": "McKenziehaven",\n "zipcode": "59590-4157",\n "ge
o": {\n "lat": "-68.6102",\n "lng": "-47.0653"\n }\n },\n
响应以字节为单位给出。您将在回复的开头看到一个字母b 。二进制响应主要用于非文本请求。
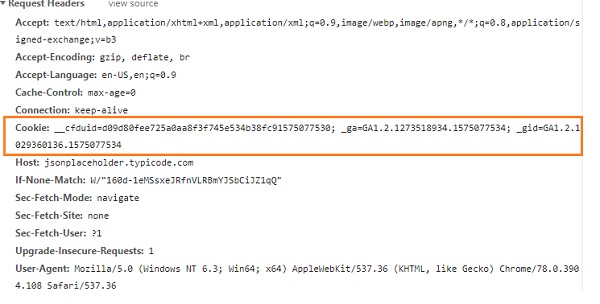
请求 - HTTP 请求标头
在上一章中,我们已经了解了如何发出请求并获得响应。本章将进一步探讨 URL 的标头部分。因此,我们将研究以下内容 -
- 了解请求标头
- 自定义标头
- 响应头
了解请求标头
点击浏览器中的任何 URL,检查它并检查开发人员工具网络选项卡。
您将获得响应标头、请求标头、有效负载等。
例如,考虑以下 URL -
https://jsonplaceholder.typicode.com/users

您可以获取标头详细信息,如下所示 -
例子
import requests
getdata = requests.get('https://jsonplaceholder.typicode.com/users', stream=True)
print(getdata.headers)
输出
E:\prequests>python makeRequest.py
{'Date': 'Sat, 30 Nov 2019 05:15:00 GMT', 'Content-Type': 'application/json; cha
rset=utf-8', 'Transfer-Encoding': 'chunked', 'Connection': 'keep-alive', 'Set-Co
okie': '__cfduid=d2b84ccf43c40e18b95122b0b49f5cf091575090900; expires=Mon, 30-De
c-19 05:15:00 GMT; path=/; domain=.typicode.com; HttpOnly', 'X-Powered-By': 'Exp
ress', 'Vary': 'Origin, Accept-Encoding', 'Access-Control-Allow-Credentials': 't
rue', 'Cache-Control': 'max-age=14400', 'Pragma': 'no-cache', 'Expires': '-1', '
X-Content-Type-Options': 'nosniff', 'Etag': 'W/"160d-1eMSsxeJRfnVLRBmYJSbCiJZ1qQ
"', 'Content-Encoding': 'gzip', 'Via': '1.1 vegur', 'CF-Cache-Status': 'HIT', 'A
ge': '2271', 'Expect-CT': 'max-age=604800, report-uri="https://report-uri.cloudf
lare.com/cdn-cgi/beacon/expect-ct"', 'Server': 'cloudflare', 'CF-RAY': '53da574f
f99fc331-SIN'}
要读取任何 http 标头,您可以执行以下操作:
getdata.headers["Content-Encoding"] // gzip
自定义标头
您还可以将标头发送到被调用的 URL,如下所示。
例子
import requests
headers = {'x-user': 'test123'}
getdata = requests.get('https://jsonplaceholder.typicode.com/users', headers=headers)
传递的标头必须是字符串、字节串或 Unicode 格式。请求的Behave不会根据传递的自定义标头而改变。
响应头
当您在浏览器开发人员工具的“网络”选项卡中检查 URL 时,响应标头如下所示:
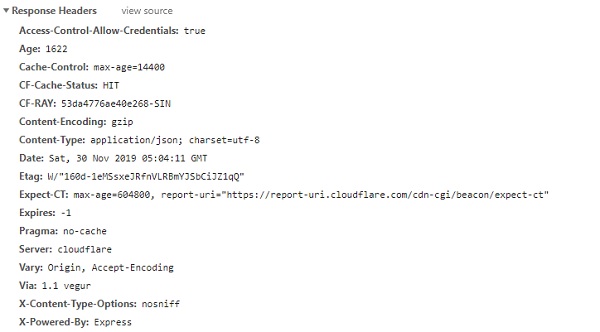
要从请求模块中获取标头的详细信息,请使用。Response.headers 如下所示 -
例子
import requests
getdata = requests.get('https://jsonplaceholder.typicode.com/users')
print(getdata.headers)
输出
E:\prequests>python makeRequest.py
{'Date': 'Sat, 30 Nov 2019 06:08:10 GMT', 'Content-Type': 'application/json; cha
rset=utf-8', 'Transfer-Encoding': 'chunked', 'Connection': 'keep-alive', 'Set-Co
okie': '__cfduid=de1158f1a5116f3754c2c353055694e0d1575094090; expires=Mon, 30-De
c-19 06:08:10 GMT; path=/; domain=.typicode.com; HttpOnly', 'X-Powered-By': 'Exp
ress', 'Vary': 'Origin, Accept-Encoding', 'Access-Control-Allow-Credentials': 't
rue', 'Cache-Control': 'max-age=14400', 'Pragma': 'no-cache', 'Expires': '-1', '
X-Content-Type-Options': 'nosniff', 'Etag': 'W/"160d-1eMSsxeJRfnVLRBmYJSbCiJZ1qQ
"', 'Content-Encoding': 'gzip', 'Via': '1.1 vegur', 'CF-Cache-Status': 'HIT', 'A
ge': '5461', 'Expect-CT': 'max-age=604800, report-uri="https://report-uri.cloudf
lare.com/cdn-cgi/beacon/expect-ct"', 'Server': 'cloudflare', 'CF-RAY': '53daa52f
3b7ec395-SIN'}
您可以获得任何您想要的特定标头,如下所示 -
print(getdata.headers["Expect-CT"])
输出
max-age=604800, report-uri="https://report-uri.cloudflare.com/cdn-cgi/beacon/exp
ect-ct
您还可以使用 get() 方法获取标头详细信息。
print(getdata.headers.get("Expect-CT"))
输出
max-age=604800, report-uri="https://report-uri.cloudflare.com/cdn-cgi/beacon/exp
ect-ct
请求 - 处理 GET 请求
本章将更多地关注最常见且最常用的 GET 请求。请求模块中 GET 的工作非常简单。下面是一个关于使用 GET 方法处理 URL 的简单示例。
例子
import requests
getdata = requests.get('https://jsonplaceholder.typicode.com/users')
print(getdata.content)
getdata.content, will print all the data available in the response.
输出
E:\prequests>python makeRequest.py
b'[\n {\n "id": 1,\n "name": "Leanne Graham",\n "username": "Bret",\n
"email": "Sincere@april.biz",\n "address": {\n "street": "Kulas Light
",\n "suite": "Apt. 556",\n "city": "Gwenborough",\n "zipcode": "
92998-3874",\n "geo": {\n "lat": "-37.3159",\n "lng": "81.149
6"\n }\n },\n "phone": "1-770-736-8031 x56442",\n "website": "hild
egard.org",\n "company": {\n "name": "Romaguera-Crona",\n "catchPhr
ase": "Multi-layered client-server neural-net",\n "bs": "harness real-time
e-markets"\n }\n }
您还可以使用 param 属性将参数传递给 get 方法,如下所示 -
import requests
payload = {'id': 9, 'username': 'Delphine'}
getdata = requests.get('https://jsonplaceholder.typicode.com/users',
params=payload)
print(getdata.content)
详细信息存储在键/值对中的对象有效负载中,并传递给 get() 方法内的 params。
输出
E:\prequests>python makeRequest.py
b'[\n {\n "id": 9,\n "name": "Glenna Reichert",\n "username": "Delphin
e",\n "email": "Chaim_McDermott@dana.io",\n "address": {\n "street":
"Dayna Park",\n "suite": "Suite 449",\n "city": "Bartholomebury",\n
"zipcode": "76495-3109",\n "geo": {\n "lat": "24.6463",\n
"lng": "-168.8889"\n }\n },\n "phone": "(775)976-6794 x41206",\n "
website": "conrad.com",\n "company": {\n "name": "Yost and Sons",\n
"catchPhrase": "Switchable contextually-based project",\n "bs": "aggregate
real-time technologies"\n }\n }\n]'
处理 POST、PUT、PATCH 和 DELETE 请求
在本章中,我们将了解如何使用 requests 库使用 POST 方法以及如何将参数传递给 URL。
使用POST
对于 PUT 请求,Requests 库有 requests.post() 方法,其示例如下所示:
导入请求
myurl = 'https://postman-echo.com/post'
myparams = {'name': 'ABC', 'email':'xyz@gmail.com'}
res = requests.post(myurl, data=myparams)
print(res.text)
输出
E:\prequests>python makeRequest.py
{"args":{},"data":"","files":{},"form":{"name":"ABC","email":"xyz@gmail.com"},"headers":{"x-forwarded-proto":"https","host":"postman-echo.com","content-length":"30","accept":"*/*","accept-encoding":"gzip,deflate","content-type":"application/x-www-form-urlencoded","user-agent":"python-requests/2.22.0","x-forwarded-port":"443"},"json":{"name":"ABC","email":"xyz@gmail.com"},"url":"https://postman-echo.com/post"}
在上面显示的示例中,您可以将表单数据作为键值对传递给 requests.post() 内的数据参数。我们还将了解如何在请求模块中使用 PUT、PATCH 和 DELETE。
使用 PUT
对于 PUT 请求,Requests 库有 requests.put() 方法,其示例如下所示。
import requests
myurl = 'https://postman-echo.com/put'
myparams = {'name': 'ABC', 'email':'xyz@gmail.com'}
res = requests.put(myurl, data=myparams)
print(res.text)
输出
E:\prequests>python makeRequest.py
{"args":{},"data":"","files":{},"form":{"name":"ABC","email":"xyz@gmail.com"},"h
eaders":{"x-forwarded-proto":"https","host":"postman-echo.com","content-length":
"30","accept":"*/*","accept-encoding":"gzip, deflate","content-type":"applicatio
n/x-www-form-urlencoded","user-agent":"python-requests/2.22.0","x-forwarded-port
":"443"},"json":{"name":"ABC","email":"xyz@gmail.com"},"url":"https://postman-ec
ho.com/put"}
使用补丁
对于 PATCH 请求,Requests 库有 requests.patch() 方法,其示例如下所示。
import requests
myurl = https://postman-echo.com/patch'
res = requests.patch(myurl, data="testing patch")
print(res.text)
输出
E:\prequests>python makeRequest.py
{"args":{},"data":{},"files":{},"form":{},"headers":{"x-forwarded-proto":"https"
,"host":"postman-echo.com","content-length":"13","accept":"*/*","accept-encoding
":"gzip, deflate","user-agent":"python-requests/2.22.0","x-forwarded-port":"443"
},"json":null,"url":"https://postman-echo.com/patch"}
使用删除
对于DELETE请求,Requests库有requests.delete()方法,其示例如下所示。
import requests
myurl = 'https://postman-echo.com/delete'
res = requests.delete(myurl, data="testing delete")
print(res.text)
输出
E:\prequests>python makeRequest.py
{"args":{},"data":{},"files":{},"form":{},"headers":{"x-forwarded-proto":"https"
,"host":"postman-echo.com","content-length":"14","accept":"*/*","accept-encoding
":"gzip, deflate","user-agent":"python-requests/2.22.0","x-forwarded-port":"443"
},"json":null,"url":"https://postman-echo.com/delete"}
请求 - 文件上传
在本章中,我们将使用 request 上传文件并读取上传文件的内容。我们可以使用文件参数来完成此操作,如下例所示。
我们将使用http://httpbin.org/帖子上传文件。
例子
import requests
myurl = 'https://httpbin.org/post'
files = {'file': open('test.txt', 'rb')}
getdata = requests.post(myurl, files=files)
print(getdata.text)
测试.txt
File upload test using Requests
例子
var total = [0, 1, 2, 3].reduceRight(function(a, b){ return a + b; });
console.log("total is : " + total );
输出
E:\prequests>python makeRequest.py
{
  "args": {},
  "data": "",
  "files": {
   "file": "File upload test using Requests"
  },
  "form": {},
  "headers": {
   "Accept": "*/*",
   "Accept-Encoding": "gzip, deflate",
   "Content-Length": "175",
   "Content-Type": "multipart/form-data;
boundary=28aee3a9d15a3571fb80d4d2a94bf
d33",
   "Host": "httpbin.org",
   "User-Agent": "python-requests/2.22.0"
  },
  "json": null,
  "origin": "117.223.63.135, 117.223.63.135",
  "url": "https://httpbin.org/post"
}
也可以发送文件的内容,如下所示 -
例子
import requests
myurl = 'https://httpbin.org/post'
files = {'file': ('test1.txt', 'Welcome to TutorialsPoint')}
getdata = requests.post(myurl, files=files)
print(getdata.text)
输出
E:\prequests>python makeRequest.py
{
  "args": {},
  "data": "",
  "files": {
   "file": "Welcome to TutorialsPoint"
},
"form": {},
"headers": {
   "Accept": "*/*",
   "Accept-Encoding": "gzip, deflate",
   "Content-Length": "170",
   "Content-Type": "multipart/form-data; boundary=f2837238286fe40e32080aa7e172b
e4f",
  "Host": "httpbin.org",
  "User-Agent": "python-requests/2.22.0"
},
  "json": null,
  "origin": "117.223.63.135, 117.223.63.135",
  "url": "https://httpbin.org/post"
}
请求 - 使用 Cookie
本章将讨论如何处理cookie。您可以在使用 requests 库调用 URL 时获取 cookie 并发送 cookie。
当在浏览器中点击URL https://jsonplaceholder.typicode.com/users时,我们可以获得 cookie 的详细信息,如下所示:
您可以读取 cookie,如下所示:
例子
import requests
getdata = requests.get('https://jsonplaceholder.typicode.com/users')
print(getdata.cookies["__cfduid"])
输出
E:\prequests>python makeRequest.py
d1733467caa1e3431fb7f768fa79ed3741575094848
您也可以在我们提出请求时发送 cookie。
例子
import requests
cookies = dict(test='test123')
getdata = requests.get('https://httpbin.org/cookies',cookies=cookies)
print(getdata.text)
输出
E:\prequests>python makeRequest.py
{
   "cookies": {
   "test": "test123"
}
}
请求 - 处理错误
本章将讨论如何处理使用 Http 请求库时出现的错误。对所有可能的情况进行错误管理始终是一个好习惯。
错误异常
请求模块给出以下类型的错误异常 -
ConnectionError - 如果存在任何连接错误,则会引发此错误。例如,网络失败、DNS 错误等,Request 库会引发 ConnectionError 异常。
Response.raise_for_status() - 基于状态代码,即 401、404,它将针对请求的 url 引发 HTTPError。
HTTPError - 对于所发出的请求的无效响应将引发此错误。
Timeout - 因请求的 URL 超时而引发的错误。
TooManyRedirects - 如果超过最大重定向限制,则会引发 TooManyRedirects 错误。
例子
这是超时错误的示例 -
import requests
getdata = requests.get('https://jsonplaceholder.typicode.com/users',timeout=0.001)
print(getdata.text)
输出
raise ConnectTimeout(e, request=request)
requests.exceptions.ConnectTimeout: HTTPSConnectionPool(host='jsonplaceholder.ty
picode.com', port=443): Max retries exceeded with url: /users (Caused by Connect
TimeoutError(<urllib3.connection.VerifiedHTTPSConnection object at
0x000000B02AD
E76A0>, 'Connection to jsonplaceholder.typicode.com timed out. (connect timeout= 0.001)'))
请求 - 处理超时
可以轻松地将超时添加到您请求的 URL 中。碰巧,您正在使用第三方 URL 并等待响应。在 URL 上设置超时始终是一个好习惯,因为我们可能希望 URL 在某个时间跨度内做出响应或出现错误。如果不这样做,可能会导致无限期地等待该请求。
我们可以使用超时参数给 URL 设置超时时间,并且值以秒为单位传递,如下例所示:
例子
import requests
getdata = requests.get('https://jsonplaceholder.typicode.com/users',timeout=0.001)
print(getdata.text)
输出
raise ConnectTimeout(e, request=request)
requests.exceptions.ConnectTimeout: HTTPSConnectionPool(host='jsonplaceholder.ty
picode.com', port=443): Max retries exceeded with url: /users (Caused by Connect
TimeoutError(<urllib3.connection.VerifiedHTTPSConnection object at 0x000000B02AD
E76A0>, 'Connection to jsonplaceholder.typicode.com timed out. (connect timeout=
0.001)'))
给出的超时如下:
getdata = requests.get('https://jsonplaceholder.typicode.com/users',timeout=0.001)
执行会引发连接超时错误,如输出所示。给定的超时时间为 0.001,这使得请求无法取回响应并引发错误。现在,我们将增加超时并检查。
例子
import requests
getdata = requests.get('https://jsonplaceholder.typicode.com/users',timeout=1.000)
print(getdata.text)
输出
E:\prequests>python makeRequest.py
[
 {
   "id": 1,
   "name": "Leanne Graham",
   "username": "Bret",
   "email": "Sincere@april.biz",
   "address": {
   "street": "Kulas Light",
   "suite": "Apt. 556",
   "city": "Gwenborough",
   "zipcode": "92998-3874",
   "geo": {
   "lat": "-37.3159",
   "lng": "81.1496"
   }
  },
   "phone": "1-770-736-8031 x56442",
   "website": "hildegard.org",
   "company": {
   "name": "Romaguera-Crona",
   "catchPhrase": "Multi-layered client-server neural-net",
   "bs": "harness real-time e-markets"
 }
超时 1 秒后,我们可以获得所请求 URL 的响应。
请求 - 处理重定向
本章将了解 Request 库如何处理 url 重定向情况。
例子
import requests
getdata = requests.get('http://google.com/')
print(getdata.status_code)
print(getdata.history)
url- http://google.com将使用状态代码 301(永久移动)重定向到https://www.google.com/。重定向将保存在历史记录中。
输出
当执行上述代码时,我们得到以下结果 -
E:\prequests>python makeRequest.py
200
[<Response [301]>]
您可以使用allow_redirects=False停止URL 重定向。它可以通过使用 GET、POST、OPTIONS、PUT、DELETE、PATCH 方法来完成。
例子
这是一个相同的例子。import requests
getdata = requests.get('http://google.com/', allow_redirects=False)
print(getdata.status_code)
print(getdata.history)
print(getdata.text)
现在,如果您检查输出,将不允许重定向,并将获得状态代码 301。
输出
E:\prequests>python makeRequest.py
301
[]
<HTML><HEAD><meta http-equiv="content-type" content="text/html;charset=utf-8">
<TITLE>301 Moved</TITLE></HEAD><BODY>
<H1>301 Moved</H1>
The document has moved
<A HREF="http://www.google.com/">here</A>.
</BODY></HTML>
请求 - 处理历史记录
您可以使用response.history获取给定 URL 的历史记录。如果给定的 URL 有任何重定向,则相同的内容将存储在历史记录中。
对于历史
import requests
getdata = requests.get('http://google.com/')
print(getdata.status_code)
print(getdata.history)
输出
E:\prequests>python makeRequest.py
200
[<Response [301]>]
response.history属性将包含基于请求完成的响应对象的详细信息。存在的值将从最旧的到最新的进行排序。response.history属性跟踪在请求的 URL 上完成的所有重定向。
请求 - 处理会话
要维护请求之间的数据,您需要会话。因此,如果同一主机被多次调用,您可以重用 TCP 连接,从而提高性能。现在让我们看看如何在使用会话发出的请求之间维护 cookie。
使用会话添加cookie
import requests
req = requests.Session()
cookies = dict(test='test123')
getdata = req.get('https://httpbin.org/cookies',cookies=cookies)
print(getdata.text)
输出
E:\prequests>python makeRequest.py
{
   "cookies": {
   "test": "test123"
}
}
使用会话,您可以跨请求保留 cookie 数据。还可以使用会话传递标头数据,如下所示 -
例子
import requests
req = requests.Session()
req.headers.update({'x-user1': 'ABC'})
headers = {'x-user2': 'XYZ'}
getdata = req.get('https://httpbin.org/headers', headers=headers)
print(getdata.headers)
请求 - SSL 认证
SSL 证书是一种安全功能,附带安全 URL。当您使用 Requests 库时,它还会验证给定 https URL 的 SSL 证书。默认情况下,请求模块中启用 SSL 验证,如果证书不存在,则会抛出错误。
使用安全 URL
以下是使用安全 URL 的示例 -
import requests
getdata = requests.get(https://jsonplaceholder.typicode.com/users)
print(getdata.text)
输出
E:\prequests>python makeRequest.py
[
   {
   "id": 1,
   "name": "Leanne Graham",
   "username": "Bret",
   "email": "Sincere@april.biz",
   "address": {
   "street": "Kulas Light",
   "suite": "Apt. 556",
   "city": "Gwenborough",
   "zipcode": "92998-3874",
   "geo": {
   "lat": "-37.3159",
   "lng": "81.1496"
   }
  },
   "phone": "1-770-736-8031 x56442",
   "website": "hildegard.org",
   "company": {
   "name": "Romaguera-Crona",
   "catchPhrase": "Multi-layered client-server neural-net",
   "bs": "harness real-time e-markets"
   }
  }
]
我们很容易从上面的 https URL 得到响应,这是因为请求模块可以验证 SSL 证书。
您只需添加 verify=False 即可禁用 SSL 验证,如下例所示。
例子
import requests
getdata = requests.get('https://jsonplaceholder.typicode.com/users', verify=False)
print(getdata.text)
您将得到输出,但它也会给出一条警告消息,表明 SSL 证书未经过验证,建议添加证书验证。
输出
E:\prequests>python makeRequest.py
connectionpool.py:851: InsecureRequestWarning: Unverified HTTPS request is being
made. Adding certificate verification is strongly advised. See: https://urllib3
   .readthedocs.io/en/latest/advanced-usage.htm  l#ssl-warnings
 InsecureRequestWarning)
[
 {
  "id": 1,
   "name": "Leanne Graham",
   "username": "Bret",
   "email": "Sincere@april.biz",
   "address": {
   "street": "Kulas Light",
   "suite": "Apt. 556",
   "city": "Gwenborough",
   "zipcode": "92998-3874",
   "geo": {
   "lat": "-37.3159",
   "lng": "81.1496"
   }
  },
   "phone": "1-770-736-8031 x56442",
   "website": "hildegard.org",
   "company": {
   "name": "Romaguera-Crona",
   "catchPhrase": "Multi-layered   client-server neural-net",
   "bs": "harness real-time e-markets"
  }
 }
]
您还可以通过将 SSL 证书托管在您的一端来验证 SSL 证书,并使用验证参数提供路径,如下所示。
例子
import requests
getdata = requests.get('https://jsonplaceholder.typicode.com/users', verify='C:\Users\AppData\Local\certificate.txt')
print(getdata.text)
输出
E:\prequests>python makeRequest.py
[
  {
   "id": 1,
   "name": "Leanne Graham",
   "username": "Bret",
   "email": "Sincere@april.biz",
   "address": {
   "street": "Kulas Light",
   "suite": "Apt. 556",
   "city": "Gwenborough",
   "zipcode": "92998-3874",
   "geo": {
   "lat": "-37.3159",
   "lng": "81.1496"
   }
  },
   "phone": "1-770-736-8031 x56442",
   "website": "hildegard.org",
   "company": {
   "name": "Romaguera-Crona",
   "catchPhrase": "Multi-layered   client-server neural-net",
   "bs": "harness real-time e-markets"
   }
  }
]
请求 - 身份验证
本章将讨论请求模块中可用的身份验证类型。
我们将讨论以下内容 -
HTTP 请求中的身份验证工作
基本认证
摘要式认证
OAuth2 身份验证
HTTP 请求中的身份验证工作
HTTP 身份验证位于服务器端,当客户端请求 URL 时,服务器端会要求提供一些身份验证信息,例如用户名、密码。这为客户端和服务器之间交换的请求和响应提供了额外的安全性。
从客户端,这些附加的身份验证信息(即用户名和密码)可以在标头中发送,稍后将在服务器端进行验证。只有当认证有效时,服务器端才会下发响应。
Requests 库在 requests.auth 中有最常用的身份验证,即基本身份验证(HTTPBasicAuth)和摘要身份验证(HTTPDigestAuth)。
基本认证
这是向服务器提供身份验证的最简单形式。为了使用基本身份验证,我们将使用请求库中提供的 HTTPBasicAuth 类。
例子
这是如何使用它的工作示例。
import requests
from requests.auth import HTTPBasicAuth
response_data = requests.get('httpbin.org/basic-auth/admin/admin123', auth=HTTPDigestAuth('admin', 'admin123'))
print(response_data.text)
我们调用 URL https://httpbin.org/basic-auth/admin/admin123 ,用户名为admin,密码为admin123。
因此,如果没有身份验证(即用户名和密码),该 URL 将无法工作。一旦您使用 auth 参数进行身份验证,则只有服务器会返回响应。
输出
E:\prequests>python makeRequest.py
{
   "authenticated": true,
   "user": "admin"
}
摘要式认证
这是请求中可用的另一种身份验证形式。我们将利用请求中的 HTTPDigestAuth 类。
例子
import requests
from requests.auth import HTTPDigestAuth
response_data = requests.get('https://httpbin.org/digest-auth/auth/admin/admin123>, auth=HTTPDigestAuth('admin', 'admin123'))
print(response_data.text)
输出
E:\prequests>python makeRequest.py
{
   "authenticated": true,
   "user": "admin"
}
OAuth2 身份验证
要使用 OAuth2 身份验证,我们需要“requests_oauth2”库。要安装“requests_oauth2”,请执行以下操作:
pip install requests_oauth2
安装时终端中的显示如下所示:
E:\prequests>pip install requests_oauth2
Collecting requests_oauth2
Downloading https://files.pythonhosted.org/packages/52/dc/01c3c75e6e7341a2c7a9
71d111d7105df230ddb74b5d4e10a3dabb61750c/requests-oauth2-0.3.0.tar.gz
Requirement already satisfied: requests in c:\users\xyz\appdata\local\programs
\python\python37\lib\site-packages (from requests_oauth2) (2.22.0)
Requirement already satisfied: six in c:\users\xyz\appdata\local\programs\pyth
on\python37\lib\site-packages (from requests_oauth2) (1.12.0)
Requirement already satisfied: urllib3!=1.25.0,!=1.25.1,<1.26,>=1.21.1 in c:\use
rs\xyz\appdata\local\programs\python\python37\lib\site-packages (from requests
->requests_oauth2) (1.25.3)
Requirement already satisfied: certifi>=2017.4.17 in c:\users\xyz\appdata\loca
l\programs\python\python37\lib\site-packages (from requests->requests_oauth2) (2
019.3.9)
Requirement already satisfied: chardet<3.1.0,>=3.0.2 in c:\users\xyz\appdata\l
ocal\programs\python\python37\lib\site-packages (from requests->requests_oauth2)
(3.0.4)
Requirement already satisfied: idna<2.9,>=2.5 in c:\users\xyz\appdata\local\pr
ograms\python\python37\lib\site-packages (from requests->requests_oauth2) (2.8)
Building wheels for collected packages: requests-oauth2
Building wheel for requests-oauth2 (setup.py) ... done
Stored in directory: C:\Users\xyz\AppData\Local\pip\Cache\wheels\90\ef\b4\43
3743cbbc488463491da7df510d41c4e5aa28213caeedd586
Successfully built requests-oauth2
我们已经完成了“requests-oauth2”的安装。要使用 Google、Twitter 的 API,我们需要获得其同意,使用 OAuth2 身份验证也是如此。
对于 OAuth2 身份验证,我们需要客户端 ID 和密钥。https://developers.google.com/identity/protocols/OAuth2上提到了如何获取它的详细信息。
稍后,登录 Google API 控制台(可在https://console.developers.google.com/获取)并获取客户端 ID 和密钥。
例子
这是如何使用“requests-oauth2”的示例。
import requests
from requests_oauth2.services import GoogleClient
google_auth = GoogleClient(
   client_id="xxxxxxxxxxxxxxxxxxxxxxxxxx.apps.googleusercontent.com",
redirect_uri="http://localhost/auth/success.html",
)
a = google_auth.authorize_url(
   scope=["profile", "email"],
   response_type="code",
)
res = requests.get(a)
print(res.url)
我们将无法重定向到给定的 URL,因为它需要登录 Gmail 帐户,但在这里,您将从示例中看到 google_auth 有效并且给出了授权 URL。
输出
E:\prequests>python oauthRequest.py
https://accounts.google.com/o/oauth2/auth?redirect_uri=
http%3A%2F%2Flocalhost%2Fauth%2Fsuccess.html&
client_id=xxxxxxxxxxxxxxxxxxxxx.apps.googleusercontent.com&
scope=profile+email&response_type=code
请求 - 事件挂钩
我们可以使用事件挂钩将事件添加到请求的 URL。在下面的示例中,我们将添加一个回调函数,该函数将在响应可用时被调用。
例子
要添加回调,我们需要使用 hooks 参数,如下例所示 -
mport requests
def printData(r, *args, **kwargs):
   print(r.url)
   print(r.text)
getdata = requests.get('https://jsonplaceholder.typicode.com/users',
hooks={'response': printData})
输出
E:\prequests>python makeRequest.py
https://jsonplaceholder.typicode.com/users
[
{
   "id": 1,
   "name": "Leanne Graham",
   "username": "Bret",
   "email": "Sincere@april.biz",
   "address": {
   "street": "Kulas Light",
   "suite": "Apt. 556",
   "city": "Gwenborough",
   "zipcode": "92998-3874",
   "geo": {
    "lat": "-37.3159",
    "lng": "81.1496"
   }
  },
   "phone": "1-770-736-8031 x56442",
   "website": "hildegard.org",
   "company": {
   "name": "Romaguera-Crona",
   "catchPhrase": "Multi-layered client-server neural-net",
   "bs": "harness real-time e-markets"
   }
  }
]
您还可以调用多个回调函数,如下所示 -
例子
import requests
def printRequestedUrl(r, *args, **kwargs):
   print(r.url)
def printData(r, *args, **kwargs):
   print(r.text)
getdata = requests.get('https://jsonplaceholder.typicode.com/users', hooks={'response': [printRequestedUrl, printData]})
输出
E:\prequests>python makeRequest.py
https://jsonplaceholder.typicode.com/users
[
  {
   "id": 1,
   "name": "Leanne Graham",
   "username": "Bret",
   "email": "Sincere@april.biz",
   "address": {
   "street": "Kulas Light",
   "suite": "Apt. 556",
   "city": "Gwenborough",
   "zipcode": "92998-3874",
   "geo": {
   "lat": "-37.3159",
   "lng": "81.1496"
 }
  },
   "phone": "1-770-736-8031 x56442",
   "website": "hildegard.org",
   "company": {
   "name": "Romaguera-Crona",
   "catchPhrase": "Multi-layered client-server neural-net",
    "bs": "harness real-time e-markets"
   }
  }
]
您还可以将挂钩添加到创建的会话中,如下所示 -
例子
import requests
def printData(r, *args, **kwargs):
print(r.text)
s = requests.Session()
s.hooks['response'].append(printData)
s.get('https://jsonplaceholder.typicode.com/users')
输出
E:\prequests>python makeRequest.py
[
 {
   "id": 1,
   "name": "Leanne Graham",
   "username": "Bret",
   "email": "Sincere@april.biz",
   "address": {
   "street": "Kulas Light",
   "suite": "Apt. 556",
   "city": "Gwenborough",
   "zipcode": "92998-3874",
   "geo": {
   "lat": "-37.3159",
   "lng": "81.1496"
   }
  },
   "phone": "1-770-736-8031 x56442",
   "website": "hildegard.org",
   "company": {
   "name": "Romaguera-Crona",
   "catchPhrase": "Multi-layered client-server neural-net",
   "bs": "harness real-time e-markets"
   }
  }
]
请求 - 代理
到目前为止,我们已经看到客户端直接连接服务器并与服务器通信。使用代理,交互发生如下:
客户端向代理发送请求。
代理将请求发送到服务器。
服务器将响应发送回代理。
代理会将响应发送回客户端。
使用 Http 代理是为了管理客户端和服务器之间的数据交换而分配的附加安全性。请求库还可以通过使用代理参数来处理代理,如下所示:
例子
import requests
proxies = {
'http': 'http://localhost:8080'
}
res = requests.get('http://httpbin.org/', proxies=proxies)
print(res.status_code)
该请求将路由到 (' http://localhost:8080 URL.
输出
200
请求 - 使用请求进行网页抓取
我们已经了解了如何使用 python requests 库从给定的 URL 获取数据。我们将尝试使用以下命令从Tutorialspoint网站上删除数据,该网站位于https://www.tutorialspoint.com/tutorialslibrary.htm :
请求库
来自 python 的Beautiful Soup库
我们已经安装了 Requests 库,现在让我们安装 Beautiful soup 包。如果您想探索Beautiful Soup的更多功能,请访问Beautiful Soup的官方网站https://www.crummy.com/software/BeautifulSoup/bs4/doc/ 。
安装Beautifulsoup
我们将在下面看到如何安装 Beautiful Soup -
E:\prequests>pip install beautifulsoup4
Collecting beautifulsoup4
Downloading https://files.pythonhosted.org/packages/3b/c8/a55eb6ea11cd7e5ac4ba
cdf92bac4693b90d3ba79268be16527555e186f0/beautifulsoup4-4.8.1-py3-none-any.whl (
101kB)
|████████████████████████████████| 102kB 22kB/s
Collecting soupsieve>=1.2 (from beautifulsoup4)
Downloading https://files.pythonhosted.org/packages/81/94/03c0f04471fc245d08d0
a99f7946ac228ca98da4fa75796c507f61e688c2/soupsieve-1.9.5-py2.py3-none-any.whl
Installing collected packages: soupsieve, beautifulsoup4
Successfully installed beautifulsoup4-4.8.1 soupsieve-1.9.5
我们现在已经安装了 python requests 库和 beautiful soup。
现在让我们编写代码,从给定的 URL 中删除数据。