- PySimpleGUI Tutorial
- PySimpleGUI - Home
- PySimpleGUI - Introduction
- PySimpleGUI - Environment Setup
- PySimpleGUI - Hello World
- PySimpleGUI - Popup Windows
- PySimpleGUI - Window Class
- PySimpleGUI - Element Class
- PySimpleGUI - Events
- PySimpleGUI - Menubar
- PySimpleGUI - Matplotlib Integration
- PySimpleGUI - Working with PIL
- PySimpleGUI - Debugger
- PySimpleGUI - Settings
- PySimpleGUI Useful Resources
- PySimpleGUI - Quick Guide
- PySimpleGUI - Useful Resources
- PySimpleGUI - Discussion
PySimpleGUI - 你好世界
使用 PySimpleGUI 的第一个窗口
要检查 PySimpleGUI 及其依赖项是否已正确安装,请使用任何支持 Python 的编辑器输入以下代码并将其另存为“hello.py”。
import PySimpleGUI as psg
layout = [[psg.Text(text='Hello World',
   font=('Arial Bold', 20),
   size=20,
   expand_x=True,
   justification='center')],
]
window = psg.Window('HelloWorld', layout, size=(715,250))
while True:
   event, values = window.read()
   print(event, values)
   if event in (None, 'Exit'):
      break
window.close()
上面的代码构造了一个带有 Text 元素(相当于 TKinter 中的 Label)的窗口,并显示位于窗口宽度中央的“Hello World”消息。
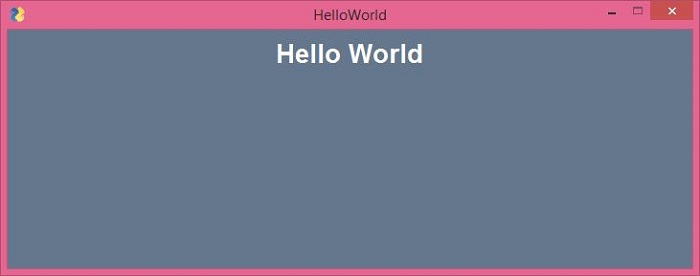
从命令终端运行该程序:
Python hello.py
程序生成的输出应类似于下面显示的输出-
等效的 Tkinter 代码
要使用纯 Tkinter 代码获得类似的输出,我们需要以下 Python 脚本 -
from tkinter import *
window=Tk()
lbl=Label(window, text="Hello World",
   fg='white', bg='#64778D',
   font=("Arial Bold", 20))
lbl.place(x=300, y=15)
window.title('HelloWorld Tk')
window['bg']='#64778D'
window.geometry("715x250+10+10")
window.mainloop()
所有其他功能保持不变,除了我们使用waitress模块的serve()函数来启动 WSGI 服务器。运行程序后在浏览器中访问“/”路由时,Hello World 消息将像以前一样显示。
除了函数之外,可调用类也可以用作视图。可调用类是重写__call__()方法的类。
from pyramid.response import Response
class MyView(object):
   def __init__(self, request):
      self.request = request
   def __call__(self):
      return Response('hello world')
PySimpleGUIQt
PySimpleGUI API 的对象模型已与 PySide2 包(Qt 图形工具包的 Python 端口)中定义的小部件兼容。PySimpleGui 的 Qt 版本称为 PySimpleGUIQt。可以使用以下 PIP 命令类似地安装它 -
pip3 install PySimpleGUIQt
由于该软件包依赖于 PySide2,因此也会安装相同的软件包。
>>> import PySide2
>>> PySide2.__version__
'5.15.2.1'
>>> import PySimpleGUIQt
>>> PySimpleGUIQt.version
'0.35.0 Released 6-Jun-2020'
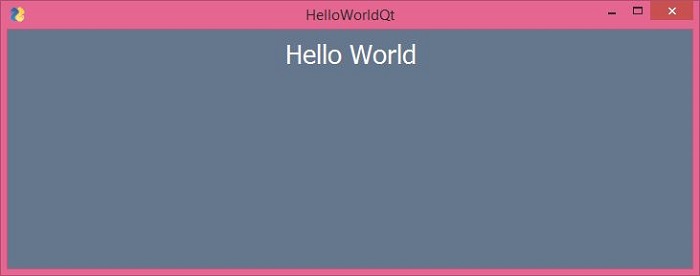
如前所述,PySimpleGui 项目最重要的特征是为一个包编写的代码与另一个包完全兼容。因此,之前使用的 hello.py 程序可以直接用于 Qt 版本。唯一需要的更改是导入 PySimpleGUIQt 而不是 PySimpleGui。
import PySimpleGUIQt as psg
layout = [[psg.Text(text='Hello World',
   font=('Arial Bold', 20),
   justification='center')],
]
window = psg.Window('HelloWorldQt', layout, size=(715,250))
while True:
   event, values = window.read()
   print(event, values)
   if event in (None, 'Exit'):
      break
window.close()
输出非常相似。
等效的 PySide2 代码
达到相同结果的纯 PySide2 代码如下 -
import sys
from PySide2.QtCore import *
from PySide2.QtGui import *
from PySide2.QtWidgets import *
def window():
   app = QApplication(sys.argv)
   w = QWidget()
   w.setStyleSheet("background-color: #64778D;")

   b = QLabel(w)
   b.setText("Hello World!")
   b.setFont(QFont('Arial Bold', 20))
   b.setAlignment(Qt.AlignCenter)
   b.setStyleSheet("color: white;")
   b.setGeometry(100, 100, 715, 250)
   b.move(50, 20)

   w.setWindowTitle("HelloWorldQt")
   w.show()
   sys.exit(app.exec_())
   if __name__ == '__main__':
      window()
它将产生相同的输出窗口。
PySimpleGUIWx
该模块封装了 WxPython 工具包中定义的 GUI 小部件的功能。WxPython 是广泛使用的 WxWidgets 库的 Python 端口,最初是用 C++ 编写的。显然,PySimpleGUIWx 依赖于 WxPython 包,因此后者将通过以下 PIP 命令自动安装 -
pip3 install PySimpleGUIWx
要确认 PySimpleGUIWx 和 WxPython 均已正确安装,请在 Python 终端中输入以下语句。
>>> import PySimpleGUIWx
>>> PySimpleGUIWx.version
'0.17.1 Released 7-Jun-2020'
>>> import wx
>>> wx.__version__
'4.0.7'
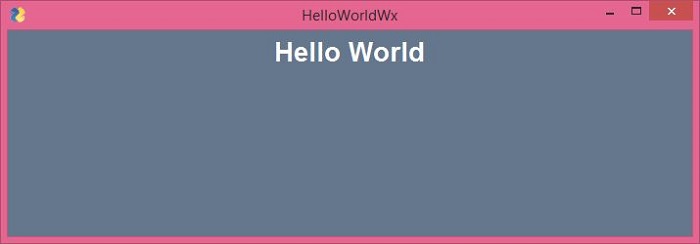
“hello.py”脚本中不需要进行太多更改。我们只需在“导入”语句中将 PySimpleGUI 替换为 PySimpleGUIWx 模块即可。
import PySimpleGUIWx as psg
layout = [[psg.Text(text='Hello World',
   font=('Arial Bold', 20),
   size=(500, 5),
   justification='center')],
]
window = psg.Window('HelloWorldWx', layout, size=(715, 250))
while True:
   event, values = window.read()
   print(event, values)
   if event in (None, 'Exit'):
      break
window.close()
它将产生以下输出:
请注意,您需要更复杂的代码才能使用纯 WxPython 代码获得类似的输出,如下所示 -
import wx
app = wx.App()
window = wx.Frame(None, title="WxPython", size=(715, 250))
panel = wx.Panel(window)
panel.SetBackgroundColour((100, 119, 141))
label = wx.StaticText(panel, -1, style=wx.ALIGN_CENTER)
label.SetLabel("Hello World")
label.SetForegroundColour((255, 255, 255))
font = wx.Font()
font.SetFaceName("Arial Bold")
font.SetPointSize(30)
label.SetFont(font)
window.Show(True)
app.MainLoop()
它将显示一个顶级窗口,其中包含一个标题为“Hello World”的文本标签。
PySimpleGUIWeb
Remi(REMote Interface)是一个用于在 Web 浏览器中呈现的 Python 应用程序的 GUI 库。PySimpleGUIWeb 包将原始 PySimpleGui 库移植到 Remi,以便其应用程序可以在浏览器中运行。以下 PIP 命令将在当前 Python 环境中安装 PySimpleGUIWeb 和 Remi -
pip3 install PySimpleGUIWeb
在编写应用程序之前检查它们的安装是否正确。
>>> import PySimpleGUIWeb
>>> PySimpleGUIWeb.version
'0.39.0 Released 6-Jun-2020'
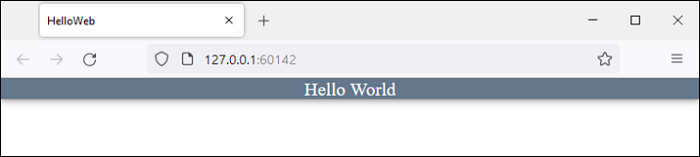
以下脚本是原始 Hello World 程序的 PySimpleGUIWeb 版本。
import PySimpleGUIWeb as psg
layout = [[psg.Text(text='Hello World',
   font=('Arial Bold', 20),
   justification='center')]]
window = psg.Window('HelloWorldWeb', layout)
while True:
   event, values = window.read()
   print(event, values)
   if event in (None, 'Exit'):
      break
window.close()
使用纯 Remi 库的功能获得类似的输出有点复杂,如以下代码所示:
import remi.gui as gui
from remi import start, App
class HelloWeb(App):
   def __init__(self, *args):
      super(HelloWeb, self).__init__(*args)
   def main(self):
      wid = gui.VBox(style={"background-color": "#64778D"})
      self.lbl = gui.Label('Hello World', width='100%', height='100%',
      style={ "color":"white",
         "text-align": "center",
         "font-family": "Arial Bold",
         "font-size": "20px"}
      )
      wid.append(self.lbl)
      return wid
      if __name__ == "__main__":
         start(HelloWeb, debug=True, address='0.0.0.0', port=0)
当我们运行这些程序时,Remi 服务器启动,浏览器窗口自动打开并显示 Hello World 消息。
这里我们看到了用 PySimpleGUI、PySimpleGUIQt、PySimpleGUIWx 和 PySimpleGUIWeb 库编写的 Hello World 程序。我们可以看到小部件库保持不变。此外,相同的 Hello world 程序,当分别用纯 Tkinter、PySide、WxPython 和 Remi 编写时,会变得比 PySimpleGUI 版本更加复杂和乏味。