- GWT 教程
- GWT - 主页
- GWT - 概述
- GWT - 环境设置
- GWT - 应用
- GWT - 创建应用程序
- GWT - 部署应用程序
- GWT - 使用 CSS 的样式
- GWT - 基本小部件
- GWT - 表单小部件
- GWT - 复杂的小部件
- GWT - 布局面板
- GWT - 事件处理
- GWT - 自定义小部件
- GWT-UIBinder
- GWT - RPC 通信
- GWT - JUnit 集成
- GWT - 调试应用程序
- GWT-- 国际化
- GWT - 历史课
- GWT - 书签支持
- GWT - 日志框架
- GWT 有用资源
- GWT - 问题与解答
- GWT - 快速指南
- GWT - 有用的资源
- GWT - 讨论
GWT - 日志框架
日志框架模拟 java.util.logging,因此它使用与服务器端日志代码相同的语法和相同的Behave
GWT 日志记录是使用 .gwt.xml 文件配置的。
我们可以配置日志记录的启用/禁用;我们可以启用/禁用特定的处理程序,并更改默认的日志记录级别。
记录仪的类型
记录器以树形结构组织,根记录器位于树的根部。
记录器的名称使用 确定父/子关系。分隔名称的各个部分。
例如,如果我们有两个记录器 Hospital.room1 和 Hospital.room2,那么它们是兄弟姐妹,其父级是名为 Hospital 的记录器。医院记录器(以及名称中不包含点“.”的任何记录器)将根记录器作为父记录器。
private static Logger room1Logger = Logger.getLogger("Hospital.room1");
private static Logger room2Logger = Logger.getLogger("Hospital.room2");
private static Logger hospitalLogger = Logger.getLogger("Hospital");
private static Logger rootLogger = Logger.getLogger("");
日志处理程序
GWT 提供默认处理程序,它将显示使用记录器生成的日志条目。
| 处理程序 | 记录到 | 描述 |
|---|---|---|
| 系统日志处理程序 | 标准输出 | 这些消息只能在开发模式下的 DevMode 窗口中看到。 |
| 开发模式日志处理程序 | 开发模式窗口 | 通过调用方法 GWT.log 记录日志。这些消息只能在开发模式下的 DevMode 窗口中看到。 |
| 控制台日志处理程序 | JavaScript 控制台 | 记录到 JavaScript 控制台,Firebug Lite(适用于 IE)、Safari 和 Chrome 使用该控制台。 |
| Firebug日志处理程序 | 萤火虫 | 记录到 Firebug 控制台。 |
| 弹出日志处理程序 | 弹出窗口 | 启用此处理程序时,记录到位于应用程序左上角的弹出窗口。 |
| 简单远程日志处理程序 | 服务器 | 该处理程序将日志消息发送到服务器,并使用服务器端日志记录机制记录这些消息。 |
在 GWT 应用程序中配置日志记录
HelloWorld.gwt.xml 文件将配置为启用 GWT 日志记录,如下所示 -
# add logging module
   <inherits name = "com.google.gwt.logging.Logging"/>
# To change the default logLevel
   <set-property name = "gwt.logging.logLevel" value = "SEVERE"/>
# To enable logging
   <set-property name = "gwt.logging.enabled" value = "TRUE"/>
# To disable a popup Handler
   <set-property name = "gwt.logging.popupHandler" value = "DISABLED" />
使用记录器记录用户操作
/* Create Root Logger */
private static Logger rootLogger = Logger.getLogger("");
...
rootLogger.log(Level.SEVERE, "pageIndex selected: " + event.getValue());
...
日志框架示例
此示例将引导您完成简单的步骤来演示 GWT 应用程序的日志记录功能。按照以下步骤更新我们在GWT - 创建应用程序章节中创建的 GWT 应用程序 -
| 步 | 描述 |
|---|---|
| 1 | 按照GWT - 创建应用程序章节中的说明,在com.tutorialspoint包下创建一个名为HelloWorld的项目。 |
| 2 | 如下所述修改HelloWorld.gwt.xml、HelloWorld.css、HelloWorld.html和HelloWorld.java 。保持其余文件不变。 |
| 3 | 编译并运行应用程序以验证实现逻辑的结果。 |
以下是修改后的模块描述符src/com.tutorialspoint/HelloWorld.gwt.xml的内容。
<?xml version = "1.0" encoding = "UTF-8"?>
<module rename-to = 'helloworld'>
   <!-- Inherit the core Web Toolkit stuff.                        -->
   <inherits name = 'com.google.gwt.user.User'/>

   <!-- Inherit the default GWT style sheet.                       -->
   <inherits name = 'com.google.gwt.user.theme.clean.Clean'/>
   <inherits name = "com.google.gwt.logging.Logging"/>
   <!-- Specify the app entry point class.                         -->
   <entry-point class = 'com.tutorialspoint.client.HelloWorld'/>
   <!-- Specify the paths for translatable code                    -->
   <source path = 'client'/>
   <source path = 'shared'/>
   <set-property name = "gwt.logging.logLevel" value="SEVERE"/>
   <set-property name = "gwt.logging.enabled" value = "TRUE"/>
   <set-property name = "gwt.logging.popupHandler" value=  "DISABLED" />
</module>
以下是修改后的样式表文件war/HelloWorld.css的内容。
body {
   text-align: center;
   font-family: verdana, sans-serif;
}

h1 {
   font-size: 2em;
   font-weight: bold;
   color: #777777;
   margin: 40px 0px 70px;
   text-align: center;
}
以下是修改后的HTML主机文件war/HelloWorld.html的内容
<html>
   <head>
      <title>Hello World</title>
      <link rel = "stylesheet" href = "HelloWorld.css"/>
      <script language = "javascript" src = "helloworld/helloworld.nocache.js">
      </script>
   </head>

   <body>
      <iframe src = "javascript:''"id = "__gwt_historyFrame"
         style = "width:0;height:0;border:0"></iframe>
      <h1> Logging Demonstration</h1>
      <div id = "gwtContainer"></div>
   </body>
</html>
让我们拥有 Java 文件src/com.tutorialspoint/HelloWorld.java的以下内容,我们将使用它来演示 GWT 代码中的书签。
package com.tutorialspoint.client;

import java.util.logging.Level;
import java.util.logging.Logger;

import com.google.gwt.core.client.EntryPoint;

import com.google.gwt.event.logical.shared.ValueChangeEvent;
import com.google.gwt.event.logical.shared.ValueChangeHandler;

import com.google.gwt.logging.client.HasWidgetsLogHandler;

import com.google.gwt.user.client.History;
import com.google.gwt.user.client.ui.HTML;
import com.google.gwt.user.client.ui.HorizontalPanel;
import com.google.gwt.user.client.ui.Hyperlink;
import com.google.gwt.user.client.ui.RootPanel;
import com.google.gwt.user.client.ui.TabPanel;
import com.google.gwt.user.client.ui.VerticalPanel;

public class HelloWorld implements EntryPoint {

   private TabPanel tabPanel;
   /* Create Root Logger */
   private static Logger rootLogger = Logger.getLogger("");
   private VerticalPanel customLogArea;

   private void selectTab(String historyToken){
      /*  parse the history token */
      try {
         if (historyToken.substring(0, 9).equals("pageIndex")) {
            String tabIndexToken = historyToken.substring(9, 10);
            int tabIndex = Integer.parseInt(tabIndexToken);
            /* Select the specified tab panel */
            tabPanel.selectTab(tabIndex);
         } else {
            tabPanel.selectTab(0);
         }
      } catch (IndexOutOfBoundsException e) {
         tabPanel.selectTab(0);
      }
   }

   /**
    * This is the entry point method.
    */
   public void onModuleLoad() {
      /* create a tab panel to carry multiple pages */
      tabPanel = new TabPanel();

      /* create pages */
      HTML firstPage = new HTML("<h1>We are on first Page.</h1>");
      HTML secondPage = new HTML("<h1>We are on second Page.</h1>");
      HTML thirdPage = new HTML("<h1>We are on third Page.</h1>");

      String firstPageTitle = "First Page";
      String secondPageTitle = "Second Page";
      String thirdPageTitle = "Third Page";

      Hyperlink firstPageLink = new Hyperlink("1", "pageIndex0");
      Hyperlink secondPageLink = new Hyperlink("2", "pageIndex1");
      Hyperlink thirdPageLink = new Hyperlink("3", "pageIndex2");

      HorizontalPanel linksHPanel = new HorizontalPanel();
      linksHPanel.setSpacing(10);
      linksHPanel.add(firstPageLink);
      linksHPanel.add(secondPageLink);
      linksHPanel.add(thirdPageLink);

      /* If the application starts with no history token,
         redirect to a pageIndex0 */
      String initToken = History.getToken();

      if (initToken.length() == 0) {
         History.newItem("pageIndex0");
         initToken = "pageIndex0";
      }

      tabPanel.setWidth("400");
      /* add pages to tabPanel*/
      tabPanel.add(firstPage, firstPageTitle);
      tabPanel.add(secondPage,secondPageTitle);
      tabPanel.add(thirdPage, thirdPageTitle);

      /* add value change handler to History
       * this method will be called, when browser's Back button
       * or Forward button are clicked.
       * and URL of application changes.
       * */
      History.addValueChangeHandler(new ValueChangeHandler<String>() {
         @Override
         public void onValueChange(ValueChangeEvent<String> event) {
            selectTab(event.getValue());
            rootLogger.log(Level.SEVERE, "pageIndex selected: "
            + event.getValue());
         }
      });

      selectTab(initToken);

      VerticalPanel vPanel = new VerticalPanel();

      vPanel.setSpacing(10);
      vPanel.add(tabPanel);
      vPanel.add(linksHPanel);

      customLogArea = new VerticalPanel();
      vPanel.add(customLogArea);

      /* an example of using own custom logging area. */
      rootLogger.addHandler(new HasWidgetsLogHandler(customLogArea));

      /* add controls to RootPanel */
      RootPanel.get().add(vPanel);
   }
}
准备好完成所有更改后,让我们在开发模式下编译并运行应用程序,就像我们在GWT - 创建应用程序章节中所做的那样。如果您的应用程序一切正常,这将产生以下结果 -
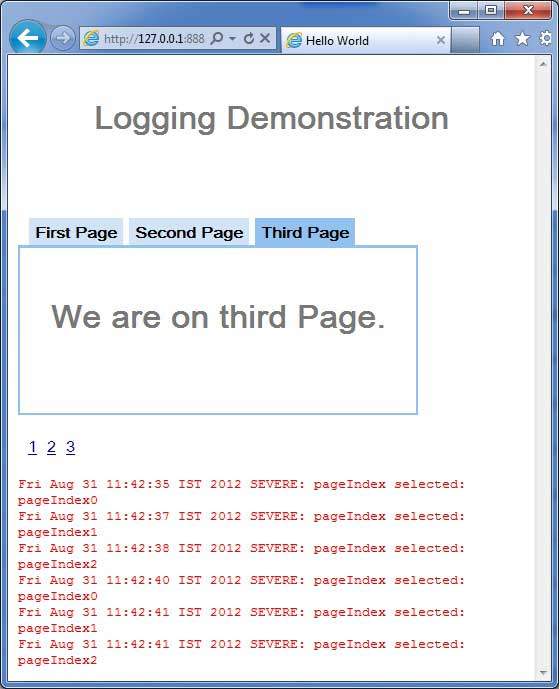
现在单击 1、2 或 3。您可以注意到,当您单击 1,2 或 3 时,您可以看到日志正在打印,显示 pageIndex。检查 Eclipse 中的控制台输出。您可以看到日志也打印在 Eclipse 控制台中。
Fri Aug 31 11:42:35 IST 2012
SEVERE: pageIndex selected: pageIndex0
Fri Aug 31 11:42:37 IST 2012
SEVERE: pageIndex selected: pageIndex1
Fri Aug 31 11:42:38 IST 2012
SEVERE: pageIndex selected: pageIndex2
Fri Aug 31 11:42:40 IST 2012
SEVERE: pageIndex selected: pageIndex0
Fri Aug 31 11:42:41 IST 2012
SEVERE: pageIndex selected: pageIndex1
Fri Aug 31 11:42:41 IST 2012
SEVERE: pageIndex selected: pageIndex2
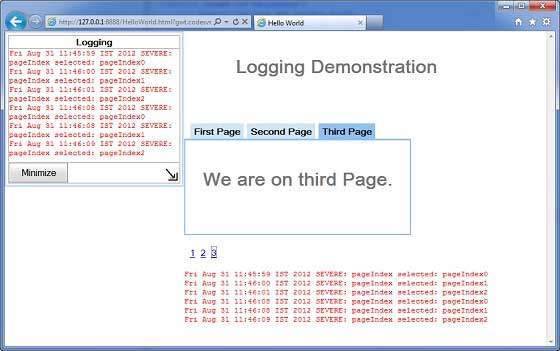
现在更新模块描述符 src/com.tutorialspoint/HelloWorld.gwt.xml以启用 popupHandler。
<?xml version = "1.0" encoding = "UTF-8"?>
<module rename-to = 'helloworld'>
  <!-- Inherit the core Web Toolkit stuff.                        -->
   <inherits name = 'com.google.gwt.user.User'/>

   <!-- Inherit the default GWT style sheet.                       -->
   <inherits name = 'com.google.gwt.user.theme.clean.Clean'/>
   <inherits name = "com.google.gwt.logging.Logging"/>
   <!-- Specify the app entry point class.                         -->
   <entry-point class = 'com.tutorialspoint.client.HelloWorld'/>
   <!-- Specify the paths for translatable code                    -->
   <source path = 'client'/>
   <source path = 'shared'/>
   <set-property name = "gwt.logging.logLevel" value = "SEVERE"/>
   <set-property name = "gwt.logging.enabled" value = "TRUE"/>
   <set-property name="gwt.logging.popupHandler" value = "ENABLED" />
</module>
准备好完成所有更改后,通过刷新浏览器窗口重新加载应用程序(按浏览器的 F5/重新加载按钮)。请注意,应用程序的左上角现在出现一个弹出窗口。
现在单击 1、2 或 3。您可以注意到,当您单击 1,2 或 3 时,您可以看到日志正在打印,并在弹出窗口中显示 pageIndex。